Greetings!
In this post I will describe how to create an app for the Pebble watch that uses the Wolfram Cloud. The Pebble watch is one of the most popular smart watches sold today. Its popularity stems from its simple but elegant monochrome user interface, a long battery life (up to 7 days with normal use) and excellent support for developing apps that work whether you have an Android or iOS phone. The Pebble watch is able to connect to the internet when it is connected via Bluetooth to your mobile phone.
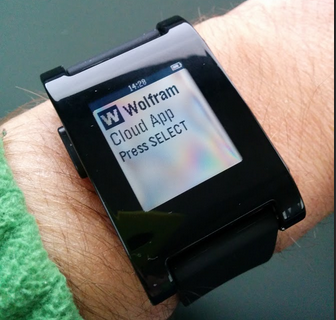
Here is a picture of the watch running the final app that we will be building in this post:
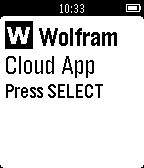
First let's look at the user interface of this app and how to navigate to the various elements. The app opens with a splash screen listing its app title and action to take to continue (Press SELECT):
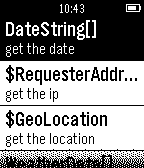
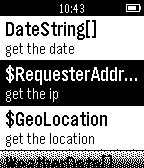
Upon pressing SELECT (the middle button on the right of the Pebble watch), you are offered a menu list with seven choices. You can scroll to each choice by using the UP and DOWN button (also on the right of the Pebble watch). Here is a list of images of each menu item and the result window that is shown when a particular menu item is selected (with the SELECT button)
The current date and time, as obtained from the Wolfram Cloud via the internet:
 Pressing SELECT will show:
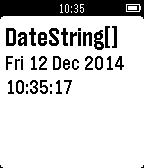
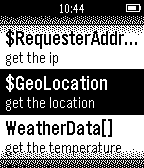
The IP address as provided by the requester (in this case the mobile phone that is connected via bluetooth to the Pebble watch):
 Pressing SELECT will show:
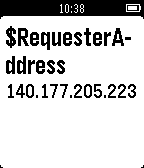
The geographical location of the watch (the Wolfram Cloud determines the geographical location based on the IP address of the request made by the watch):
 Pressing SELECT will show:
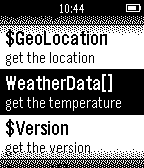
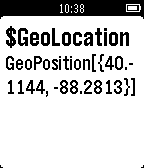
The current temperature for the location of the watch (the temperature is for the geographical location of the watch):
 Pressing SELECT will show:
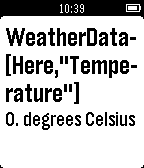
The version of the Wolfram Language kernel that is executing the commands in the cloud:
 Pressing SELECT will show:
The date and time of the next sunset:
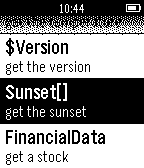 Pressing SELECT will show:
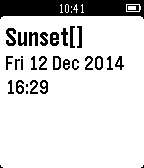
Information about a given stock price, in this case General Electric (GE):
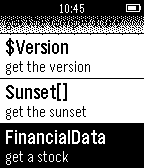 Pressing SELECT will show:
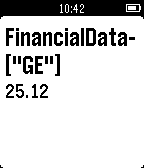
Now we need to create cloud instant api calls for each of the individual menu items. I will show one example here, the remaining six are similar and the full source code can be obtained from this cloud object: https://programming.wolframcloud.com/objects/fb8127d1-6a88-438f-8f9a-4b00ebcbe3a6
This utility function creates a named cloud object (using 'name') and an expression you want it to execute, like DateString[]:
Attributes[CreateCloudObject]={HoldAllComplete};
CreateCloudObject[name_String,expr_]:=Module[{cloudObject,apiFunction},
  cloudObject=CloudObject["pebble/"<>name];
  apiFunction=APIFunction[{},ExportForm[{"result" ->ToString[expr]}, "JSON"] &];
  CloudDeploy[apiFunction, cloudObject, Permissions -> "Public"]
]
Then for each menu item you create one cloud instant api function:
CreateCloudObject["date",DateString[]]
That's all the code that it required on the Wolfram Cloud side.
Next, we need to write the app for the Pebble. Pebble provides an online cloud IDE for this (https://cloudpebble.net). One of the options is the use Pebble.js, a javascript editing environment which Pebble then translates into an binary application that can be executed on the watch.
The full javascript source code is included with this post as an attachment. Here are a few key highlights of this implementation.
First import the required libraries and set the base url for all the cloud calls:
var ui = require('ui');
var ajax = require('ajax');
var base = 'https://www.wolframcloud.com/objects/user-7053ce31-817f-4643-aec1-eda27051bba6/pebble/';
Define the splash card (window) and show it on the watch:
var main = new ui.Card({
  title: ' Wolfram',
  icon: 'images/wolfram.png',
  subtitle: 'Cloud App',
  body: 'Press SELECT'
});

main.show();
This code is part of the SELECT click handler and defines the menu that is shown to the user:
var menu = new ui.Menu({
  sections: [{
    items: [
      { title: 'DateString[]', subtitle: 'get the date' },
      { title: '$RequesterAddress', subtitle: 'get the ip' },
      { title: '$GeoLocation', subtitle: 'get the location' },
      { title: 'WeatherData[]', subtitle: 'get the temperature' },
      { title: '$Version', subtitle: 'get the version' },
      { title: 'Sunset[]', subtitle: 'get the sunset' },
      { title: 'FinancialData', subtitle: 'get a stock' }]
  }]
});

menu.show();
This code is executed when the user selects a given menu item:
switch(e.itemIndex) {
  case 0: displayResults( base + 'date', 'DateString[]' ); break;
  case 1: displayResults( base + 'address', '$RequesterAddress' ); break;
  case 2: displayResults( base + 'location', '$GeoLocation' ); break;
  case 3: displayResults( base + 'weather', 'WeatherData[Here,"Temperature"]' ); break;
  case 4: displayResults( base + 'version', '$Version'); break;
  case 5: displayResults( base + 'sunset', 'Sunset[]'); break;
  case 6: displayResults( base + 'stock', 'FinancialData["GE"]'); break;
  default: console.log('e.itemIndex is out of bounds: ' + e.itemIndex);
  }
The 'displayResults' function is a function which shows a tempory 'Loading' card and then retrieves the cloud instant api result from the cloud and displays it:
function displayResults(url, title) {
  var wait = new ui.Card({title: 'Loading...', subtitle: 'Please wait'});
  wait.show();
  ajax( { url: url, type:'json' },
    // success
    function(json) {
      var result = new ui.Card({ title: title, body: json.result });
      result.show();
      wait.hide();
    },
    // error
    function(error) {
      console.log('Error during displayResults');
      console.log(url);
      console.log(title);
    });
}
And that's it! You can now upload the app to your watch from the Pebble cloud IDE and make calls to the Wolfram Cloud! And it's easy to completely customize it with any Wolfram Language function you find useful.
 Attachments:


