Hi all,
First time community poster here! I'll start off by saying, I am by no means an expert in machine learning. I dabble with the basic tutorials and training options offered by Wolfram, but when it comes to the guts of this stuff, I'm brand new. I say this as I think my project here is a good proof of concept on how easy it is to pick up machine learning with the Wolfram language. (Feel free to skip to the bottom of the post for a link to my notebook.)
Initial testing
To start out, I simply looked into the basic machine learning examples provided around our Mathematica 11 release, linked here. The Create a Legendary Creature Recognizer in particular is what I based my initial testing off of.
To start, I narrowed it down to two relatively different but very popular characters, Daenerys Targaryen and Jon Snow. Similar to the format in the creature recognizer, I simply imported images, associated them to the character name, and plugged this into my Classify function. To test it's capabilities, I used the "Top Probabilities" call to see with what confidence it was assigning characters.
Like I said, I'm new to machine learning, so this was a learning process for me. To my surprise, this solution was rather messy and just not at the level of accuracy I was looking for. It struggled with actors/actresses out of costume, was polluted by the background, and just didn't have enough images to be accurate.
This is what lead me to ultimately focus on 3 things when training my classifier function and eventually my neural networks. 1) Images of characters should include the actors or actresses both in and out of costume. 2) The FindFaces functions needed to be used to remove any background or outfit pollution. 3) The amount of images for each character needed to be as large as possible.
Collecting images for my dataset
Once I was able to mast extracting images using FindFaces, it was time to do some heavy internet image searching to get the relevant images. I decided to limit my identifier to just 7 characters: Dany, Jon, Tyrion, Cersei, Jaime, Arya, and Sansa (apologies to all of the Davos fans!) As mentioned before, I did specific searches for characters throughout the seasons as well as actors/actresses outside of costume (as well as additional searches for different hairstyles, facial hair, glasses, age, etc.)
To speed up this process, I first created a quick image tester to be sure that each of the images I pulled from my searches was being pulled correctly without having to test the entire dataset all at once. For example, I would test all of the season 1 images I found of Dany at one time. You can see what this looks like below.
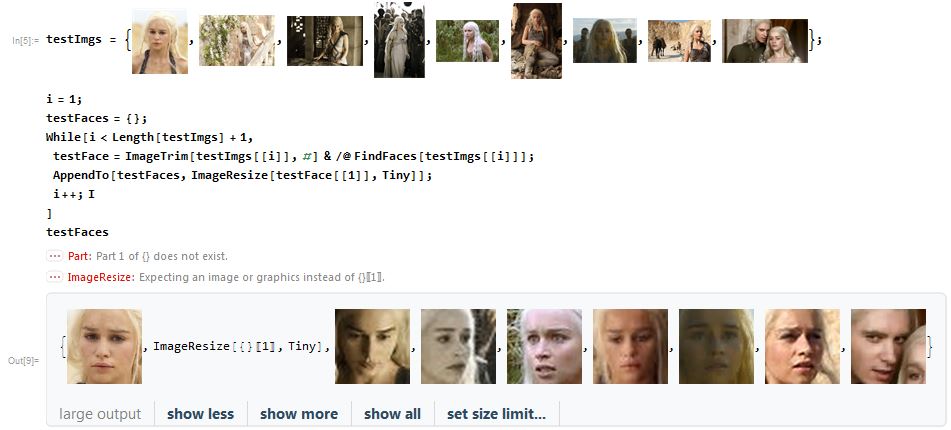
testImgs = {}
i = 1;
testFaces = {};
While[i < Length[testImgs] + 1,
 testFace = ImageTrim[testImgs[[i]], #] & /@ FindFaces[testImgs[[i]]];
 AppendTo[testFaces, ImageResize[testFace[[1]], Tiny]];
 i++;
 ]
testFaces
For proof of concept, the image includes a couple common errors that I found. In some cases, The image would not be able to find any faces per low-quality or just odd lighting/angles, in which would result in the error. In other cases, images would pick up background noise that resembled a face (not provided in this example). You can see in the last picture, another character's face was found first. These images would need to be removed from the set before being added to the full dataset. As I went along, it became easier to weed out images that would likely be unusable. You can see an example of what these image sets would look like below. Jaime's in particular was my smallest.

The final step in this process was to make the appropriate associations for the images and provide a list that could be used by the Classify function. You can see the code for this below. To summarize, I made separate lists of images for each character, then iterated through those list to associate them with the appropriate character name then add that associated object to my master list.
faceRec = {};
i = 1;
While[i < Length[dt] + 1,
 dtface = ImageTrim[dt[[i]], #] & /@ FindFaces[dt[[i]]];
 AppendTo[faceRec, ImageResize[dtface[[1]], {100, 100}] -> "Dany"];
 i++;
 ]
i = 1;
While[i < Length[js] + 1,
 jsface = ImageTrim[js[[i]], #] & /@ FindFaces[js[[i]]];
 AppendTo[faceRec, ImageResize[jsface[[1]], {100, 100}] -> "Jon"];
 i++;
 ]
i = 1;
While[i < Length[tl] + 1,
 tlface = ImageTrim[tl[[i]], #] & /@ FindFaces[tl[[i]]];
 AppendTo[faceRec, ImageResize[tlface[[1]], {100, 100}] -> "Tyrion"];
 i++;
 ]
i = 1;
While[i < Length[cl] + 1,
 clface = ImageTrim[cl[[i]], #] & /@ FindFaces[cl[[i]]];
 AppendTo[faceRec, ImageResize[clface[[1]], {100, 100}] -> "Cersei"];
 i++;
 ]
i = 1;
While[i < Length[jl] + 1,
 jlface = ImageTrim[jl[[i]], #] & /@ FindFaces[jl[[i]]];
 AppendTo[faceRec, ImageResize[jlface[[1]], {100, 100}] -> "Jaime"];
 i++;
 ]
i = 1;
While[i < Length[as] + 1,
 asface = ImageTrim[as[[i]], #] & /@ FindFaces[as[[i]]];
 AppendTo[faceRec, ImageResize[asface[[1]], {100, 100}] -> "Arya"];
 i++;
 ]
i = 1;
While[i < Length[ss] + 1,
 ssface = ImageTrim[ss[[i]], #] & /@ FindFaces[ss[[i]]];
 AppendTo[faceRec, ImageResize[ssface[[1]], {100, 100}] -> "Sansa"];
 i++;
 ]
faceRec = RandomSample[faceRec, Length[faceRec]];
Per a note from one of our developers, I also chose to randomize the list of associations, as our neural network framework down assume a random order when processing. This didn't provide any noticeable difference in my dataset, but I thought it was an important thing to at least note.
Using the Classify function
With my images associated, I was ready to jump into creating my ClassifierFunction. With a single line of code, I was able to do so, as seen below.
gotFaces = Classify[faceRec]
To test my model, I pulled in some new images and used the same logic as before to create a testing set. I did try to find images in costume as well as in real life, with different hairstyles, and at different ages to provide some more variety in my testing.
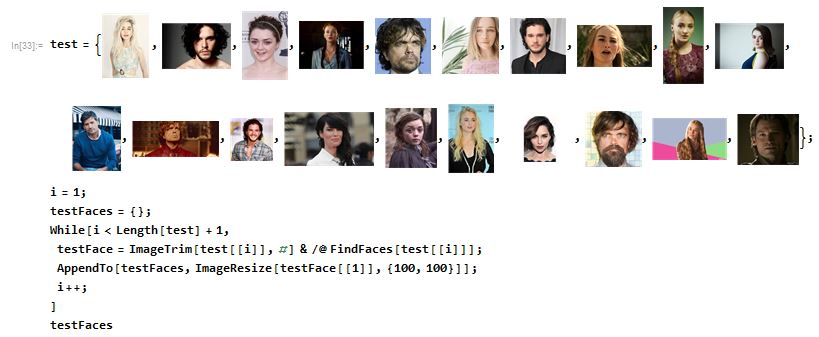
test = {}
i = 1;
testFaces = {};
While[i < Length[test] + 1,
 testFace = ImageTrim[test[[i]], #] & /@ FindFaces[test[[i]]];
 AppendTo[testFaces, ImageResize[testFace[[1]], {100, 100}]];
 i++;
 ]
testFaces
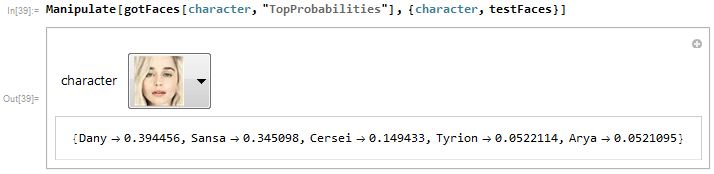
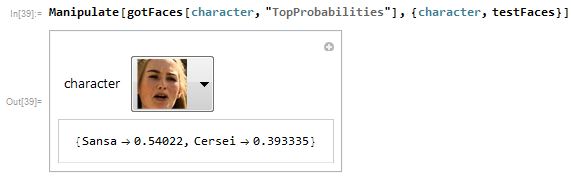
I will note, that doing this same process to this point with just Jon and Dany worked REALLY well. To my surprise, though, it just wasn't quite as promising with a larger cast of characters. Some characters were correct with relatively high confidence, some were right but with a split between a few characters, and some were wrong but at least had the correct character in close proximity to the top character.
Manipulate[gotFaces[character, "TopProbabilities"], {character, testFaces}]

This had me troubleshooting like crazy. I will say that simply duplicating the associations already in the list several times actually improved the accuracy quite a bit, which was expected. With this in mind, I decided to try my hand at our neural network functionality.
Using the NetChain and NetTrain functions
I'll say it once, and I'll say it again. I am by no means an expert in neural networks. It's a big topic in tech now, so I've developed a basic conversational understanding of the concept. However, this was my first time actually creating my own neural network in any language.
The process was relatively simple, much to my surprise, thanks to Wolfram's vast amount of documentation. Per some research, I learned about "convolutional" neural nets and found a similar image example of this in our documentation pages for NetTrain. Using this example, I made some minor adjustments to the NetChain to fit this to my own data and was well on my way to training my first neural net! You can see what this ended up looking like below. The variable "classes" simply being all of the potential characters.
lenet = NetChain[
  {ConvolutionLayer[20, 5], Ramp, PoolingLayer[2, 2],
   ConvolutionLayer[50, 5], Ramp, PoolingLayer[2, 2], FlattenLayer[],
   500, Ramp, 7, SoftmaxLayer[]},
  "Output" -> NetDecoder[{"Class", classes}],
  "Input" -> NetEncoder[{"Image", {100, 100}}]
  ]
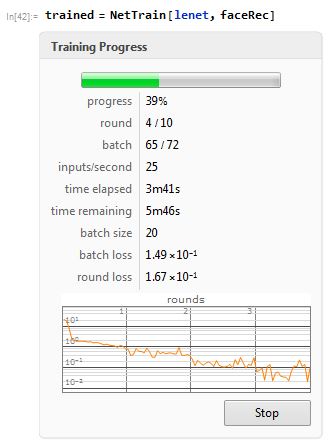
From here, the NetTrain function is super simple. You can see an image of what this looks like in motion below with real-time training progress as the program runs. For larger sets of data, there is also the option to add a time goal. For mine, I simply allowed it to run for the full 10-15 minutes. It's certainly interesting to be able to actually see the loss function change as the data set runs.
trained = NetTrain[lenet, faceRec]
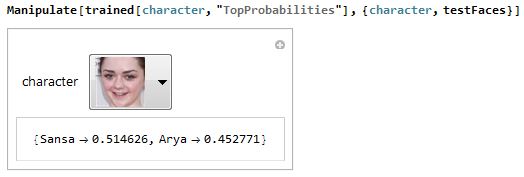
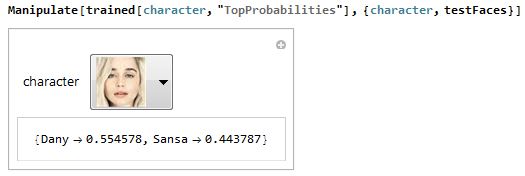
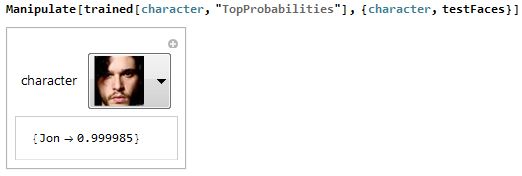
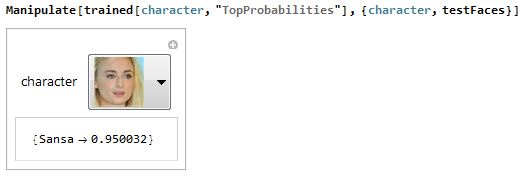
This method did still have its errors but the accuracy as well as the confidence in the selections did seem to be significantly higher. I saw much more examples of split "TopProbabilities" for the wrongly classified images, as with the Dany and Arya pictures below, but also a much larger level of correctly classified images with 90%+ as their "TopProbabilities" return, as with the Jon and Sansa pictures below.
Manipulate[trained[character, "TopProbabilities"], {character, testFaces}]
As with the Classify function, adding more images (even duplicates) to the dataset did provide even more accurate results and confidence to the neural net model. Ideally, if using this for an actual application, I would have a more elegant way of importing the images in for the NetTrain. A suggestion from a meeting I sat in recently was to explore NetEncoder. I also got the vibe that there are some other options in the pipeline to support this, specifically with large numerical datasets.
Real-time character matching
Moving on to the fun part that you've all been waiting for! I started out by using the same logic as with my character image import to pull in images from LinkedIn of my coworkers to see how the ClassifierFunction and NetChain handled these outside inputs.
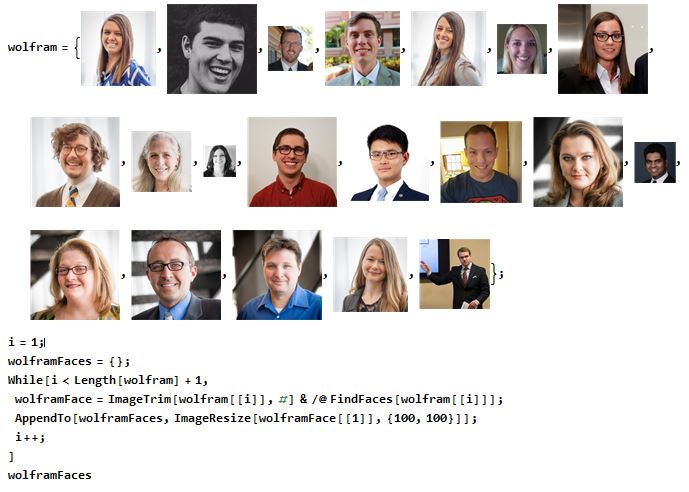
wolfram = {}
i = 1;
wolframFaces = {};
While[i < Length[wolfram] + 1,
 wolframFace = ImageTrim[wolfram[[i]], #] & /@ FindFaces[wolfram[[i]]];
 AppendTo[wolframFaces, ImageResize[wolframFace[[1]], {100, 100}]];
 i++;
 ]
wolframFaces
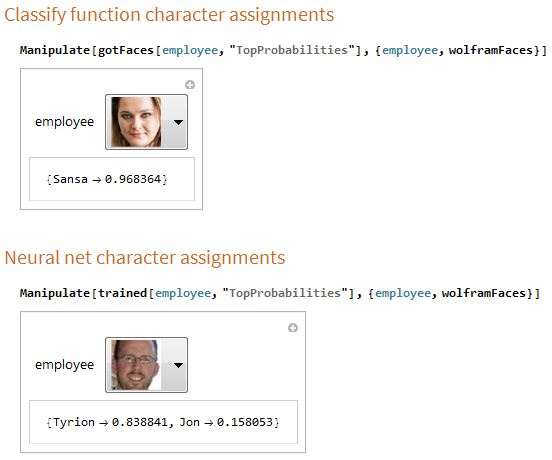
I understand that this is not exactly what deep learning is intended for, but it's a fun little application to try to trick the trained sets to force us into a character. The models definitely vary on what character they give to each coworker, so it is noticeable that their methods are likely quite different. However, it did give a highly odd confidence for some of my coworkers in both cases.
Manipulate[
 gotFaces[employee, "TopProbabilities"], {employee, wolframFaces}]
And finally, the quiz you've all been waiting for. THE LIVE IDENTIFIER! You can see a quick image of what this looks like below. It uses the camera on your computer to allow you to grab a live image of yourself and run this through the ClassifierFunction and NetChain.
Panel[
 Column[{
   Row[{ImageCapture[ImagingDevice -> $ImagingDevice]}],
   Row[{
     Button[TextCell["Grab Image", FontSize -> 24],
      img = CurrentImage[ImageSize -> 900], ImageSize -> {337, 50},
      Alignment -> Center]
     }],
   Row[{TextCell["Captured Faces", Bold, FontSize -> 24]},
    Alignment -> {Top, Center}],
   Row[{Dynamic[currentFace = ImageTrim[img, #] & /@ FindFaces[img]]}],
   Row[{TextCell["Classify function ID", Bold, FontSize -> 24]}],
   Row[{Dynamic[
      Style[gotFaces[currentFace, "TopProbabilities"],
       FontSize -> 16]]}],
   Row[{TextCell["Neural net ID", Bold, FontSize -> 24]}],
   Row[{Dynamic[
      Style[trained[currentFace, "TopProbabilities"],
       FontSize -> 16]]}]
   }
  ], ImageSize -> 355]
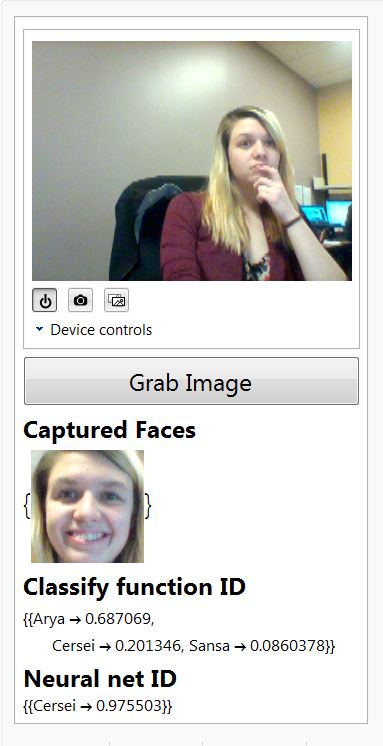
It's interesting to use this "live" model to start exploring how the input images are affecting the final trained sets. I noticed that although I tended to lean towards a small group of characters (especially in the Neural net ID), some particular factors could vary the outputs. Image quality (per camera or amount of cropping from not being close enough), head tilt, hair in face, facial expressions, etc. did provide some level of variation in my quick analysis.
Closing thoughts
Although not a perfect model, it's been really reassuring to know the level of accuracy obtained on such a small dataset and with very little knowledge of the appropriate neural networks to be used with this type of analysis. Being able to jump right in per the support of the Wolfram documentation as well as the ease of built-in functions made it SUPER easy to build such a model from scratch.
If I were looking to develop further, I would like to explore more about neural networks geared towards facial recognition as well as better way to collect as well as import a vast dataset of even more characters. It would be my hope that this would 1) better identify certain defining features and 2) eliminate the variations that we see more obviously in the live camera model.
It's not perfect, but what a fun proof of concept and a great learning experience! You can download all of the files at the following links: full notebook, trained NN, and webcam app. Specifically, the GOTFacesApplication is a more simplistic model that imports the .wlnet model vs. having you have to sit and wait for the full project notebook to evaluate. Since some of the Import/Export on the WLNet functionality is still "experimental", I hit some snags on creating a CDF to be used with our free CDF player (my apologies to those who haven't made the jump to Mathematica yet!)
Hope you all enjoy!


