Microsite
https://one.wolframcloud.com/objects/rohit.panse8/pneumoniadiagnosis
Introduction
Pneumonia is an infection that causes inflammation in one or both of the lungs; it is induced by a variety of organisms: bacteria, viruses, and fungus. Bacterial pneumonia, the more common type, is caused by bacteria that multiplies in the lungs; Viral Pneumonia is caused by an array of viruses, the most common one being Influenza. Although the severity of pneumonia can vary, young children, seniors, and people with a weakened immune system are the most vulnerable.The CDC reports that of the close to 540,000 cases of pneumonia each year, 50,000 people die. Early and proper diagnosis can tremendously decrease mortality rate. Conventional diagnosis methods like examining patient medical history and symptoms have their shortcomings. Dutch researchers, who published their findings in the European Respiratory Journal, found that of 140 patients who had their pneumonia diagnosed by x-ray, doctors initially thought only 41 of them had the severe lung infection. Chest X-rays have long been reliable diagnostic tools for pneumonia. Since pneumonia, is an airspace disease, patients' air spaces are filled with bacteria, viruses, pus, and other microorganisms. A diagnosis is determined by infiltrates, or white spots, present in a chest X-ray. My project uses a convolutional neural network to diagnose the type of pneumonia that a patient has and. Thank you to Daniel Kermany, Daniel Zhang, and Michael Goldbaum for creating and labeling the dataset. Thanks to Paul Timothy Mooney for making the dataset available on Kaggle.
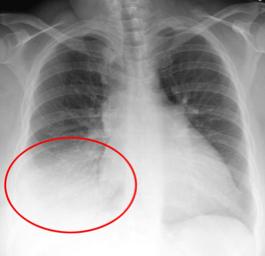
Below is an example of an infiltrate present in a chest X-ray.
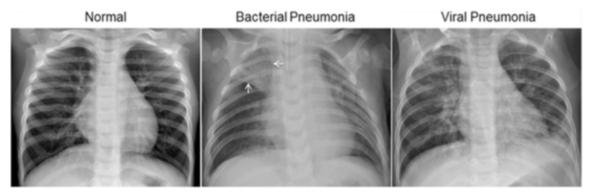
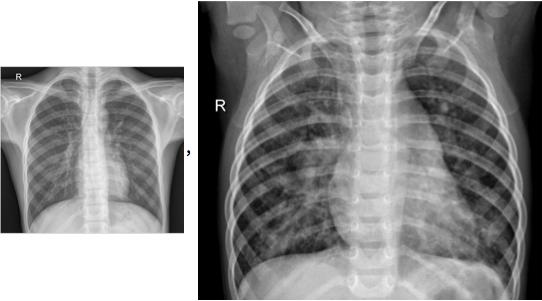
Below is an example of how chest X-rays of the three classifications generally look. Chest X-rays of pneumonia patients are characterized by loss of diaphramatic shadows, and evidence of pulmonary consolidation(an area of the lung that has filled with liquid instead of air).
Diagnosing pneumonia
Neural Network
I used transfer learning to create my neural network. Transfer learning is the process of using a pre-trained model as a starting point as a model for a second task.
"Transfer learning and domain adaptation refer to the situation where what has been learned in one setting [Ellipsis] is exploited to improve generalization in another setting"-(Page 526, Deep Learning, 2016)
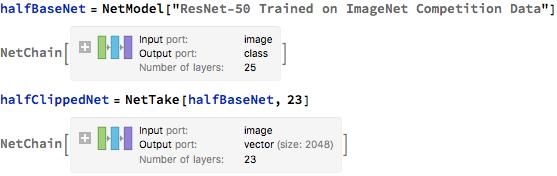
I used ResNet 50, an architecture released in 2015 by Microsoft Research Asia; this network was originally trained on 1.2 million images with 1000 classes. The immense computing power, time resources, and knowledge dedicated to perfect this network made it a great neural network to use for transfer learning.
Below is an example of the ResNet 50 in action. It correctly predicts that the image is a golden retriever. In addition, I set the program to output the top 10 probabilities of what it thought the image was.

There are two notable layers in this network: linear layer and softmax layer. First, the Linear Layer maps the features processed by the other layers to the classifications given. Classifications(classes) are the different objects the neural network is trained to recognize. In the standard ResNet's case the classes are the 1000 different objects that it is trained to recognize. In the case of my project, the classes are a normal, bacterial pneumonia, and viral pneumonia chest X-rays. Second, the Softmax layer determines the probabilities of what the image is. Above the probabilities of the image are displayed; the class with the highest probabilities is what the Neural Net outputs.
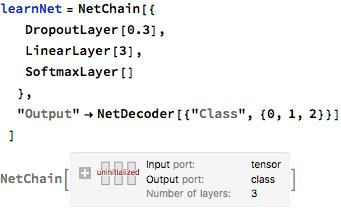
Below, I remove the Linear and the Softmax layer. These layers are currently configured to recognize 1000 classes; I only need them to recognize 3 classes of images(normal, bacterial pneumonia, viral pneumonia). I will add these two layers later on. 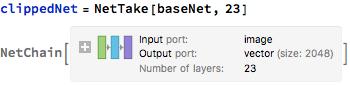
Below, I replaced the "Input" layer to recieve an input of an image of dimensions 512 by 512. I will configure my training images to be of this size. 
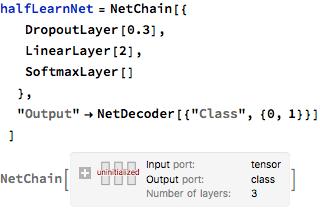
I added 3 layers to a new neural net. The above resizedNet will extract features from the dataset. This new neural net that I created will be used to interpret the features and output what it thinks the input image was. The 3 layers that will do this are the "DropoutLayer", "LinearLayer", and "SoftmaxLayer". The "DropoutLayer" is used to reduce overfitting; this is the tendency of a neural network to become extremely specialized to a limited set of data points. Overfitting is not desirable because it makes the neural network very ineffective on data points outside of the training set. The Linear layer maps the features from the above layers to the 3 classes, and the softmax layer determines the probabilities of the features. Additionally, the output, determining what class the chest X-ray is, is specified. 0 means a normal chest X-ray, 1 means virus pneumonia, 2 means bacterial pneumonia.
Data Importing and Formatting
I imported the files from their respective folders. The virus and bacterial pneumonia files were in the same formula, so I used a simple separating sort tool organize only images of a certain class to their corresponding variables.
normalImg =
  Import /@
   FileNames["*.jpeg", NotebookDirectory[] <> "train\\NORMAL"];
virusImg =
  Import /@
   FileNames["*_virus_*.jpeg",
    NotebookDirectory[] <> "train\\PNEUMONIA"];
bacImg = Import /@
   FileNames["*_bacteria_*.jpeg",
    NotebookDirectory[] <> "train\\PNEUMONIA"];
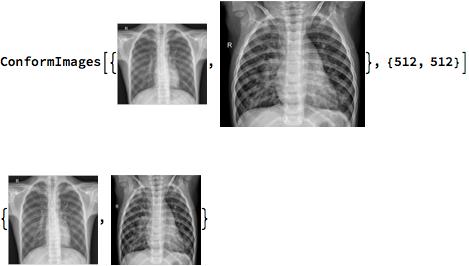
I conformed the images to have dimensions of 512 by 512. I did this because I specified the Input layer to take images of only those dimensions.
normNorm = ConformImages[Import /@ normalFiles, {512, 512}];
virusNorm = ConformImages[Import /@ virusFiles, {512, 512}];
bacNorm = ConformImages[Import /@ bacFiles, {512, 512}];
Below is how conformed images look.
Before:
After:
Later, I adjusted the way I conformed my images. I augmented my data set to improve my neural net. By altering the data set, my neural net would become adapted to a greater variety of images.
normNorm =
  ConformImages[
   Table[If[RandomReal[] > .8,
     If[RandomReal[] > .5, rotateImage[i], shearImage[i]], i], {i,
     Import /@ normalFiles}], {512, 512}];
virusNorm =
  ConformImages[
   Table[If[RandomReal[] > .8,
     If[RandomReal[] > .5, rotateImage[i], shearImage[i]], i], {i,
     Import /@ virusFiles}], {512, 512}];
bacNorm =
  ConformImages[
   Table[If[RandomReal[] > .8,
     If[RandomReal[] > .5, rotateImage[i], shearImage[i]], i], {i,
     Import /@ bacFiles}], {512, 512}];
I made 40% of the images undergo a rotation via rotateImage, and I made another 40% of the images undergo a perspective transformation via shearImage.
rotateImage[i_] := ImageRotate[i, RandomReal[{-Pi/27, Pi/27}]];
shearImage[i_] :=
  ImagePerspectiveTransformation[
   i, {{1, RandomReal[{-.25, .25}], 0}, {0, 1, 0}, {0, 0, 1}}];
Below are the images before a rotate and perspective change respectively. 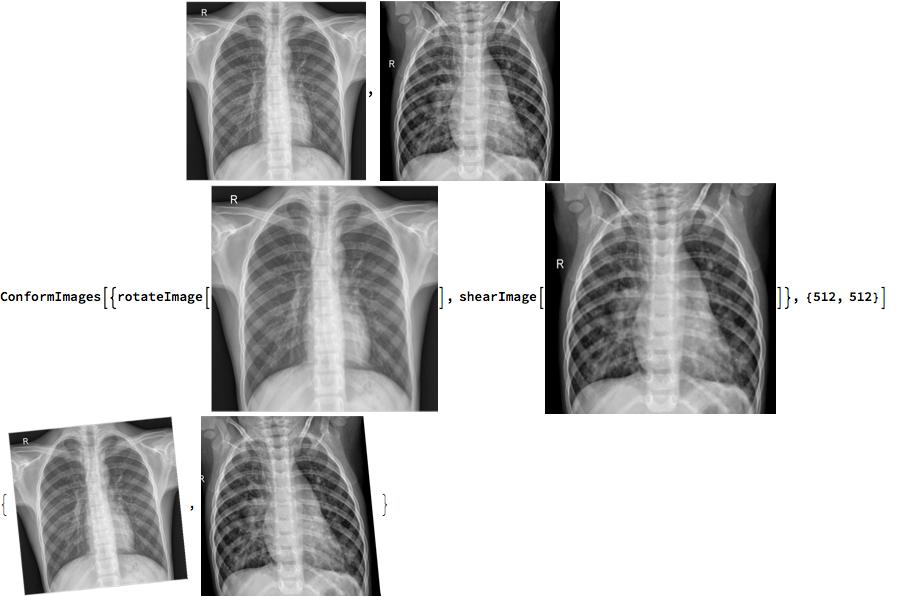
Preparing Images
Above, two separate neural networks were created. One, the resizedNet, extracts features. The other, the learnNet, would interpret the features and determine the output. By creating two separate neural networks we can preprocess the data instead of having to process the data repeatedly as we would have to in a prematurely combined network. Below, I process the images to extract features using the resizedNet, a neural network that uses the ResNet 50 framework.
normalFeats = resizedNet[normNorm, TargetDevice -> "GPU"];
virusFeats = resizedNet[virusNorm, TargetDevice -> "GPU"];
bacFeats = resizedNet[bacNorm, TargetDevice -> "GPU"];
Below, the feature extracted images undergo two processes. First, the images are mapped to certain numerical codes. The normal chest X-rays are mapped to the code 0, the virus chest X-rays are mapped to the code 1, and the bacteria chest X-rays are mapped to the code 2. The images are mapped to codes, so the neural network knows the identity of the images when training the network. In addition, the codes are outputted when the trained network interprets an image to be a certain class. For example if the trained network is given a normal chest X-ray, then it should output the code 0. Second, the processed images are joined into one massive list.
feats = RandomSample[
   Join[Map[# -> 0 &, resizedNet[normNorm, TargetDevice -> "GPU"]],
    Map[# -> 1 &, resizedNet[virusNorm, TargetDevice -> "GPU"]],
    Map[# -> 2 &, resizedNet[bacNorm, TargetDevice -> "GPU"]]]];
The massive list of processed images are partitioned into a training set and a test set. The training set will train the network and determine the proper weights needed to recognize the images properly. The test set will be used to check the true progress of the neural network. Since, the neural network is never trained on the test set, it would serve as an objective indicator of progress when training.
trainFeat = feats[[1 ;; 5000]];
testFeat = feats[[5000 ;; 5200]];
Training the Neural Net
The below script was used to train the learnNet with the training data set, trainFeat, and the testing data set.
trainedNet =
 NetTrain[learnNet, trainFeat, ValidationSet -> testFeat,
  MaxTrainingRounds -> 35, TargetDevice -> "GPU"]
I trained the neural network 4 separate times each with different settings:
- Regular data set 35 rounds of training
- Regular data set 70 rounds of training
- Augmented data set 35 rounds of training
- Augmented data set 70 rounds of training
The accuracy results of the neural network are below
- Regular 35 rounds: about 24.9% error
- Regular 70 rounds: about 19.9% error
- Augmented 35 rounds: about 20.9% error
Augmented 70 rounds: about 17.4% error
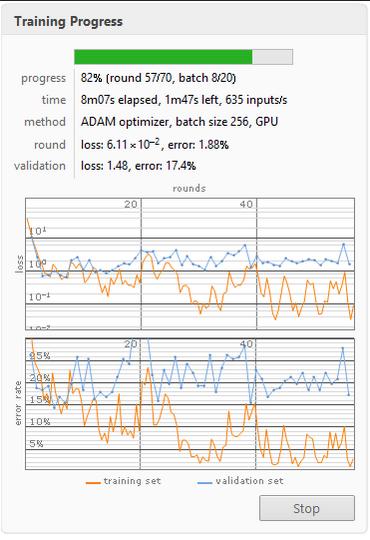
Below is an image loss function and error rate of the Augmented 70 rounds neural net. I used this neural net in the final product.
The trained neural network was exported for use on the microsite.
Export["/pnemonia.wlnet", combinedNet]
Determining Location of Pneumonia
4 separate neural networks were created to determine the location of the pneumonia: leftVirus, rightVirus, leftBacteria, rightBacteria. The left lob images were evaluated in a separate neural network because an image of the left side of the chest when compared to the right side of the chest may appear to have pneumonia; the heart appears very white much like a pulmonary consolidation, a key evidence of pneumonia. Evaluating the lobes separately for each type of pneumonia helped ensure accuracy in location recognition.
Importing Images
For the pneumonia location detection part of this project a subset of data was created. The right and left lungs are often referred to as lobes. 100 images of left lob normal and right lobe normal each and 100 images of left lobe virus, right lobe virus, left lobe bacteria, right lobe bacteria pneumonia each were selected to train 4 separate neural nets to help determine location of the pneumonia.
Below are the statements to import the unedited chest X-rays.
    halfNormalImg =
      Import /@
       FileNames[Except["."] ~~ "*.jpeg",
        NotebookDirectory[] <> "HalfData/NORMAL"];
    leftVirusImg =
      Import /@
       FileNames[Except["."] ~~ "*.jpeg",
        NotebookDirectory[] <> "HalfData/VIRUS/Left_Real"];
    rightVirusImg =
      Import /@
       FileNames[Except["."] ~~ "*.jpeg",
        NotebookDirectory[] <> "HalfData/VIRUS/Right_Real"];
    leftBacImg =
      Import /@
       FileNames[Except["."] ~~ "*.jpeg",
        NotebookDirectory[] <> "HalfData/BACTERIA/Left_Real"];
    rightBacImg =
      Import /@
       FileNames[Except["."] ~~ "*.jpeg",
        NotebookDirectory[] <> "HalfData/BACTERIA/Right_Real"];
Image Editing Functions
Below are the functions which were used to edit the images. "widthResize" and "cropFinder" both are used in conjunction to crop the image. The number of black pixels on both sides of an image are found at 5 separate places. The greatest amount of pixels for both side are used to crop the image. This function was useful because it almost always placed the spinal chord in the center, and as a result the images could be correctly separated.
    cropFinder[x_, img_] :=
     Module[{mid, flatValues, cropLeft, cropRight},
      mid = Ceiling[Last[ImageDimensions[img]]/(x)];
      flatValues =
       Flatten@ImageData[
         ImageTake[ColorConvert[img, "Grayscale"], {mid, mid}]];
      cropLeft = LengthWhile[flatValues, # < 0.2 &];
      cropRight = LengthWhile[Reverse[flatValues], # < 0.2 &];
      List[cropLeft, cropRight]
      ]

    widthResize[img_] :=
     Block[{ flatValues, cropLeft, cropRight, meanLeft, meanRight, list1,
       list2, list3, list4, list5, resizedImage},
      list1 = cropFinder[10, img];
      list2 = cropFinder[2, img];
      list3 = cropFinder[4, img];
      list4 = cropFinder[1.5, img];
      list5 = cropFinder[1, img];
      meanLeft = meanLeft /. x_ /; x > 300 :> 0;
      meanLeft = -(Max[{list1[[1]], list2[[1]], list3[[1]], list4[[1]],
           list5[[1]]}]);
      meanRight = meanRight /. x_ /; x > 300 :> 0;
      meanRight = -((Max[{list1[[2]], list2[[2]], list3[[2]], list4[[2]],
            list5[[2]]}]));
      resizedImage = ImagePad[img, {{meanLeft, meanRight}, {0, 0}}];
      ImageResize[resizedImage, {512, 512}]
      ]
Image Editing Functions cont.
The below functions were used to separate the images into halves. If a certain image was in the left lobe virus data set, only the left side was extracted. The respective operations were performed on all of the groups of data. (Note: The chest X-rays display the right side of the chest on the left and the left side of the chest on the right. When I crop the image for the left section it will extract the right side of the image.)
    halfFormat[x_, y_] :=
      Block[{i} ,
       Table[ImageCrop[widthResize[x[[i]]], {256, 512}, y], {i,
         Length[x]}]];
    singleHalfFormat[x_, y_] := ImageCrop[widthResize[x], {256, 512}, y];

Below was the script that was used to edit the images
leftNormalNorm = halfFormat[widthResize[halfNormalImg], Left]; rightNormalNorm = halfFormat[widthResize[halfNormalImg], Right]; leftVirusNorm = halfFormat[widthResize[leftVirusImg], Left]; rightVirusNorm = halfFormat[widthResize[rightVirusImg], Right]; leftBacNorm = halfFormat[widthResize[leftBacImg], Left]; rightBacNorm = halfFormat[widthResize[rightBacImg], Right];
Neural Network
The ResNet 50 was used for transfer learning with a similar set up as the neural network created above.
A "halfLearnNet" was created with a "DropoutLayer", "LinearLayer", "SoftmaxLayer", and an "Output" of two classes. The outputs were 0 and 1; 0 means that the chest X-ray given is a normal image(no pneumonia); 1 means that the lung had pneumonia.
Preparing Images/Training the Neural Net
The below sequence of steps were used for the other neural nets (right lobe virus, left lobe bacteria, right lobe bacteria). The trained files were exported for use on the microsite.

Below are error rates of the location detecting neural networks.
- Virus Left : about 5% error
- Virus Right : about 5% error
- Bacteria Left: about 0% error
- Bacteria Right: about 15% error
Creating a MicroSite
Due to the immense size of my trained neural nets, I needed to create a cloud objects for them.
    bacLeftNet = CloudImport[CloudObject["bacLeftNet.wlnet"]]
    bacRightNet = CloudImport[CloudObject["bacRightNet.wlnet"]]
    virusLeftNet = CloudImport[CloudObject["virusLeftNet.wlnet"]]
    virusRightNet = CloudImport[CloudObject["virusRightNet.wlnet"]]
    CloudImport[CloudObject["pneumonia.wlnet"]]
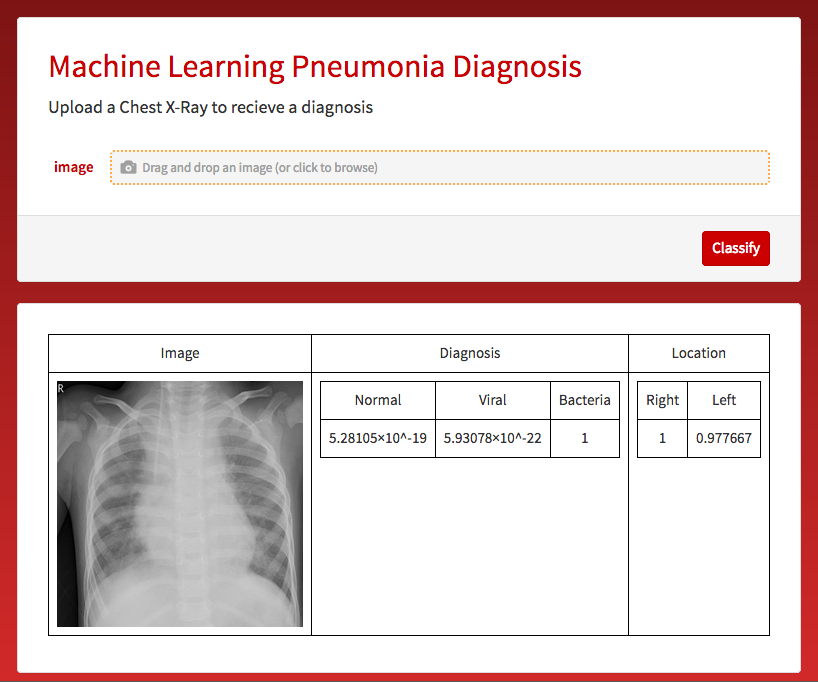
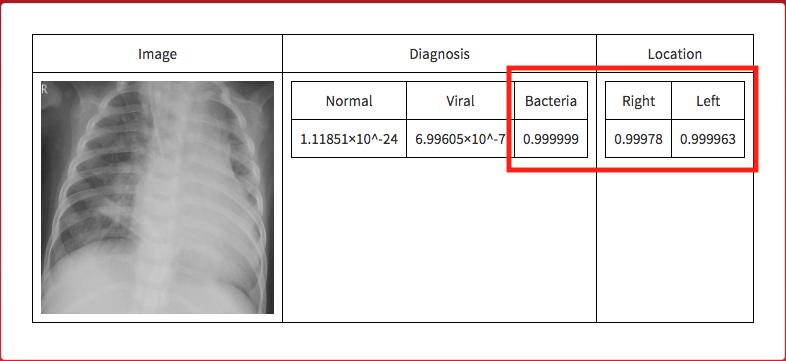
I created a function which performed my desired tasks: Determine if the given chest X-ray is normal, bacterial, or virus. If the chest X-ray appeared to have pneumonia, the function outputted an the probability that the pneumonia was in the right lung and the left lung. In addition, the given image was returned so the user could view. it.
Below was the code for my microsite.
    CloudDeploy[Delayed@FormPage[{"image" -> "Image"},
       tesla[#image] &,
       AppearanceRules -> <|
         "Title" -> "Machine Learning Pneumonia Diagnosis",
         "Description" ->
          "<style>.wolfram-branding>.wolfram-branding-cloud:after{\
    background-image: url(http://i.imgur.com/hFuh1YT.png)}</style>Upload \
    a Chest X-Ray to recieve a diagnosis", "SubmitLabel" -> "Classify",
         "PageTheme" -> "Red"|>], "test3", Permissions -> "Public"]
If an image is given to the microsite the following is outputted.
Real World Testing
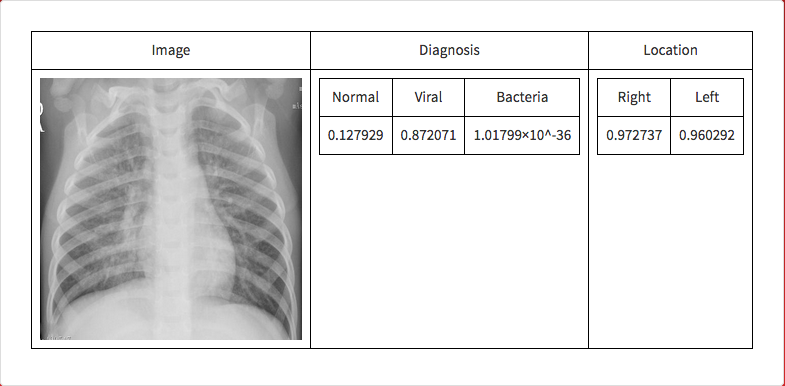
Real world testing was performed to simulate a real use case. I took a picture of the screen, like someone would take a picture of an chest X-ray.
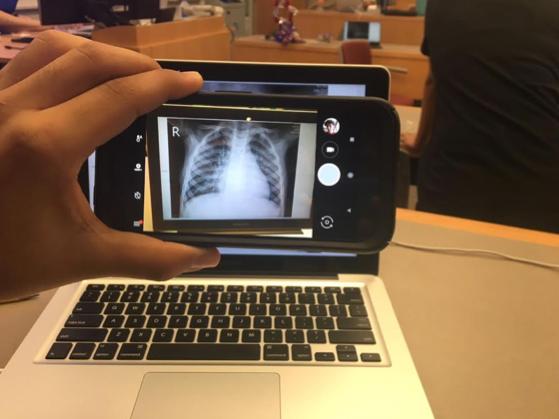
The neural network correctly guessed that the image was an instance of viral pneumonia.
Conclusion and Acknowledgement
I created a transfer learning neural networks which successful diagnosed pneumonia with an accuracy of about 83% and accurately detected the location of the pneumonia with an average accuracy of about 93%. Data editing and augmentation procedures and increasing the amount of training rounds helped increase accuracy of diagnoses. I would like to thank my mentor, Michael Kaminsky, for helping guide me. In addition, I would like to thank other mentors including Rick Harrigan, Andrea Griffin, Douglas Smith, and Greg Hurst for helping me. Finally, I would like to thank my parents for encouraging me to pursue my passions and keep learning.
Future Improvements
- Improving image formatting function to make the current program more compatible with poor quality chest X-Rays.
- Using a similar Neural Network set up except with thermal images to efficiently diagnose pneumonia.
Further augmenting data to improve accuracy of the neural network.
Citations
https://www.mayoclinic.org/diseases-conditions/pneumonia/symptoms-causes/syc-20354204
https://my.clevelandclinic.org/health/diseases/4471-pneumonia
https://www.hopkinsmedicine.org/healthlibrary/conditions/respiratory_disorders/pneumonia_85,P01321
https://www.kaggle.com/paultimothymooney/chest-xray-pneumonia
https://www.med-ed.virginia.edu/courses/rad/cxr/pathology3chest.html
https://machinelearningmastery.com/transfer-learning-for-deep-learning/
https://www.amazon.com/Deep-Learning-Adaptive-Computation-Machine/dp/0262035618/ref=as_li_ss_tl?ie=UTF8&qid=1505772822&sr=8-1&keywords=deep+learning&linkCode=sl1&tag=inspiredalgor-20&linkId=e16a8bbb28ecba154d225ca5f7efcbed
http://www.cell.com/cell/fulltext/S0092-8674(18)30154-5
https://data.mendeley.com/datasets/rscbjbr9sj/2
 Attachments:


