Mentor: Riccardo Di Virgilio
Project Github Link
Introduction
The language you use determines how you think. This is the concept of linguistic relativity: that language influences thought, and that linguistic categories limit and determine cognitive categories. Stephen Wolfram, in his blog about computational essays, argues that this is especially true of computer languages. The symbolic nature of Wolfram Language allows one to describe and conceptualise complex ideas in one word, that normally would take tens or hundreds of lines of code in any other computer language.A natural way of expressing a language is writing in prose, and the Wolfram Language allows the user to understand and express real-world ideas and processes in a readable, precise, and interactive style - a Computational Essay.
The ideal computational essay is written to convey a scientific message with the audience in mind, and contains a mixture of code, text, and other supporting visual elements. Although simple in theory, in practice it can be difficult to write a computational essay in a way that carries a narrative in an organised, visually engaging, and flowing manner. In the same way that Wolfram Language directs the user as they are writing code with colours, visual cues, and automatic formatting, a similar paradigm can be followed to direct a user to write better computational essays.
Improving Computational Essays
The goal of this project was to develop methods to automatically give feedback to the Computational Essay writer, and provide a framework to validate and submit the essay once completed. The end result of this project is a method to test that computational essays are:
- Valid notebooks that do not contain errors or profanity
- Do not contain outdated or obsolete functions
- Standardised in their options including: magnification, window size, and position
Each of these tasks can be done by the user with simple button presses on the GUI I created, and it is all done within the context of their own notebook.
How can a notebook test itself?
Most of the time it's a great thing that everything behind the scenes in a notebook just happens automatically, but there are some concepts that are worth understanding which are involved in the process of a notebook testing itself. The following is my attempt at simplifying what exactly is going on behind the scenes so it makes sense what is going on when I introduce code that reads some lower-level, less human-understandable representations of user input.
The Front End
The Front End is what you're looking at when you're writing a Wolfram Language notebook. It is the graphical user interface (GUI) for Mathematica which takes a user's input like keystrokes and mouse clicks and converts them into objects that the Kernel can understand. The Kernel is what handles the evaluation and computation of the messages that are passed to it by the Front End, then give them back for the Front End to turn for us to read.
Typically, user input is converted by the Front End into "Boxes." For example:
This text, with some styles applied is all handled by boxes which the Front End renders!
To see what the Front End renders into the things you see, use the menu command Cell > Show Expression in a notebook. Below is the Expression:
Cell[TextData[StyleBox["This text, with some styles applied is all handled by boxes which the \ Front End renders!", FontWeight->"Bold", FontSlant->"Italic", FontColor->GrayLevel[0]]], "Text", CellChangeTimes->{{3.7716860193897715*^9, 3.7716860207409754^9}, {3.771686053604227^9, 3.771686107490671*^9}}]
All this information is stored in the cell, which is what the Front End will be looking at when performing operations on a notebook.
Checks
Each of these checks will take an individual cell, and read the Expression:
profanityCheck[cell_] :=
 If[
  Classify["Profanity", ToString[cell]],
  <|"Error" -> "This cell contains profanity"|>,
  Nothing
  ]

missingCheck[cell_] :=
 If[
  MemberQ[cell, "$Failed", Infinity],
  <|"Warning" -> "The evaluation of this cell failed"|>,
  Nothing
  ]
Both take an expression, and return either an Error, Warning, or Nothing depending on the input, which can be any type of Cell. The third check is quite a bit more involved, partly because obsolete and deprecated functions are only in Input- and Code-type cells:
inputTest[cell_] :=
 Cases[cell, # :> cell, Infinity] & /@ {"Input", "Code"} // Flatten
It's also more involved because I only wanted to check Symbols, which are the parts of the Wolfram Language which are symbolic, for example, in the expressions:
x = 1;
x + 2;
"x" is a symbol, and so is "+". The difference is that x is a symbol which I defined which is stored in the GlobalContext, and "+" or **Plus** is a symbol that Wolfram Language always understands - these are stored in the System Context. In the following check, I used WolframLanguageData[] on each Systemsymbol. If it does not return a value for a System symbol, then it is an obsolete or deprecated function.
obsfuncCheck[cell_] :=
 obsfuncCheck[
  Cases[MakeExpression[Flatten[inputtest[cell]], StandardForm],
   s_Symbol /; Context[s] === "System`", {3, Infinity}, Heads -> True]]
obsfuncCheck[symbollist_List] := With[
  {symbols = Map[ToString, symbollist]},
  Replace[
   Keys@Cases[
     Thread[symbols ->
       Quiet@WolframLanguageData[symbols]], _[_, _Missing]],
   {
    {} -> Nothing,
    values_ :> <|
      "Error" ->
       StringJoin[
        "This cell contains the following obsolete or deprecated \
functions: ", Riffle[
         values, ", "
         ]
        ]
      |>
    }
   ]
  ]
obsfuncCheck[] := <|Nothing|>
The obsfuncCheck function is also a bit special, because it will return a readable String that contains the functions that are obsolete.
Transforms
To standardise the style of notebooks, simple transforms can be done on them, like setting the magnification:
magnificationTransform[nbobject_] :=
  SetOptions[nbobject, Magnification -> 1];
Moving the window to a standard position, and resizing:
windowpositionTransform[nbobject_] :=
  SetOptions[nbobject,
   WindowMargins -> {{0, Automatic}, {Automatic, 0}}];

windowsizeTransform[nbobject_] :=
  SetOptions[nbobject, WindowSize -> Medium];
Applying the Checks and Transforms
Each of the checks will return an association, but to give feedback to the user, each check needs to be done on every cell of the notebook, and the transforms on the whole notebook.
validationRules = {
   profanityCheck,
   missingCheck,
   obsfuncCheck
   };

transformationRules = {
   magnificationTransform,
   windowpositionTransform,
   windowsizeTransform
   };

validation[cell_] := Cases[
  Flatten[#[cell] & /@ validationRules],
  <|key_ -> value_|> :>
   TextCell[Style[value, Red, FontWeight -> Bold], CellTags -> key]
  ]
This applies each check to a given cell, and returns their output as a text cell:
notebookValidation[notebook_, option_] := CreateDocument[
   Flatten@Map[
     {#, validation[#]} &,
     Map[NotebookRead, Cells[notebook]]
     ],
   notebook,
   ShowCellTags -> True,
   Visible -> option,
   StyleDefinitions -> "Validation.nb"
   ];
And then iterates the validation over each cell of a given notebook. Next, each transformation is applied to the notebook:
notebookTransformation[notebook_NotebookObject] := #[notebook] & /@
   transformationRules;
If we give a notebook object to notebookValidation it will create a new notebook with each of the validation results as a text cell underneath. Below is a notebook before notebookValidation was done on it: 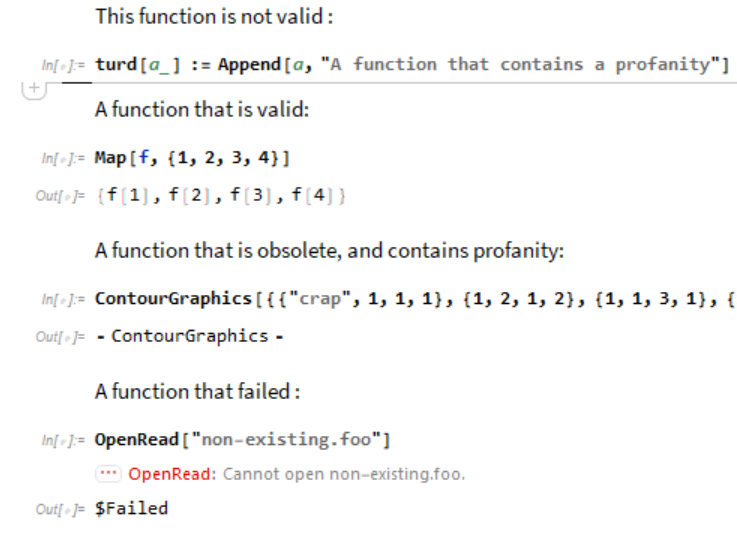
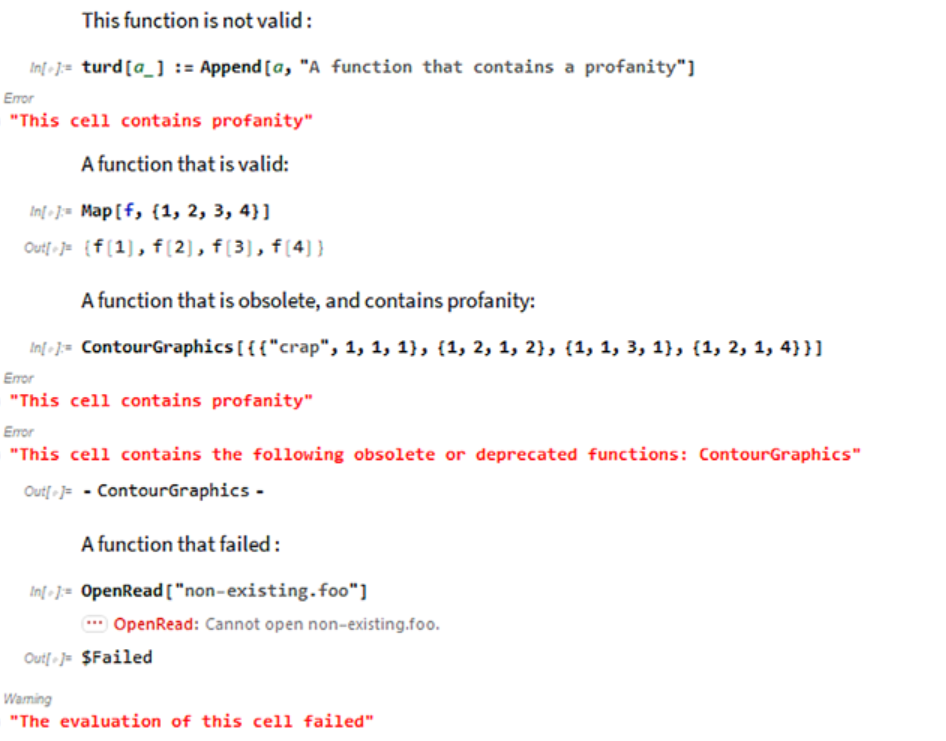
After validation, it will look like this :
User-Facing Functions
The preceding functions are great to have, but they don't make it easy for the average notebook writer to use. To make the feedback more clear for a writer or someone checking a large volume of notebooks, the functions should also come back as either a Success with no Errors, or a Failure with Errors and any number of Warnings. Notebooks that fail probably shouldn't be shared until things have been fixed up, whereas notebooks that succeed are probably okay to share. checkNotebook just combines everything that was defined earlier into one simple function, that applies them all to a notebook.
Options[checkNotebook] = {"Visible" -> False};
checkNotebook[notebook_, OptionsPattern[]] := Through[
  {
   SetSelectedNotebook[notebook],
   notebookTransformation[
    notebookValidation[notebook, OptionValue["Visible"]]],
   Length[Flatten[{Cells[notebook, CellTags -> #]}, 2]] & /@ {"Error",
      "Warning"},
   Cases[NotebookRead[Cells[notebook, CellTags -> #]],
      Cell[BoxData[StyleBox[msg_, ___]], ___] :> msg,
      Infinity] & /@ {"Error", "Warning"}
   }, notebook
  ]
checkNotebook also returns values from notebookValidation that can be used to determine if the Notebook is a Success or Failure, and counts how many each of Errors and Warnings there are in the checked notebook.
returnResult[checkednb_] :=
 With[
  {meta = <|
     "MessageParameters" -> <|
       "Errors" -> Part[checkednb, 3, 1],
       "Warnings" -> Part[checkednb, 3, 2]
       |>,
     "Errors" -> Part[checkednb, 4, 1] // Flatten,
     "Warnings" -> Part[checkednb, 4, 2] // Flatten,
     "Notebook" -> checkednb[[1]],
     "TimeStamp" -> DateString[]
     |>},
  If[
   MatchQ[checkednb[[3]], {_?NumberQ, _?Positive}],
   Failure[
    "InvalidNotebook",
    <|
     "MessageTemplate" :>
      "The notebook is invalid with `Errors` error(s) and `Warnings` \
warning(s).",
     meta
     |>
    ],
   Success[
    "ValidNotebook",
    <|"MessageTemplate" :>
      "The notebook is valid with `Warnings` warning(s).", meta|>
    ]
   ]
  ]
Here is an example Failure that can be returned by returnResult: 
To allow the user to actually apply these checks to their own notebook, as well as anyone to programmatically check lots of notebooks quickly, everything can be combined into 3 functions:
Validate Notebook: Performs all checks and transforms on notebook, opening a new notebook with messages, and a Success or Failure.
ValidateNotebook[] := MessageDialog[
  ValidateNotebook[EvaluationNotebook[], True],
  WindowSize -> {All, All}, WindowTitle -> "Result"
  ]
ValidateNotebook[notebook_NotebookObject, visibleopt_] :=
 returnResult[checkNotebook[notebook, "Visible" -> visibleopt]]
Clear Notebook: Clears all the cells that were generated during the validation.
ClearNotebook[] := clearMessages[EvaluationNotebook[]];
ClearNotebook[notebook_NotebookObject] := clearMessages[notebook];
Submit Notebook: Submits a notebook with all messages cleared into the cloud.
SubmitNotebook[] := SubmitNotebook[EvaluationNotebook[]];
SubmitNotebook[notebook_NotebookObject] :=
  Through[
   {
    ClearNotebook[notebook];,
    MessageDialog[CloudDeploy[notebook]]
    },
   notebook
   ];
For someone programmatically checking large numbers of notebooks, one final function allows the user to preview the notebook.
PreviewNotebook[notebook_String] :=
  Through[
   {
    ValidateNotebook[notebook, True],
    NotebookOpen[File[FileNameJoin[{NotebookDirectory[], notebook}]],
     Visible -> True]
    }
   ];
Creating a Toolbar
All the functions can now come together in 3 buttons which evaluate the above 3 main functions. A toolbar will make the workflow for someone writing an essay easy and painless to validate their essay against any number of checks.
check = Button["Check Notebook", ValidateNotebook[]];

clear = Button["Clear Messages", ClearNotebook[];];

submit = Button["Submit Notebook", SubmitNotebook[];];
Putting all three in a toolbar which is "docked" at the top of the notebook:
Cell[BoxData[RowBox[ToBoxes /@ {check, clear, submit}]], "DockedCell"]
So anyone can use the toolbar when writing, the above toolbar can be added to a stylesheet! Anyone can download the stylesheet contained below, and use it on their own machine. The end result is something easy to use, and that provides visual feedback to anyone writing their own computational essay:
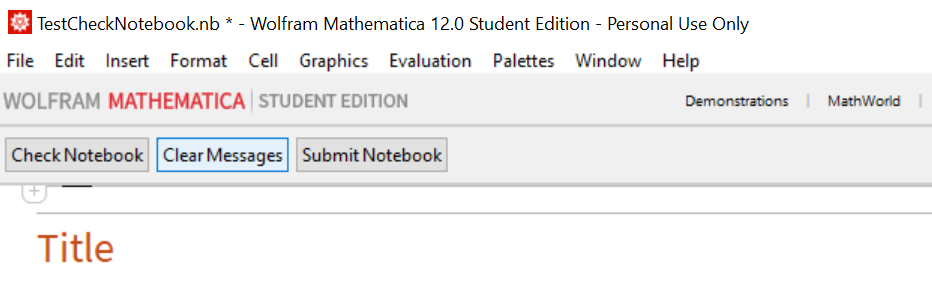
As long as you evaluate the cells in the notebook included with the post (ImprovingComputationalEssays.nb), then install and set the stylesheet included at the end of this post (Validation.nb) on a new notebook, you can use the tool as well!
Future Directions
This framework is modular, allowing for future improvement and features. Some examples could include:
- Ensuring figure readability for people with colour vision deficiencies
- Automatically separate function definitions and iconizing optional arguments
- Re-evaluating the notebook to ensure that the output has not changed
- Suggest against large blocks of code without any explanatory text
Computational Essays are a format which allows for creativity, and there are endless ways to make the experience of a user writing one easier. The automated framework developed here will allow the quality of future computational essays to be better by improving the workflow of an essay writer.
 Attachments:


