Message Boards Message Boards

13
|
48799 Views
|
10 Replies
|
30 Total Likes
View groups...
Share
Share this post:

Reading Temperature Sensors in the Wolfram Language on the RPi

Posted 11 years ago
These sensors are pretty cool--they are cheap to buy and surprisingly sensitive to small changes in temperature. Here's a first attempt I made to interact with the sensors in the Wolfram Language.

For this setup I used DS18B20 temperature sensors and hooked them up to the Raspberry Pi breadboard according to Adafruit's setup guide. The board should look like the following diagram (make sure the sensor is hooked up to a 3.3V pin--not a 5V pin or you could fry the sensor):


Once hooked up and connected to your Pi, run the following commands in the terminal:

sudo modprobe w1-gpio
sudo modprobe w1-therm

The temperatures are read from the sensor by "reading" the file that's created in the devices directory. You can locate the file with the following commands:

cd /sys/bus/w1/devices
ls

This will show you the contents of your devices folder, where there should be a file titled 28-xxxx, where the xxxx is the serial number unique to your sensor. Once you've got that number, enter:

cd 28-xxxx (the xxxx should be replaced with the serial number unique to your sensor)
cat w1_slave

Two lines of data should return back to you--if the first line ends with "YES" then the 5-digit number at the end of the second line is the temperature, to be read as xx.xxx degrees Celsius.

And now that we know that the temperature sensor is working, and we know how to find it, we can copy the file path and import it using the Wolfram Language.

Import["/sys/bus/w1/devices/28-000004fe0343/w1_slave"]

Since this still returns a really long string of data that we don't need, we can single out the temperature and then convert the string into a computable expression.

temp:=N[ToExpression[StringTake[Import["/sys/bus/w1/devices/28-000004fe0343/w1_slave"],-5]]/1000]

So now when we read the file, we just get the temperature back!

temp
(*22.312*)

For kicks, I set up a scheduled task to plot the ambient temperature of my office every 60 seconds for 6 hours. Unsurprisingly, the temperature only fluctuated a few tenths of a degree...!

t={}
RunScheduledTask[(deg=temp;AppendTo[t,deg]),{60,360}];
Dynamic[ListLinePlot[t,Joined->True,PlotRange->Automatic]]

And here's what the graph looked like after a little bit of time--it truly is a sensitive device (the "large" dip down to 22.1 was me touching the sensor with my cold hands!):

Any suggestions for what to do next?
POSTED BY: Allison Taylor
10 Replies

Is it possible to get the readings of the DS18B20 through the Mathematica custom Arduino Sketch?

POSTED BY: Pedro Fonseca

The following will work with the DS18B20 but you will have to consult the DHT22 specifications in order to get your digital signal. This code saves the temperature along with the memory in use to a new Databin. You will need to enter your password and appropriate Wolfram ID.

$HistoryLength=0
$pollinginterval=60;
initialmemory=MemoryInUse[];
CloudConnect[$WolframID, "yourpassword"];
bin=CreateDatabin[];

devicefolders[]:=FileNames["28-*", {"/sys/bus/w1/devices"}];
devicefolder[i_] := devicefolders[][[i]];
lengthdevicefolder:=Length[devicefolders[]];
devicefile[i_] := FileNameJoin[{devicefolder[i], "w1_slave"}];
read[i_] := ReadList[devicefile[i], String];
temperature[devicefile_String] := Flatten[StringCases[ReadList[devicefile, String], 
    "t=" ~~ x___ :> ToExpression[x]/1000., 1]][[1]];

Run["sudo modprobe w1-gpio"];
Run["sudo modprobe w1-therm"];
Print[devicefolders[]];
task = CreateScheduledTask[DatabinAdd[bin,{
Sequence@@Join[{"Memory"->MemoryInUse[]-initialmemory},
Map[(StringJoin["Temperature",ToString@#]->temperature[devicefile[#]])&,Range[lengthdevicefolder] ]
]
}], $pollinginterval];
StartScheduledTask[{task}];
While[Length[ScheduledTasks[]]>0,Pause[1]];

If you are using a single sensor then you could also explicitly define the data semantics of your Databin in the following way.

  SetOptions[bin,  "Interpretation" -> {"Memory" ->  Restricted["StructuredQuantity", "Bytes"], 
  "Temperature1" -> Restricted["StructuredQuantity", "DegreesCelsius"]}]

You can then deploy a report.

CloudDeploy[
 FormFunction[{{"initialchoice", "Databin Key"} -> Keys@Databin["42ffdT3r"]},
  Column[{StringTemplate[ "The choice for the Databin Key was `choice`"][<| "choice" -> #initialchoice|>],
     data = Databin["42ffdT3r"];
     DateListPlot@TimeSeries@data["Values"][#initialchoice]}] &,  "CloudCDF"]
 , Permissions -> "Public"]
POSTED BY: Emerson Willard
Posted 10 years ago

Hi, I am trying to upload temperature and humidity data from DHT 22 sensor connected to Raspberry pi into the Wolfram Datadrop. I read the GPIO documentation. I understand GPIO DeviceRead command gives the value one or zero.I used the following

DeviceRead["GPIO",4]

I am getting 4-> -1 i want to read the temperature and humidity value from DHT22 sensor.I am not sure how to achieve it. Please guide me.

POSTED BY: Priya Sivaraj

I have been using the DS18B20 temperature sensor on a Raspberry Pi B for a while, but tried to do the same on a Raspberry Pi 2 and the 28-xxxx device file doesn't appear. I think I've tracked down the problem. It seems that there is a Device Tree described at https://github.com/raspberrypi/firmware/blob/master/boot/overlays/README that allows you to enable the hardware to read the temp. sensor. I'm not certain what the setting would be. Any idea what it is?

POSTED BY: Ken Levasseur

I figured out that all I had to do is disable the Device Tree using raspi-config / Advanced Options. My only concern is that I read that this may not be a reasonable option in the future. I would hope that more guidance in connecting devices using the Device Tree will appear at some point!

POSTED BY: Ken Levasseur
(1) Yes but I used a .m file.
(2)$ wolfram -script temperaturescript.m
(3) Yes, or on startup using /etc/rc.local.
(4+5) only the Wolfram language is used.
(6) You could embed a cdf in a web page,however this would require users to have plugins, or wait for the arrival of the cloud funtionality as detailed here: http://blog.wolfram.com/2014/02/24/starting-to-demo-the-wolfram-language/
(7) This is the content of the .m file which can be run as a script. The code now automatically determines the number of sensors connected.
The last line of code is necessary to stop the kernel from exiting after all the commands have been read in, which is a trap for those used to working in the front end only. It is easiest to develop code interactively using a Notebook(front end) interface or the Workbench, and then run it as a script once you have it working. Currently I have three sensors connected to a Beehive to measure temperature regulation, I will post on this shortly.

 devicefolders[]:=FileNames["28-*", {"/sys/bus/w1/devices"}];
 devicefolder[i_] := devicefolders[][[i]];
 lengthdevicefolder:=Length[devicefolders[]];
 devicefile[i_] := FileNameJoin[{devicefolder[i], "w1_slave"}];
 read[i_] := ReadList[devicefile[i], String];
 temperature[devicefile_String] := Flatten[StringCases[ReadList[devicefile, String],
     "t=" ~~ x___ :> ToExpression[x]/1000., 1]][[1]];
 
 upload[filesourcepath_, savedir_String] := 
  Run["/home/pi/Dropbox-Uploader/dropbox_uploader.sh upload " <>
    filesourcepath <> " " <>
    FileNameJoin[{savedir, FileNameTake[filesourcepath]}]];
   
file = "/home/pi/Desktop/temperaturedata.txt"
Run["sudo modprobe w1-gpio"];
Run["sudo modprobe w1-therm"];
Print[file];
Print[devicefolders[]];

task1 = CreateScheduledTask[upload[file, "temperaturexperiment"], 120,AbsoluteTime[] + 180];
task2 = CreateScheduledTask[PutAppend[{DateList[AbsoluteTime[]],
Sequence@@Map[temperature[devicefile[#]]&,Range[lengthdevicefolder] ]}, file], 5];
StartScheduledTask[{task1, task2}];
While[Length[ScheduledTasks[]]>0,Pause[1]];
 (8) I would Install Mathematica on the Raspberry Pi and try any of the above code.
POSTED BY: Emerson Willard
Posted 11 years ago
Hello, Thank you.
I have succeeded in measuring the cooling of hot water using Vernier and LM73 sensor, which I described in a bit more detail here.
http://mmays.hatenablog.com/entry/2014/03/07/155351
Yoshihiro Sato
POSTED BY: Yoshihiro Sato
Posted 11 years ago
I just discovered Wolfram Alpha and Mathmatica yesterday and I'm excited about the possibilities.  I've been doing something very simmilar with DS18b20s on my Raspberry Pi with a LAMP server setup, you can see it here http://richpoints.x64.me  I'm currently using a service called Xively to graph the data which has some limitations, ideally I'd like to have multiple lines on one graph as you guys have detailed here.

Being new to Wolfram I have some basic questions.  
  1. Wolfram scripts end in .wl?
  2. Is this how you'd execute a script from the command line? $ wolfram file_name.wl
  3. Can I call Wolfram scripts from cron?
  4. How does Wolfram integrate with a LAMP server?  
  5. Is a LAMP server still neccesary?
  6. How do I embed graphs into an html page?
  7. What would the code look like from Emerson's example in it's entirety?  Just copy and past the code blocks?
  8. I'm finding it hard to find Wolfram Alpha 101 tutorials any suggestions?
Thanks!
Rich
POSTED BY: Rich Points
The DS18B20 temperature sensor can be connected in parallel and is also available in cable format.
A simple experiment is to investigate the cooling of a hot cup of water over an extended time.

For this cable, connections have been soldered on and shrink wrapped for a more robust connection with the breadboard..
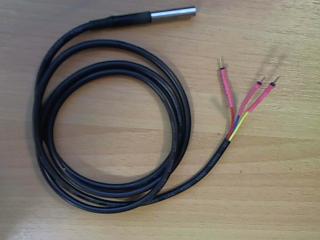
http://www.adafruit.com/products/381#Technical_Details

Follow setup details for a single sensor and then put the extra sensor in parallel.
Two files are created,each with different seriall numbers, when the temperature sensors are working.
If your sensor has three wires - Red connects to 3 - 5 V, Blue/Black connects to ground and Yellow/White is data
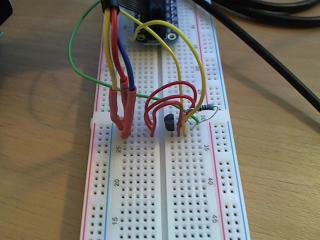


Setup of temperature probes is similar to a previous post (Trying to connect temperature sensor DS18B20) but allows for multiple sensors.
ReadList is more efficent than Import when getting the temperature from the file.
devicefolder[i_] := FileNames["28-*", {"/sys/bus/w1/devices"}][[i]];
Run["sudo modprobe w1-gpio"];
Run["sudo modprobe w1-therm"];

devicefile[i_] := FileNameJoin[{devicefolder[i], "w1_slave"}];
temperature[devicefile_String] := Flatten[StringCases[ReadList[devicefile, String],
    "t=" ~~ x___ :> ToExpression[x]/1000., 1]][[1]];

I decided it would be nice to save the data to dropbox in a text file by following this tutorial, however you could easily store the data within Mathematica.
http://raspi.tv/2013/how-to-use-dropbox-with-raspberry-pi
upload[filesourcepath_, savedir_String] := 
  Run["/home/pi/Dropbox-Uploader/dropbox_uploader.sh upload " <>
    filesourcepath <> " " <>
    FileNameJoin[{savedir, FileNameTake[filesourcepath]}]];

Record the data after creating an empty text file. After a time put some boiled water in the cup. Record data every five seconds and upload every two minutes.
file = "/home/pi/Desktop/temperaturedata.txt";
task1 = CreateScheduledTask[upload[file, "temperaturexperiment"], 120];
task2 = CreateScheduledTask[PutAppend[{DateList[AbsoluteTime[]],
    temperature[devicefile[1]], temperature[devicefile[2]]}, file], 5];
StartScheduledTask[{task1, task2}]
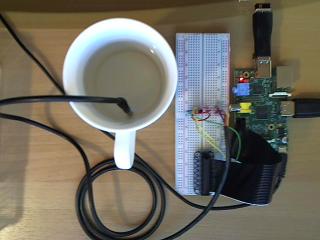

Results
The data is imported and the outliers are removed quickly.

data = Import["C:\\Users\\2moro\\Downloads\\temperaturedata (18).txt","Lines"];
data1 = DeleteCases[data[[All, {1, 2}]], {x__, y_} /; y < 10 || y >= 30];
data2 = DeleteCases[data[[All, {1, 3}]], {x__, y_} /; y < 10];
DateListPlot[{data1, data2}, Joined -> True, PlotRange -> {0, 90}]
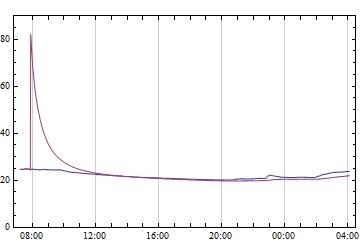

As an initial step, students could investigate Newton's law of Cooling.
More advanced students could model temperature changes when a known stimulus is applied to the system.
Note the smoother response of the temperature sensor in the water to changes in room temperature.
POSTED BY: Emerson Willard
This pretty cool start, Allison, thanks for sharing! Do you mean "what to do next" with Temperature Sensors or in general with R-Pi? I can give an idea for the former. If some folks here are physicists (and who isn't honestly at least a little bit?) and they are not afraid to get their feet wet in literal and figurative senses, there is famous simple experiment:

Calorimetry: Specific Heat Capacity of Copper

*Copper* could be any given metal. One would need some basic lab equipment and will use R-Pi as a thermometer in that setup. One surely needs some waterproof coating for sensor - simple nail polish will do I think.

The advantage of the R-Pi thermometer is that it shows record of temperature and makes it easier to judge when thermodynamic equilibrium is reached. Usually kids just have to eye-estimate when the temperature stopped changing on thermometer.

But it is not clear if one can run RunScheduledTask fast enough for this experiment.
POSTED BY: Sam Carrettie
Reply to this discussion
Community posts can be styled and formatted using the Markdown syntax.
Reply Preview
Attachments
Remove
or Discard

Group Abstract Group Abstract