By default, web forms that you deploy in the Wolfram Cloud are generated upon evaluation of CloudDeploy[ ]. But you can also deploy web forms that gets generated on-demand. This allows you to deploy forms whose content may change for each user or session.
In the following example, I want to create a simple checklist that displays my to-do items. Once I've noted that I've completed it, the information will be transferred to Data Drop's databin, where it will be stored for easy access. Each time I revisit the form, the items that I have completed will be hidden from the options.
1. Set up your databin.
The databin is composed of accepting two pieces of information: the to-do item and the data in which it was completed.
    bin = CreateDatabin["Name" -> "My Checklist",
      "Interpretation" -> {"Todo" -> "String",
        "DateCompleted" -> "String"}, Permissions -> "Public"]
2. Insert some empty data.
For me, I had to insert initial placeholders in the databin so that the web form can inject data into the databin without issues.
DatabinAdd[bin, <|
  "Todo" -> {},
  "DateCompleted" -> {}
  |>]
3. Create the web form
CloudDeploy[
 Delayed[
  FormFunction[{
    {"todo", "List of Todo Items"} ->
     AnySubset[
      Complement[{"do laundry", "buy groceries", "get oil change",
        "walk the dog", "feed the cat", "call parents", "exercise",
        "pick up prescription"},
       Flatten[Values[Values[Databin["---databinID---"]]][[1]]]
       ]],
    {"date", "Date Completed"} -> <|"Interpreter" -> "Date",
      "Required" -> False|>
    },
   Column[{
      DatabinAdd["---databinID---", <|
         "Todo" -> #todo,
         "DateCompleted" -> #date
         |>];,
      Style["Alright!", "Chapter", FontSize -> 24]
      }] &,
   "CloudCDF",
   AppearanceRules -> <|
     "Title" -> "My Todo List",
     "Description" -> "Check off the todo list for the day",
     "SubmitLabel" -> "Submit"
     |>
   ], "HTMLCloudCDF"],
 Permissions -> "Public"]
The key here is the Delayed[] function. It will generate the contents of the form when the user visits the page. It is followed by FormFunction[] that will construct the inputs for the form. AnySubset[] and Complement[] are used to compare the initial list of the to-do list and the items that have been completed and are logged into the databin.
The middle part of the code creates the form response page.
The last part of the code specifies extra information for the form, such as the title, description, and the label for the Submit button. These are all optional.
After the form is deployed, the form should look something like this: 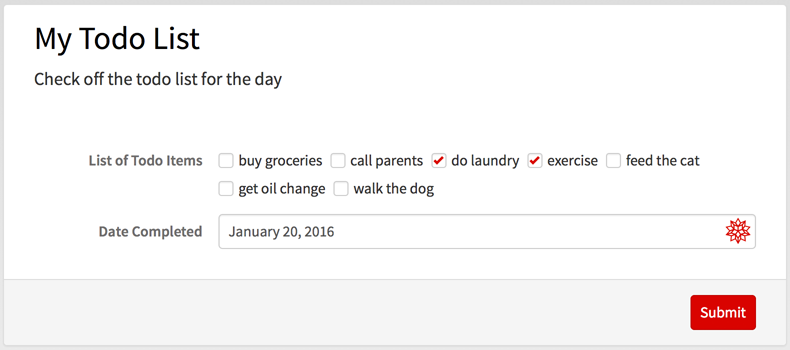
I will choose to do the laundry and exercise.
After I submit the form and return to it later on, I will see that those two options are removed from the form: 
When I check my databin page, I will also see that the two to-do items are added: 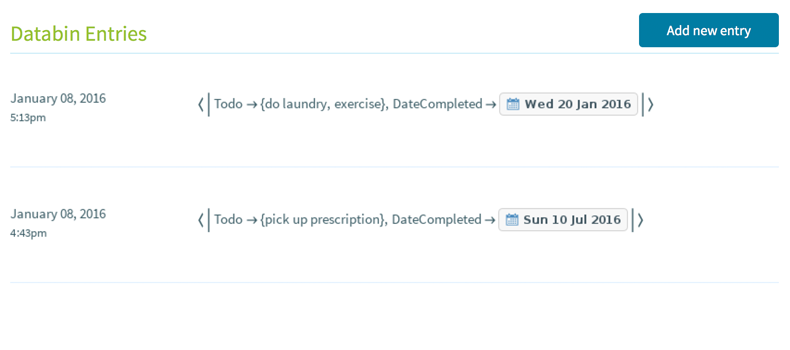
Feel free to experiment, and let me know how it goes!
 Attachments:


