In my previous post, I went over the usage of controlling an RGB LED by using the digital GPIO pins on the Beaglebone Black. Using the GPIO pins meant that we could only get up to a total of 7 colors. Here, we can get a near infinite number of colors using the BBBs PWM pins.
Parts Used
- 1 x Common Cathode RGB LED
- 3 x 220 ? Resistors
- 4 x Jumper Wires
- 1 x Beaglebone Black
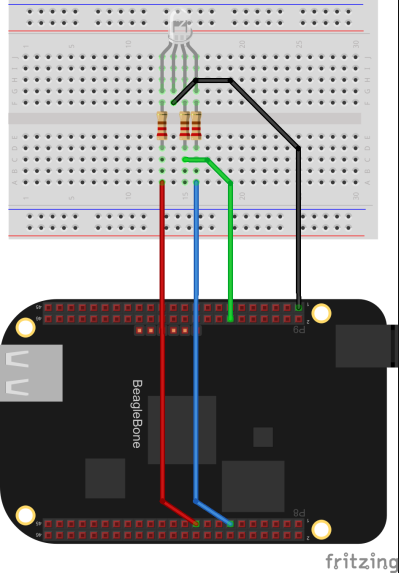
Connect the following pins:
- Red: P8_19
- Green: P9_14
- Blue: P8_13
Assuming you have connected those pins to the same ones that I have, we can enter the following into our .m file:
$redPin = "8_19"
$greenPin = "9_14"
$bluePin = "8_13"
We still need to set these pins to behave as PWM pins on the BBB. If you have connected the pins where I have connected them, you can simply run the following commands on your BBB:
cd /opt/source/beaglebone-universal-io
sudo git pull origin master
make install
echo cape-universaln > /sys/devices/bone_capemgr.*/slots
config-pin overlay cape-universala
config-pin P9.14 pwm
config-pin P8.13 pwm
config-pin P8.19 pwm
Next, we define a function to validate the range of output to the PWM pins:
validRangeQ[r_?NumberQ] := r >= 0 && r <= 100
I found that the most consistent way to get the PWM pins of the Beaglebone Black working were by using Adafruit's BBIO package. We can install it with the following commands (as root):
apt-get update
apt-get install build-essential python-dev python-setuptools python-pip python-smbus
pip install Adafruit_BBIO
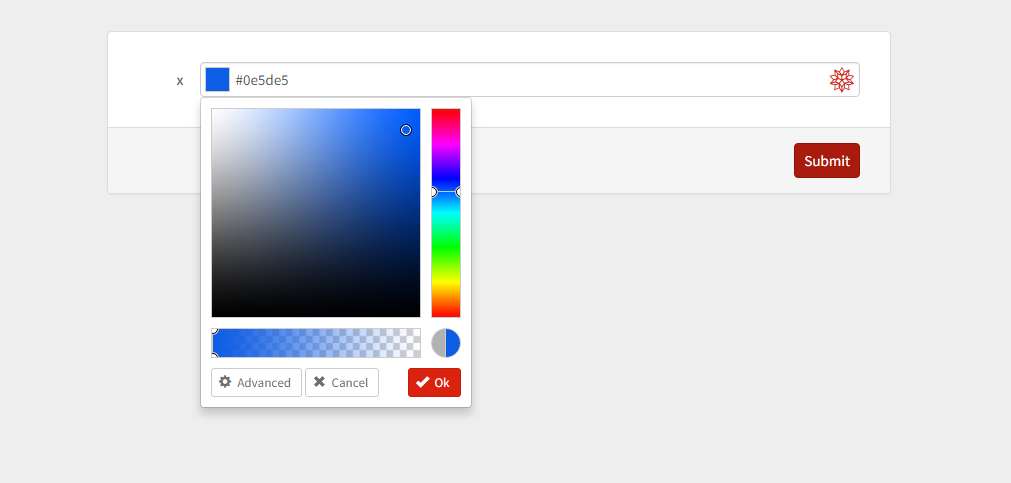
Next, we will deploy a FormFunction in our notebook to create the color slider:
$Permissions = "Public";
$sliderURL = CloudObject["PWM"];
slider = CloudObject["slider"];
CloudDeploy[
 FormFunction[
  "x" -> "Color", (Set[CloudSymbol[$sliderURL], #x];
    "Your color has been set!") &], slider]
Visiting the URL from the CloudDeploy should look similar to:
Now that we've got all the prerequisites, we can write the main part of the code in our .m file:
ioutputPWMString[] := "python -c 'import Adafruit_BBIO.PWM as PWM"
ioutputPWMString[s_String, v_?NumberQ] := "\nPWM.start(\"P" <> s <> "\", " <> ToString[v] <> ")"
outputPWMString[s_String, v_?NumberQ] := ioutputPWMString[] <> ioutputPWMString[s, v] <> "'"
outputPWMString[rules:{(_String -> _?NumberQ)..}] := ioutputPWMString[] <>    (ioutputPWMString@@@rules) <> "'"
outputPWM[s_String, v_?(validRangeQ[#]&)] := Run[outputPWMString[s, v]]
outputPWM[rules:{(_String -> _?(validRangeQ[#]&))..}] := Run[outputPWMString[rules]]
outputPWM[red_?(validRangeQ[#]&), green_?(validRangeQ[#]&), blue_?(validRangeQ[#]&)] := outputPWM@@@{{$redPin, red}, {$greenPin, green}, {$bluePin, blue}}
outputPWM[__] := $Failed

fetchPWM[] := Check[res = CloudGet[$sliderURL]; outputPWM[MapThread[Rule, {{$redPin, $greenPin, $bluePin}, 100.*List@@res}]], Null]
The following will pull for a new color for the LED every 10 seconds so as to not overload the cloud servers and to keep the BBB's CPU from becoming overworked, as well.
While[True, fetchPWM[]
  Pause[10]
 ]
Note that the LED won't be able to become the same exact color as the color you select because it's impossible to create a black on the RGB LED as it will simply turn off the LED and as a result it's not possible to achieve some colors on the LED.
I am new here to the Wolfram Community and would appreciate any suggestions or questions that you might have.


