Message Boards Message Boards

Make color gradients with a GUI

Posted 8 years ago

UPDATE: Thanks to JM's comment I decided to update this post. I had updated the code a while ago but never updated here. The updates include labeled opacity sliders (red circle) and labels for the position sliders (green circle) so all slider positions can be input by value. I also copy to clip board instead of writing directly to the notebook. The attached file has the latest code or you can find it on my github or on PackageData[]

enter image description here


I've been in the process of creating some GUIs for Mathematica plots. This is an ongoing project, but it's been suggested to me that I break the project up into smaller independent pieces. This is my first completed piece: the so-called color blender.

It is a GUI for creating color gradients. It takes either no input, an integer, or a list (of lists) of location/color pairs. If given no input, then a random gradient is created, made up of 4 colors. If an integer n>=2 is input, then a random gradient is created, made up of n colors. You can move around where the colors are positioned, add and remove specific colors, change current colors with the color slider, or choose a pre-existing gradient from the ColorData data paclets via an action menu. Moreover, you can output the existing state of the gradient to use elsewhere with a button.

Last, though the gif below cuts off the upper part of the action menu, the first entry is "Custom 1". Said differently, any input gradient or list of gradients are added to the top of the action menu and labeled as "Custom 1", "Custom 2", etc. so you can start off from a previously created custom gradient. Also, the gif has been down-converted so the colors look slightly off, but don't let that discourage you from using it.

Animated gif of the color blender in action.

Attachments:
POSTED BY: Kevin Daily
8 Replies

Hi Kevin,

Why don't you find a better home for this package (such as GitHub) and then add a link to http://packagedata.net/ ? Such small packages are very welcome there (even when they are still under development and you may not yet be comfortable adding them tot he Wolfram Library Archive).

POSTED BY: Szabolcs Horvát

Done.

POSTED BY: Kevin Daily
Posted 7 years ago

I have not seen this neat GUI before. I actually did something similar a while back on Stack Exchange:

color gradient maker


With respect to modifying built-in color gradients, user R. M. on Stack Exchange wrote ColorBar (also here):

ColorBar

POSTED BY: J. M.

Thanks for these references! It's amazing to me that good ideas spontaneously pop up from different sources. I like the simplicity of your interface, and I also like R.M.'s compactness.

With your comment I was encouraged to post an update. You can see it at the top of the post.

POSTED BY: Kevin Daily

enter image description here - another post of yours has been selected for the Staff Picks group, congratulations !

We are happy to see you at the tops of the "Featured Contributor" board. Thank you for your wonderful contributions, and please keep them coming!

POSTED BY: Moderation Team

Cool !

I was going to build exactly the same thing this weekend (or probably the following one...). But for my application I need it mixed with the Opacity duality.

In my mind, that means:

  • three "color" bars
    • the one you have, on the top, for the color setting
    • a black one on the bottom, for the Opacity setting, which will end up being kind of in grayscale, eventually with the checker (chess squares) underneath, as an option to a white background.
    • the blend of both in the middle (and here, the checker makes more sense)
  • the Opacity setting is done exactly the same way you have done for the colors, but in order to fit into the interface, the sliders are flipped down (and obviously, there's no color slider, but just a simple 1D slider). But you should be able to add multiple control points as you have done for the color counterpart.
  • so that we can set an opacity at exactly the same value of a color setting, or not, some sort of snapping to the counterpart sliders can be of great help (something that can be activated or not). In this way, when you are sliding an Opacity control point, it can snap to existing color control points, and vice versa.
  • Since this is useful for technical stuff, I think that it is important to be able to specify exact values. Have you though on adding an access to an InputField (or Control)? I know that you can edit them by hand, on the code / input parameters, but having this functionality makes it more convenient for what I will explain latter (function generation).
  • The output of the opacity would need to fit into the different needs of the WL:
    • together with the color information, inside the Blend, as a fourth/alpha channel
    • separated from the color information, as a function compatible with the OpacityFunction format
    • etc. (I don't know if there are other pertinent ways of feeding this into the WL; anyone?)
  • with the addition of the opacity information, I think that an option to have a single function as an output, with its behaviour depending on the value of a single parameter ("Blend", "BendAndOpacity", "OpacityFunction", etc), can be of great help, avoiding the copying and past of the interface results, since we could then use it on a delayed option or inside a Dynamic content:
    • with the "Blend" or "BendAndOpacity", this function generates a static content (a Blend[something]);
    • with the "OpacityFunction", this function generated another function usable like the following OpacityFunction->colorBlenderFunction["OpacityFunction"].

As you can see, I was/am seriously thinking on doing it... It is actually a small component I need for a presentation I'm preparing for a local WRI event.

Are willing to give it a try!

POSTED BY: Pedro Fonseca

Kevin, this is very nice! But can you update your post with some usage-case examples? I mean how do you use colorBlender output inside other code? Or does it have a different purpose?

POSTED BY: Sam Carrettie

For example, you can use output from the colorBlender with the Blend function to create color functions, such as

Blend[{{0,Red},{1,Blue}},x]

which would output a color blend that depends on the value of 'x'. With this format, you can create color maps like you would with ColorData functions, such as

Plot3D[Exp[-x^2 - y^2], {x, -2, 2}, {y, -2, 2}, ColorFunction -> (ColorData["TemperatureMap"][#3] &)]

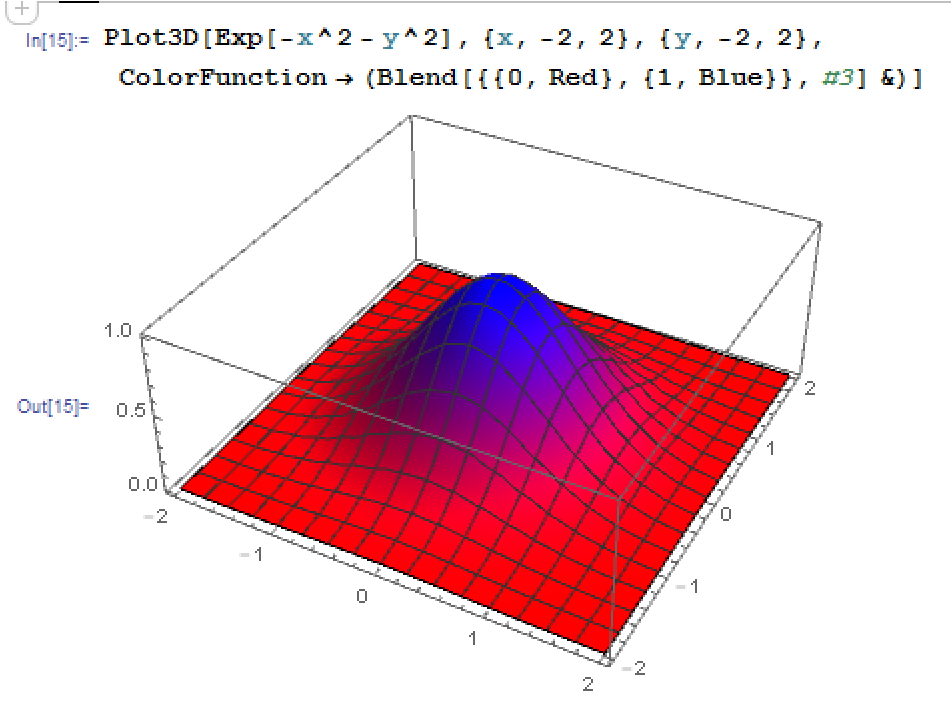
could become instead

Plot3D[Exp[-x^2 - y^2], {x, -2, 2}, {y, -2, 2}, ColorFunction -> (Blend[{{0, Red}, {1, Blue}}, #3] &)]

Example of using a color blend in Plot3D.

POSTED BY: Kevin Daily
Reply to this discussion
Community posts can be styled and formatted using the Markdown syntax.
Reply Preview
Attachments
Remove
or Discard

Group Abstract Group Abstract