Gizmodo: This Question-Answering Typewriter Is Like if We Had Siri in the ’70s
Original articles: Termi2 - a Typewriter That Answers Your Questions
Siri like it's 1976 with a TI silent 700 terminal
What if a typewriter could respond to questions you enter?
I answered that question several years ago with a project I called Termi. I salvaged a vintage TI Silent 700 electric typewriter/terminal (Model 745) and connected it to a Raspberry Pi Zero W that ran a script to query Wolfram Alpha. When the user typed a question into the typewriter, it would type out the answer ...like a 1976 version of Siri.
For example, a simple exchange might look like:
Question: who is the president of the United States?
Answer: the current president of the United States is Joe Biden
Termi2 is a reimagined version of that project, but better. I'm both reusing vintage hardware (the TI Silent 700) and the original idea in order to improve upon one of my favorite projects.
What's changed?
The basic concept is still the same: the user types a question, then Wolfram Alpha answers that question and the response automatically types out.
But all of the hardware, aside from the TI Silent 700 itself, is different. I realized that an SBC (Single-Board Computer) was overkill for this project and introduced unnecessary complications. For example, it required that the user log into the Linux terminal at startup, took a while to boot, and necessitated a specific question command structure and some strange formatting.
Termi2 now uses an ESP32 to handle the same functionality in a much more streamlined way. When powered on, it takes just a few seconds to connect to WiFi and prompt the user for a question. The user can type that question any way they like—no special commands or formatting necessary. Within a few seconds, a short answer from Wolfram Alpha (which can process a wide range of queries) will print out.
The new hardware also eliminates the need for the Arduino adapter I created for the original and runs on a lithium battery, so no additional power adapter is needed.
Supplies
Components:
- TI Silent 700 Terminal (Model 745)
- ESP32 Development Board
- SN74LVC245A level shifter IC
- Battery charging/distribution module
- Lithium-ion battery (between 250-1000mAh should work)
- Power switch
- Female DA-15 connector
- Perfboard
Supplies:
- Soldering iron
- 3D printer
- Computer (for programming ESP32)
- Hot glue gun
- Wire
Step 1: The TI Silent 700 Explained
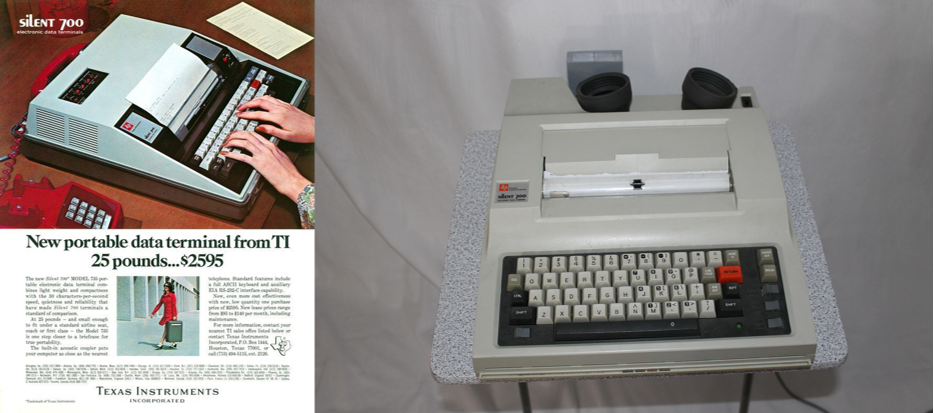
The TI Silent 700 is a strange device by modern standards. It looks like an electric typewriter and operates as such. TI even advertised it that way.
But it isn't just a typewriter; it is also a computer terminal. It isn't a standalone computer and can't process anything on its own, but rather acts as an interface for a computer.
In the 1970s, computers were big, expensive, and often shared among multiple users. In many ways, the kinds of high-end computers that businesses and universities used were more like what we think of as servers today. Like most modern servers, those vintage computers were often headless (meaning they didn't have their own monitor and keyboard). To work with them, could connect a terminal to input data into a computer and receive the output. That was especially useful when working with remote computers.
In this case, when the TI Silent 700 is in online mode it will send anything typed on its keyboard to a connected computer. Optionally, it will also print the typed characters directly onto the paper like a normal electric typewriter. Anything the connected computer returns will print out on the paper via the same typewriter mechanism (a thermal printhead).
This specific model, the 745, could connect to connects through a serial port or an acoustic coupler. The latter works with primitive modems and accepts a telephone handset. The TI Silent 700's speaker would beep and chirp into the handset to send data, and its microphone would listen for beeps and chirps to receive data.
The serial port enables more conventional local communication and is what I used for this project. Data transfer is very slow and there are no advanced handshake features, but the serial communication is straightforward.
Of note, this model can only output uppercase letters. That made it difficult to use with Linux, which meant that I had to utilize some creative workarounds for the original Termi project.
Step 2: TI Silent 700 Serial Communication
The most important thing to know when trying to setup serial communication with a TI Silent 700 is that the logic is inverted—voltage between -15V and -3V is a 1 (one, TRUE), and voltage between +3V and +15V is a 0 (zero, FALSE). This is the opposite logic of most modern serial communication.
This means that, unless you correct for it, when the TI Silent 700 sends what it thinks is a 1, the receiving computer will likely receive a 0 (and vice-versa). The data will still send, but it will appear to be random characters.
There are a few ways to correct for this. If the device supports it (as the ESP32 does), you can simply setup the serial connection with inverted logic on both RX and TX. You can also use a hex inverter IC chip, which has multiple input/output pairs that invert logic.
The other serial data settings are straightforward. The TI Silent 700 requires:
- 7 data bits
- 1 stop bit
- Odd parity bit (apparently even also works)
- No flow control
The Model 745 can print at either 30 characters a second or 10 characters a second. The former requires 300 baud and the latter requires 100 baud.
There is also a switch for duplex mode. I use half duplex, which means it can only receive or send data at any given time. But that will also print everything the user types (something I wanted). In full duplex, the TI Silent 700 will only print data it receives over serial (not what the user types, unless the receiver echoes that).
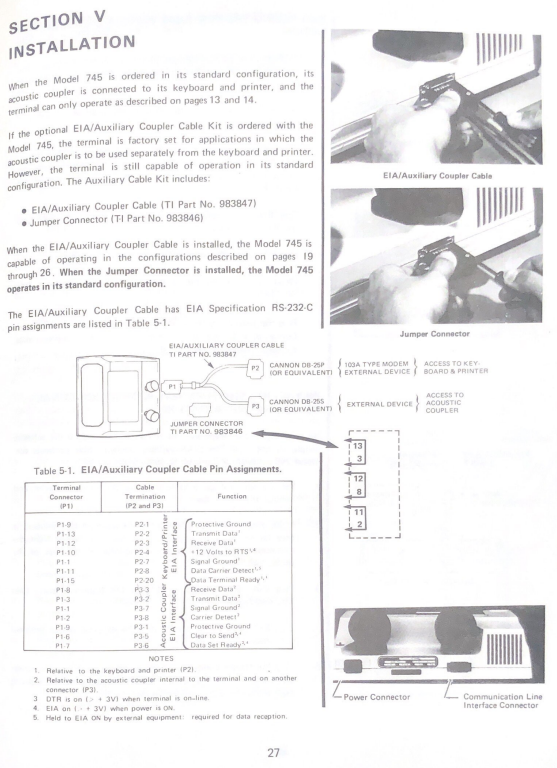
The Serial Port
I'm calling it a serial port, but that isn't actually what it is. It is actually a proprietary port that has pins for two separate serial connections (one for the acoustic coupler, one for normal serial communication).
That port accepts a female DA-15 connector with 15 pins arranged in two rows. Looking at the TI Silent 700's port, the top left pin is Pin 1 and the bottom right pin is Pin 15.
The pictured page from the manual shows the pin functions (with their proprietary cable adapter). We won't need the adapter, because we're going to connect to the pins ourselves.
Here are the connections I used:
- Pin 1 > Ground
- Pin 11 > 5V
- Pin 12 > RX
- Pin 13 > TX
Pin 11 needs to receive steady voltage for the TI Silent 700 to register that it is connected to something. If it doesn't, it will refuse to send or receive data.
Level Shifting
The TI Silent 700 considers anything between -3V and 3V to be null—it isn't a 1 or a 0. And it outputs at somewhere between 5V and 8V.
But the ESP32's pins cannot handle anything over 3.3V. It also outputs at 3.3V, which is enough for the TI Silent 700 to detect.
To avoid damaging the ESP32, the output from the TI Silent 700 needs to come down to acceptable voltage. This is the job of the SN74LVC245A level shifter IC. It brings inputs down to whatever voltage it is supplied with and outputs them at that voltage. So if we supply it with 3.3V, it will take the high-voltage output from the TI Silent 700 and bring it down to 3.3V that is acceptable for the ESP32.
Step 3: ESP32 Wiring
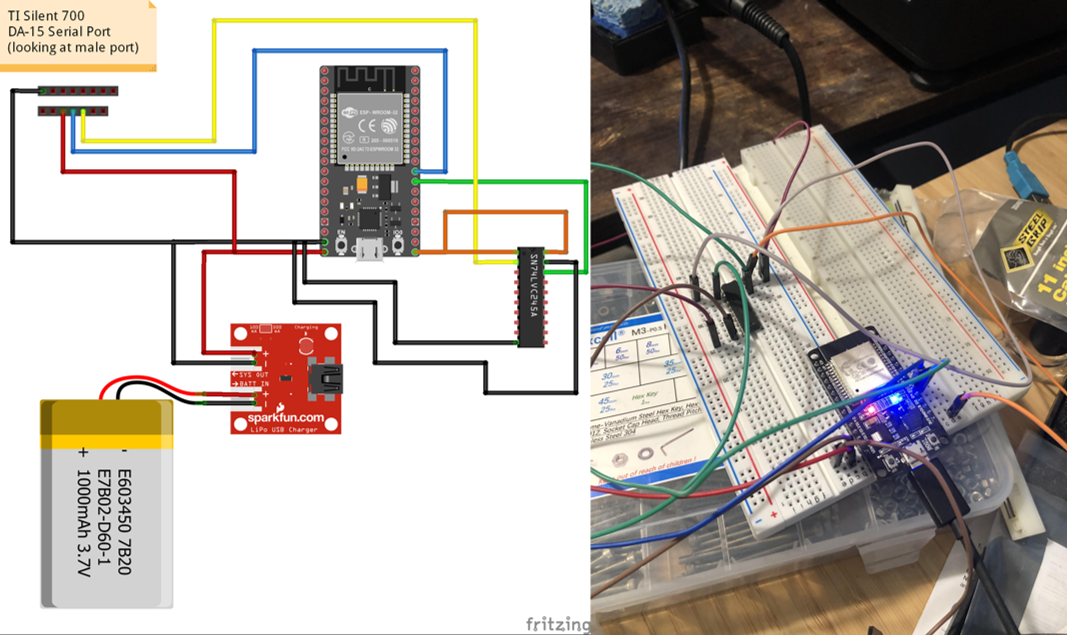
ESP32 modules are available on different development boards without different pinouts. I used this ESP-WROOM-32 development board, which seems to have the most common pinout.
You can see in the Fritzing schematic how everything is connected, but I'll cover it all here in detail.
Connections to the ESP32's pins:
- GND > ground for everything
- VIN > 5V from battery, 5V to Pin 11 on the TI Silent 700
- 3V3 > to level shifter
- RX2 > to level shifter output from TI Silent 700's Pin 13 TX output
- TX2 > to Pin 12 on TI Silent 700
Connections to the SN74LVC245A's pins:
- Pin 1 (DIR) > 3.3V from ESP32
- Pin 20 (Vcc) > 3.3V from ESP32
- Pin 2 (A1) > TX from Silent 700
- Pin 10 (GND) > Ground
- Pin 19 (OE) > Ground
- Pin 18 (B1) > TX output to ESP32
Connections to the DA-15 connector:
- Pin 1 > Ground
- Pin 11 > 5V
- Pin 12 > RX
- Pin 13 > TX
The battery charging/power distribution module will depend on your particular model, but it should be pretty simple. Connect the battery's + and - leads to the module's + and - pads. Then the output + pad goes to the ESP32's VIN pin (through a power switch) and the - pad goes to the ESP32's GND pin.
Step 4: ESP32 Code
The code for the ESP32 (which I wrote in MicroPython) needs to do a few things:
- Connect to WiFi
- Listen for incoming data
- Understand when the user finishes their query
- Format the query
- Send the query to the Wolfram Alpha API
- Receive answer from Wolfram Alpha
- Send the answer data to the TI Silent 700 for printing
- Wait for a new query
I'll explain how I went about accomplishing each step below. I've also fully commented the code, which is attached here.
Connect to WiFi
Connecting to WiFi is easy—that's the whole purpose of the ESP32 and MicroPython makes it simple.
The easiest way is to hardcode your WiFi credentials, but I didn't go that route. Initially, I wanted the user to be able to type in their WiFi credentials using the TI Silent 700 and have the ESP32 store them. That would make it easy to connect to new networks. For that reason, I set it up so that the WiFi credentials are stored in a simple text file in flash memory.
No, that isn't at all secure. If you're concerned about WiFi security (which you probably should be), you'll want to go a more secure route. But hardcoding the WiFi credentials in MicroPython isn't secure, either. In fact, there aren't many ways to secure the credentials on an ESP32.
Unfortunately, the TI Silent 700 can only output uppercase and that made it very difficult to allow users to type in their credentials. How do you let them type an SSID or password that contains lowercase letters (or other characters not on the TI Silent 700's keyboard)? There are workarounds, such as letting the user also input a sort of map of cases, but I decided to just nix that feature. So to change network credentials, one has to plug the ESP32 into a computer and alter the text file.
The code simply grabs those credentials and attempts to connect to WiFi for a while. If it isn't able to (or if the file isn't present), then it will print an error message on the TI Silent 700.
Listen for incoming data
The code simply runs a loop where it checks for incoming bytes.
Once it receives a byte, it decodes it (as UTF-8) and then saves it as a string (which should only contain one character). It then adds that string to the query string that contains all of the received characters.
Understand when the user finishes the query
When the user presses the "RETURN" key on the TI Silent 700, it sends a byte for a carriage return. This is what we want to detect to determine when the user has entered their query and wants an answer.
But their is problem: when decoded and converted to a string, the carriage return byte doesn't look like anything. It isn't a character we can scan for.
The solution was to look at every byte that comes in and check to see if it matches a carriage return byte. It does that before converting the new byte to a character and adding it to the query string.
If the incoming byte is a carriage return, it breaks the loop and passes the query string on. If it isn't a carriage return, it simply adds the new character to the query string as normal.
Format the query
The Wolfram Alpha Short Answers API (which returns simple answers perfect for this project) requires a URL request formatted like this:
http://api.wolframalpha.com/v1/result?appid=DEMO&i=How+far+is+Los+Angeles+from+New+York%3f
But the query as input by the user might look something like:
What is today's date?
The spaces, apostrophe, and question mark won't work in this format.
So the code processes the query string to remove all the spaces and special characters, then adds it to the URL for the request.
Send the query to Wolfram Alpha
MicroPython makes this easy. All we have to do is send a GET Request to the URL.
Receive answer from Wolfram Alpha
This is also easy. When we send the GET Request, the return will be the short answer.
Send the answer data to the TI Silent 700 for printing
All we have to do to print something on the TI Silent 700 is send it some data. But we want to do that one character at a time. So we cycle through a loop for each character in the answer string, writing that character to the UART (serial) port.
But there is one complication: the TI Silent 700 is bad at understanding when it can't print any additional characters on a line. So the loop also checks if it has printed more than 75 characters (index 74). If it has, then it will send both an two newlines ("\n" to advance to the next line) and a carriage return ("\r" to move back to the beginning of the line).
The reason it sends two newlines instead of just one is practical. My particular machine doesn't seem to feed paper quite as well as it should, so this compensates for that. It may not be necessary for other machines.
Wait for a new query
After printing the answer, the code just moves back to the loop where it waits for incoming bytes. This lets users continue to ask questions without ever having to reset anything. As long as there is still paper on the roll, it will continue answering questions as long as it as power and WiFi is working.
Step 5: Using Wolfram Alpha's API
Wolfram Alpha is really cool—I'm a huge fan.
If you aren't familiar, Wolfram Alpha is a bit like a search engine mixed with a math processor, with a dash of virtual assistant (like Siri or Alexa) thrown in. It can handle things like mathematical formulas, but it also does natural language processing (NLP) and can answer a huge range of questions. If Siri or Alexa can answer it, there is a good chance that Wolfram Alpha can, too.
The best part is that Wolfram Alpha has an API (Application Programming Interface) that is easy to use and free for things like hobby projects.
There are different API calls one can make, but we're interested in the "Short Answers API" that returns just a sentence or two in plain text. That is exactly what we want for this project.
Instructions on using it are here:
https://products.wolframalpha.com/short-answers-api/documentation
Basically you just need to sign up for a free account, create an API application, and then plug your APP ID into the MicroPython code I provided.
Step 6: Setup WiFi
All you need to do to get the ESP32 connected to WiFi using my MicroPython code is create a text file in its flash memory called "creds.txt" and then enter your SSID and password as a single line with a comma between, like this:
Your_Network_SSID,Your_Password
Nothing else should be in the file and it shouldn't have any spaces.
If you don't know what I mean by putting the file in flash memory or haven't yet installed MicroPython on your ESP32, this site has some good instructions:
https://randomnerdtutorials.com/getting-started-micropython-esp32-esp8266/
Step 7: Assembly
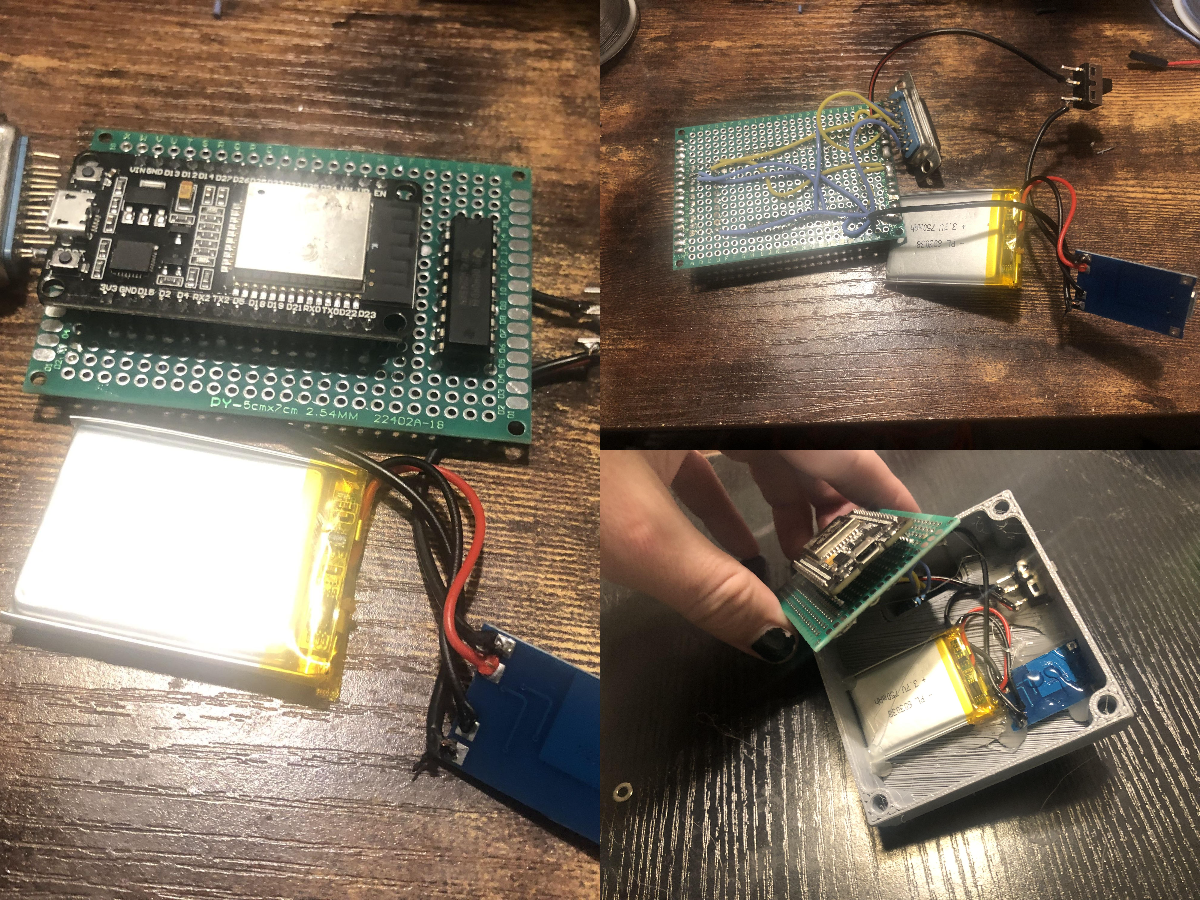
I've designed Termi as a self-contained module that plugs into the TI Silent 700's serial port.
I will probably redesign this in the near future to utilize a custom PCB and a nicer enclosure, which will make it look much nicer and far more compact. But for now it's all on a stripboard.
The stripboard I used is 70x50mm, which is important for making it fit in the 3D-printed case.
For the wiring, you'll want to reference the schematic and connections back in Step 3.
I got a little sloppy with the CAD work, since I'm planning on redoing it after designing a real PCB. So hot glue is holding all of the components in place inside the case.
The lid fastens to the main case using M3 screws in heat-set inserts.
Step 8: Using Termi2
To use it, you just plug it in, turn on the TI Silent 700, and then turn on the module. Make sure the TI Silent 700 is set to online, half-duplex, and not low-speed.
After a few seconds for the WiFi to connected, the TI Silent 700 should print out:
ASK TERMI2:
You can then type in whatever question you want, with or without a question mark, and then press the return key.
After a few seconds for Wolfram Alpha to process the request and send the answer back, the TI Silent 700 will print the results and then prompt you to ask another question.
That's it! Siri like it's 1976 ..again.
This is a project I'm very proud of. It's awesome to make an old, obsolete piece of technology that would normally end up as e-waste into something useful and fun. Everyone who sees it loves it, because there is something fun about vintage hardware printing internet knowledge onto paper.
 Attachments:


