Using the Wolfram Cloud in conjunction with an embedded Linux device allows one to create neat IoT applications. Here, by using a Beaglebone Black (BBB) and its plethora of IO ports, it was possible to control an RGB LED connected using the cloud.
Although I'm using a Beaglebone Black for this project to show that it is possible to use Wolfram Language on other ARM devices, this can most likely be done in a similar manner on a Raspberry Pi.
Parts Used
- 1 x Common Cathode RGB LED
- 3 x 220 ? Resistors
- 4 x Jumper Wires
- 1 x Beaglebone Black (of course!)
The BBB is running Debian Jessie off of a MicroSD card. Since running the Mathematica front-end is a little resource heavy on the BBB, I would not suggest developing the functions in a notebook, but to create an .m file instead that contains all the functions and just Get the .m file in the notebook. For faster development, I recommend using ssh to connect to the BBB and editing the file using a terminal editor.
In order for these instructions to work, you will need to run CloudConnect[] in a notebook and log in to your cloud account on your BBB.
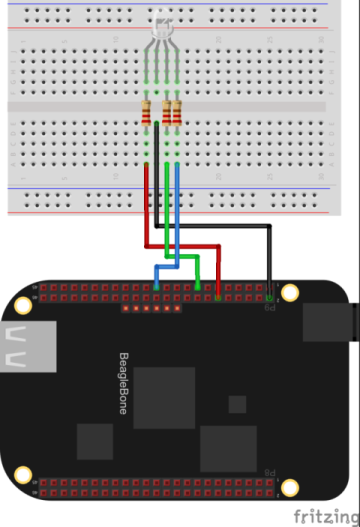
In order to be able to use our GPIO pins on the Beaglebone Black, we have to set them up. Here, I have connected the red pin to P9_12, green to P9_15, blue to P9_23, and of course, DGND (reminder: this is common cathode!). If you're wondering what all that means, refer to this where P9_12 is referring to pin 12 on the P9 header.
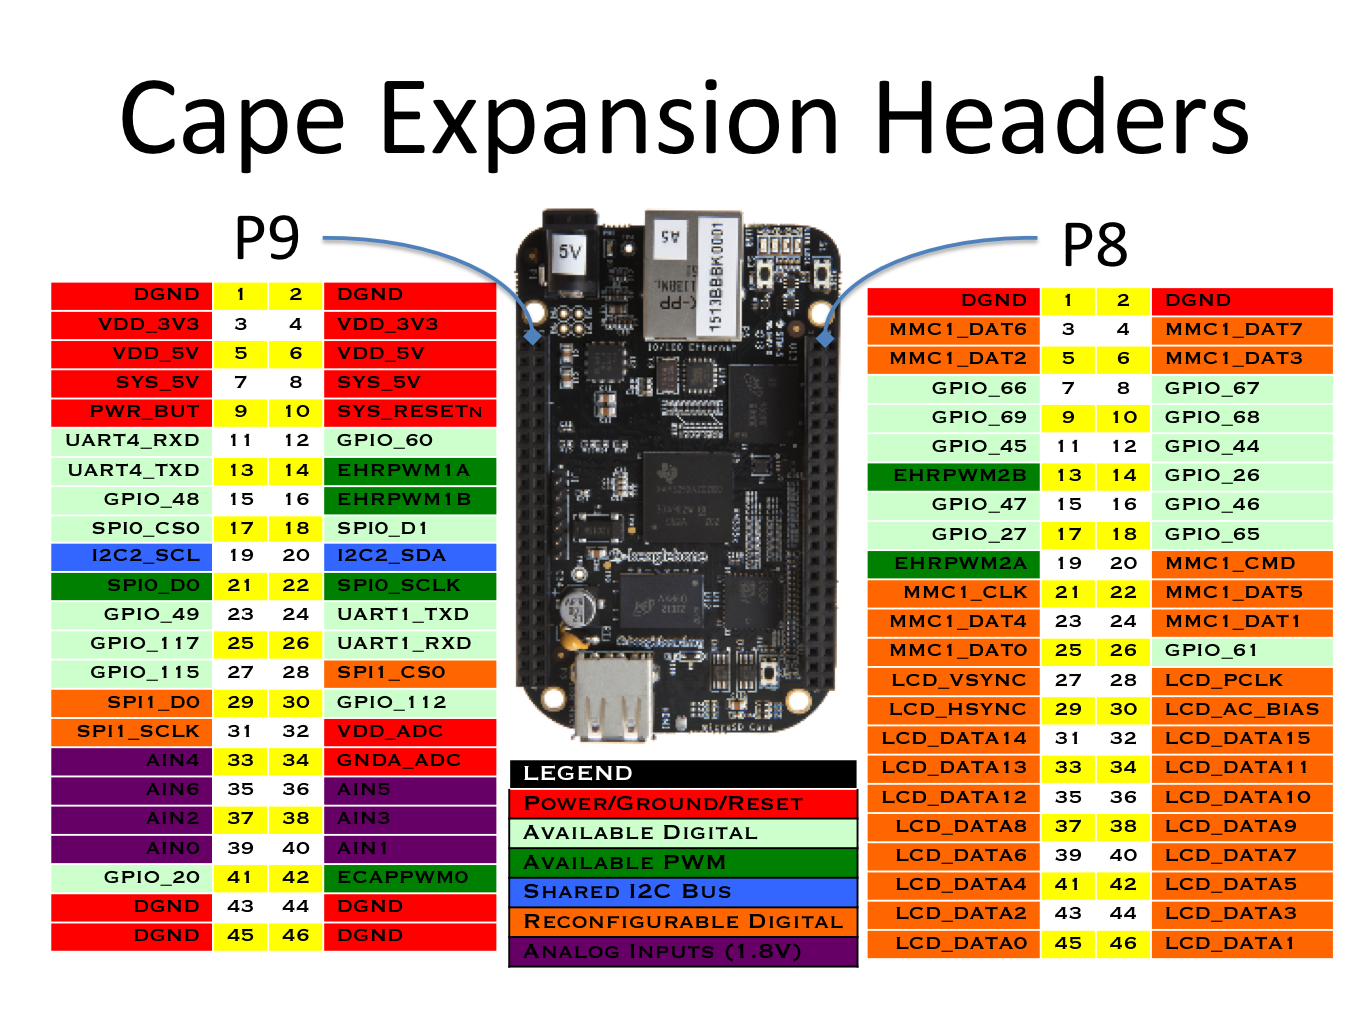
Looking at the image, P9_12 appears to be referring to GPIO_60, P9_15 to GPIO_48 and P9_23 refers to GPIO_49. So, if you're using the same connections for your RGB LED as I am, you can go ahead and run the following code in the command line on the BBB as root:
echo 60 > /sys/class/gpio/export
echo 49 > /sys/class/gpio/export
echo 48 > /sys/class/gpio/export
For each pin, there is a file that is within the /sys/class/gpio/gpio* folder that sets the direction and another that sets the value. The following functions constructs the path to those files for a given pin and type (value or direction).
file[pin_Integer, type_String]:= "/sys/class/gpio/gpio" <> ToString[pin] <> "/" <> type

outputDigitalString[pin_Integer, type_String] := "echo " <> type <> " > " <> file[pin, "direction"]
outputDigitalString[pin_Integer, bool_?BooleanQ] := "echo " <> ToString[Boole[bool]] <> " > " <> file[pin, "value"]
The outputDigitalString function constructs a string command that specifies the direction and the value of each pin depending on whether the second argument is a string or boolean respectively. Since the digital pins direction has to be set first before outputting the value, the following function uses both strings constructed to set the direction and the value.
outputDigital[pin_Integer, bool_?BooleanQ] := (Run[outputDigitalString[pin, "out"]]; Run[outputDigitalString[pin, bool]];)
Finally, the following function is just a helper function to deal with the case when we provide the function with pin1 instead of 1 to address the pins.
outputDigital[s_String, rest___] := outputDigital[ToExpression@StringReplace[s, "pin" -> ""], rest]
Next, we begin the functions that will allow us to communicate through the Wolfram Cloud.
f[rules_] := CloudPut[rules, "ColorForm", Permissions -> "Public"]
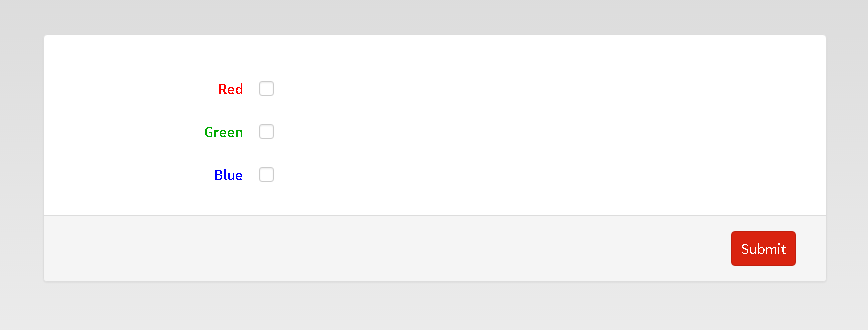
form = FormFunction[{{"pin60", "Red"} -> "Boolean", {"pin48", "Green"} -> "Boolean", {"pin49", "Blue"} -> "Boolean"}, f, HTML];
This makes a FormFunction that will have three checkboxes for each of the three colors. After submitting, the output will be CloudPut to a URI "ColorForm". Changing the permissions can be omitted if you would not like to share the link.
Now, we will head over to our notebook (Reminder: you must have Mathematica opened as root in order for this to work!):
Get["/home/debian/CloudFunctions.m"]
Where you can change the /home/debian/CloudFunction.m to point to the .m file that you created. Next:
CloudDeploy[form, Permissions -> "Public"]
Again, it is not necessary to change the Permissions here if you're not planning on sharing the link. Run the code, and open the link that is given to you. From there, you can optionally choose a color(s) and submit. You will be redirected and a link will be given to you, which should have "ColorForm" at the end of the URL. Copy this URL and paste it into your .m file as $formURL. Then, go back to your notebook and run the following:
oldInput = {};
While[True,
 userInput = Normal[CloudGet[CloudObject[$formURL]]];
 If[oldInput =!= userInput,
  Replace[userInput,
   HoldPattern[tag_ -> value_] :> outputDigital[tag, value], 1]];
 oldInput = userInput
 ]
The reason for the creation of the oldInput variable is to make sure that the form has been changed, otherwise the LED will flicker as the BBB attempts to change the color.
There you have it! Now you can run the While loop and submit your colors through the form and watch them change almost immediately.
If you would like to do a similar project with more color flexibility, take a look at this.
This is my first post here and I would appreciate any feedback or suggestions!


