The Orton Effect is a growing trend in landscape photography that essentially adds a soft glow effect to the image, typically by blending two (could be more) layers of the same scene. While the original Orton Effect by Michael Orton is pretty artistic, the modern-day twist on it simplifies it by creating a "faux" effect by playing with one of the layers. One could just use a single image to produce the effect. These types of images are now becoming common in social networks and even photography competitions.
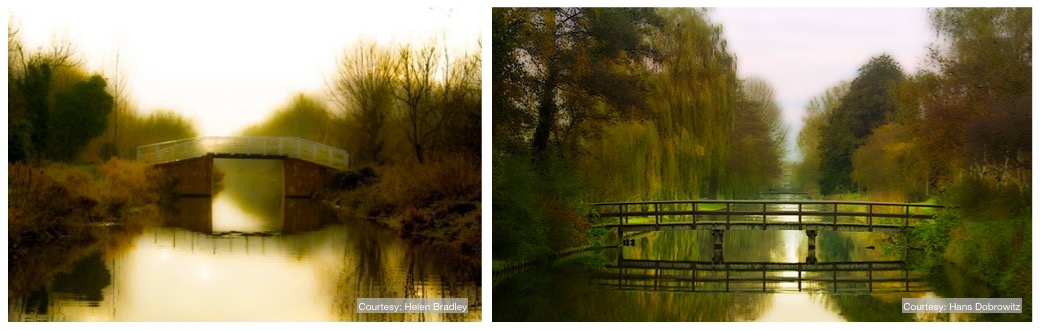
Unfortunately it is sometimes being overused, almost like those heavily post-processed Instagram photos. And from a personal point-of-view, it shouldn't be used for all landscape photos. But that won't be the point of this post.
Creating this basic effect in the Wolfram Language is pretty straightforward. We will essentially look at:
- Using built-in image processing functions, such as ImageAdjust[] and SetAlphaChannel[]
- Blending the processed layer with the original
- Binding everything under a Manipulate[] so that you can dynamically adjust the levels increase or decrease the "dreamy" effect and compare the image with the original. In the end, we will produce:
Modifying the blending layer
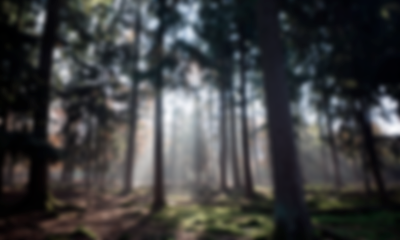
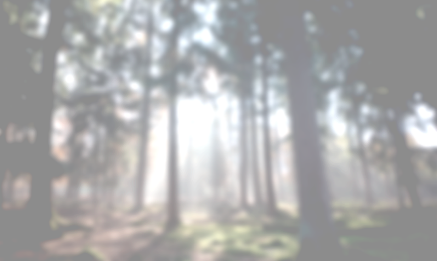
First, blur the image with a particular radius. I am using 10 for this 800x480 px image. It depends on your image dimensions and the scene.
GaussianFilter["--image--",10]
Next, adjust the brightness and contrast of the image. You probably would not need huge values.
ImageAdjust[
 GaussianFilter["--image--", 10], {.25, .26}
]
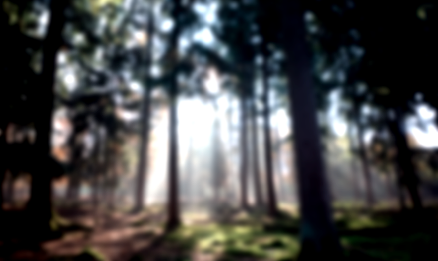
Before combining it with the original image, the processed image needs to be semi-transparent.
SetAlphaChannel[
 ImageAdjust[GaussianFilter["--image--", 10], {.25, .26}],
.45]
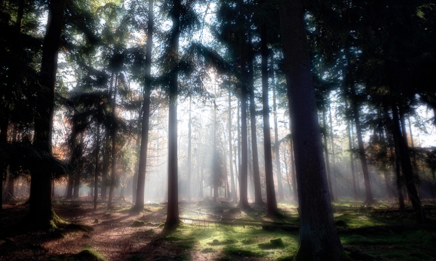
Combine the layers
The processed image is placed on top of the original image using ImageCompose[].
ImageCompose["--original image--",
 SetAlphaChannel[ImageAdjust[GaussianFilter["--image--", 10], {.25, .26}], .45]
]
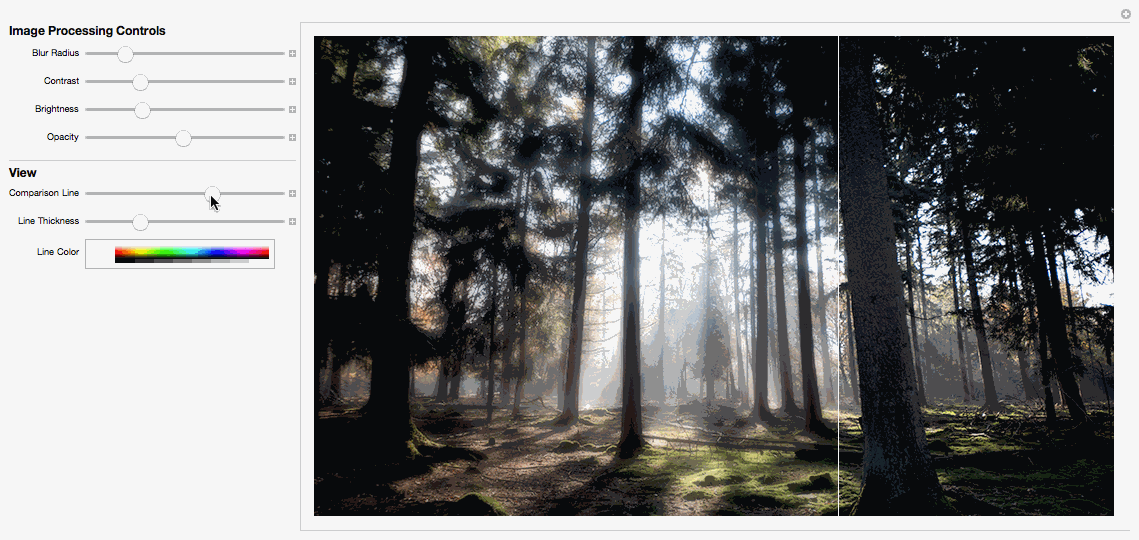
Building the Manipulate
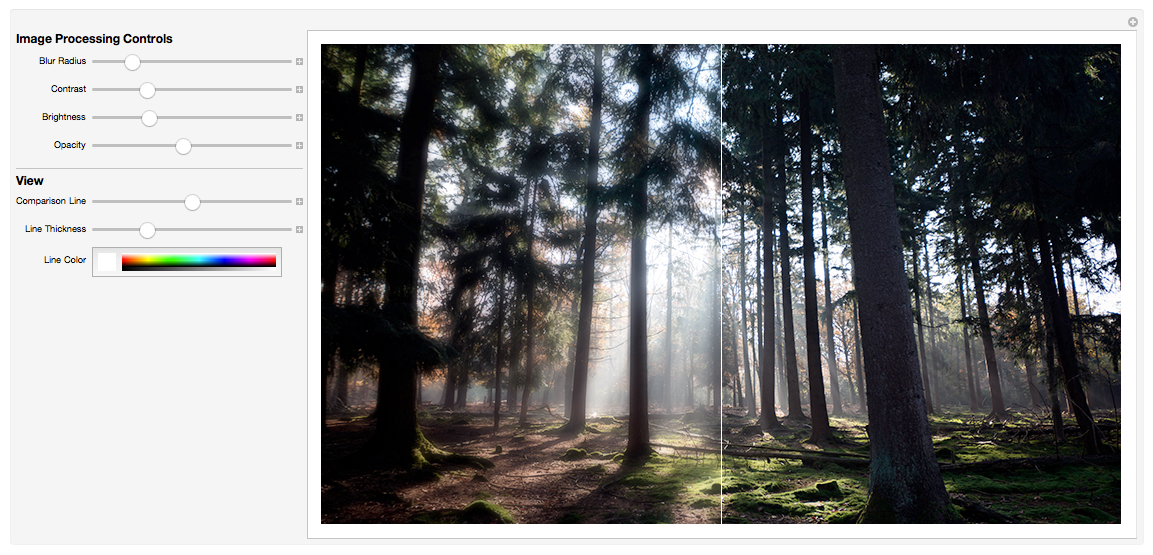
The result above is good and dandy, but if you wanted to optimize your image processing workflow, using a function like Manipulate[] will help you quickly change values with sliders and see the effect immediately. Below is what the code looks like. Breakdown of the code is explained below the code.
image1 = "--image--";
image2 = image1;

width = ImageDimensions[image1][[1]];
height = ImageDimensions[image1][[2]];

Manipulate[
 ImageCompose[image1,
  ImagePad[
   ImageTake[
    ImageCompose[image2, SetAlphaChannel[
      ImageAdjust[
       GaussianFilter[image2, gaussian2],
       {contrast, brightness}], alpha]],
    {1, height}, {1, width - div}],
   {{0, divthickness}, {0, 0}}, divcolor],
  {0, height}, {0, height}],
 Style["Image Processing Controls", Bold, Medium],
 {{gaussian2, 10, "Blur Radius"}, 0, 60},
 {{contrast, 0.25, "Contrast"}, 0, 1},
 {{brightness, 0.26, "Brightness"}, 0, 1},
 {{alpha, 0.45, "Opacity"}, 0, 1},
 Delimiter,
 Style["View", Bold, Medium],
 {{div, width/2, "Comparison Line"}, width, 1},
 {{divthickness, 1, "Line Thickness"}, 0, 4, 1},
 {{divcolor, White, "Line Color"}, ColorSlider},
 ControlPlacement -> Left
 ]
image1 is the original image. Since the Wolfram Language will take care of the post-processing (blurring, brightening, etc.), image2 is the same as image1.
ImageDimensions[] is needed to extract the size of the image. The width and height will needed to apply the vertical comparison line and align the original image and the processed image to the left.
The inner part of Manipulate[] will look familiar. The values have been replaced with variables that can be modified by sliders in the interface. gaussian2 represents the blur level in the GaussianFilter[] function. Then we apply the ImageAdjust[] function to it, which is followed by SetAlphaChannel[] that will set the opacity level (controls how it will blend with the original image during ImageCompose[]).
Next, we need to crop the image so that in the Manipulate interface, you will see the processed image on the left (which is the cropped image) and the original image on the right for comparison. This is done by using ImageTake[]. For cropping, we want the entire height, so it ranges from 1 to the height of the image. For the width, we want it to be varied, so we have it range from 1 to the width of the image minus some value.
ImagePad[] is optional. It places a thin, colored padding to the right of the cropped image, so you can see the comparison line.
ImageCompose[] is used again to have the original image as the background and the cropped, processed image will be on top of it.
The second half the Manipulate organizes the controls and the labels. The ranges are set according to the limits accepted by the function, the image's size, and values that are sensible (e.g. 60 for blur).
Once you evaluate, you should be able to fiddle around with the controls to adjust any image and give it a faux Orton effect.
Forest photo courtesy of Michel Bosma.
 Attachments:


