Couple of days ago, in Wolfram's Wechat group there was a pleasant discussion about Tim's neat post Ray-tracing Graphics3D with UnityLink. I then promised a walkthrough on how to work with LuxCoreRender. I think it would be nice to share my experience not only in the Wechat group but also here to the Community.
LuxCoreRender is a cross-platform render engine published under GPLv3 license. It provides nice features and both Python and C++ APIs. According to the official site, it's a physically correct, unbiased rendering engine. Usually LuxCoreRender can be accessed as a plugin in many popular 3D tools such as Blender, but in this post I'll talk about the way more suitable for scripting from Mathematica's side.
First of all, let's set our working directory.
SetDirectory[NotebookDirectory[]];
Import and Export LuxCoreRender SDL files
Readers can safely skip this section. We'll just dump our import and export functions for the LuxCoreRender SDL files here. Please use them with caution. Though I have tested them with some examples, edge cases can bite.
ClearAll[branch]
branch = Through@*{##} & ;
ClearAll[luxcoreReaderInternalStep, luxcoreReader]

luxcoreReaderInternalStep[e : {__List}] := e // RightComposition[
     Map[If[Length[#] == 1, #[[1]], #] &],
     GroupBy[ListQ],
     If[KeyExistsQ[#, True], # // MapAt[GroupBy[First -> Rest] /* Map[luxcoreReaderInternalStep], Key[True]], #] &,
     If[KeyExistsQ[#, False], # // MapAt[Apply[Sequence], Key[False]], #] &,
     Values,
     Switch[#,
            {_Association}, #[[1]],
            _, #
            ] &
     ]

luxcoreReader =
 Module[{numReader = ImportString[#, "Table"][[1, 1]] &},
        RightComposition[
              StringReplace[(StartOfLine ~~ {Whitespace, "#" ~~ Except["\n"] ...} ... ~~ "\n") .. :> ""],
              StringTrim,
              StringSplitNested[#, {"\n", Whitespace ~~ "=" ~~ Whitespace}] &,
              MapAt[StringTrim, {;; , ;;}],
              MapAt[StringSplit[#, "."] &, {;; , 1}],
              Map[Flatten],
              luxcoreReaderInternalStep,
              Map[Last, #, {-2}] &,
              Map[
                  Switch[#,
                         _?(StringMatchQ["\"" ~~ ___ ~~ "\""])                    , StringTake[#, {2, -2}],
                         _?(Not@*StringFreeQ[Whitespace])                         , StringSplit[#, Whitespace] // Map[#0],
                         _?(StringMatchQ[{DigitCharacter, ".", "+", "-", "e"} ..]), numReader@#,
                         _, #
                         ] &
                  , #, {-1}] &
              ]
       ];
ClearAll[luxcoreWriter]

luxcoreWriter =
 Module[{
         keychainCombiner = Cases[Key[key_] :> key] /* (Riffle[#, "."] &),
         stringifier = ExportString[#, "RawJSON", "Compact" -> 0] &
        },
        RightComposition[
               MapIndexed[Sow[{##}] &, #, {-1}] &, Reap, #[[2, 1]] &
               , {#, Range[Length@#]}\[Transpose] &
               , GroupBy[IntegerQ[#[[1, 2, -1]]] &]
               ,(* atomic values: *)
               MapAt[
                     MapAt[Apply[{#1 // stringifier, #2 // keychainCombiner} & /* Apply[StringJoin[#2, " = ", #1] &]], {;; , 1}]
                     , Key[False]]
               ,(* numerical arrays: *)
               If[# // KeyExistsQ[True]
                  , # // MapAt[
                    RightComposition[
                           MapAt[Apply[{#2 // Most, {Last[#2], #1}} &], {;; , 1}]
                           , GroupBy[(#[[1, 1]] &) -> ({#[[1, 2]], #[[2]]} &)]
                           , Map@branch[
                                  (#[[;; , 1, 2]] &) /* stringifier /* (StringReplace[{"," -> " ", "[" | "]" :> ""}])
                                  , #[[1, 2]] &
                                  ]
                           , KeyMap[keychainCombiner]
                           , KeyValueMap[{StringJoin[#1, " = ", #2[[1]]], #2[[2]]} &]
                           ]
                    , Key[True]]
                  , #] &
               , Values, Apply@Join, SortBy[Last], #[[;; , 1]] &
               , Riffle[#, "\n"] &, StringJoin
               ]
        ];
Anchor the world
Before any rendering happens, a scene is necessary. The center of our scene is going to be the origin of our "world" coordinate system.
stageCenter = {0, 0, 0};
Lighting
Spotlight
On a stage, the most indispensable thing is lighting. Among all the lights, nothing attracts more attention than a spotlight. To project a spotlight onto the stage, we need to determine its position, aiming target, color, size, etc. (Reference: "Spot" in documentation of Lighting )
spotLightPos = {4.5, 0, 6};

Clear[spotLight]
spotLight := <|"type" -> "spot"
               , "position" -> spotLightPos, "target" -> stageCenter
               , "color" -> RGBColor[1, 1, 1], "power" -> 100, "efficency" -> 17,
               "gain" -> {1, 1, 1}
               , "coneangle" -> 14 \[Degree] (* <- half angle of the cone *)
               , "conedeltaangle" -> 1 \[Degree]
               |> //
      Function[cfg
               , cfg //
                RightComposition @@
                 MapThread[
                     If[KeyExistsQ[cfg, #2], MapAt[##], Identity] &
                        , {
                             {"color"         , List @@ ColorConvert[#, "RGB"] &}
                           , {"transformation", TransformationMatrix /* Transpose /* Flatten}
                           , {"coneangle"     , N[#]/Degree &}
                           , {"conedeltaangle", N[#]/Degree &}
                          }\[Transpose] // Reverse]
               ]
For more detail about lighting in LuxCoreRender, please refer to the official wiki and document page.
Camera
Rendering is like taking a photo, you carefully set up your camera, adjust the aperture and focal distance, and look for the the best angle of view.
We set up a camera aiming at the stage from an angle somewhat perpendicular to the light and focusing on the center. With this setting, we hope to capture a rich shades of light and shadow.
Perspective Camera
cameraPos        = {7., -7., 5.};
cameraTarget     = stageCenter + {-.2, 0, -.3};
cameraAimingAxis = cameraTarget - cameraPos;
cameraFocus      = stageCenter;
cameraUpVecF[ $\theta$,cameraAimingAxis] will be used to adjust the orientation of our film. Setting $\theta$ to $0^\circ$ and $90^\circ$ correspond to landscape and portrait.
Clear[cameraUpVecF]
cameraUpVecF = Function[{\[Theta], aimingAxis}, aimingAxis //
    RightComposition[
          RotationTransform[90 \[Degree], {aimingAxis, {0, 0, 1}}]
          , RotationTransform[\[Theta], aimingAxis]
          , Developer`FromPackedArray (* <- Currently our luxcoreWriter cannot handle PackedArray correctly *)
          ]];
Clear[camera]
camera := <|
     "type"          -> "perspective"
     (* (* use the default clipping *)
        ,"cliphither" -> 0           (* <- Working like minimum distance in M's ViewRange *)
        ,"clipyon"    -> \[Infinity] (* <- Working like maximum distance in M's ViewRange *)
     *)
   , "lookat"        -> <|"orig" -> cameraPos, "target" -> cameraTarget|>
   , "up"            -> cameraUpVecF[0 \[Degree], cameraAimingAxis]
   , "fieldofview"   -> 25 \[Degree]  (* <- Working like M's ViewAngle *)
   , "lensradius"    -> 0.1           (* <- Set a positive value to enable blurring by depth-of-field, 0 to disable it. *)
   , "focaldistance" -> Norm[cameraFocus - cameraPos]
   |> // Function[cfg
   , cfg // RightComposition @@
     MapThread[If[KeyExistsQ[cfg, #2], MapAt[##], Identity] &, {
         (* clip-range must be positive real number in luxcore renderer: *)
           {"cliphither"  , Clip[#, {.001, 1. 10^30}] &}
         , {"clipyon"     , Clip[#, {.001, 1. 10^30}] &}
         , {"fieldofview" , N[#]/Degree &}
         }\[Transpose] // Reverse]
   ]
For more detail about camera, please refer to the official wiki and document page.
Object
In LuxCoreRender, solid objects can be represented by meshes and materials. The easiest way to introduce mesh is through the PLY format. It's well-supported both in LuxCoreRender and in Mathematica.
Stage plane
We have been talking a lot about stage, but we haven't really got a stage yet. We are goint to forge a minimalist one with a square plane.
stage     = Polygon[Append[0] /@ CirclePoints[{5, \[Pi]/4}, 4]] // TranslationTransform[{0, 0, -1.7}];
stageMesh = stage // DiscretizeRegion // Export["stage_plane.ply", #, "PLY", "BinaryFormat" -> True] &;
We use LuxCoreRender's built-in Lambertian material to style our stage, with a neural gray diffuse color.
stageMaterial = <|"type" -> "matte", "kd" -> {0.5, 0.5, 0.5}|>;
The full configuration is
stageConfig = <|
     "objects"   -> <|"stage_plane" -> <|"ply" -> stageMesh, "material" -> "stage_mat"|>|>
   , "materials" -> <|"stage_mat"   -> stageMaterial                                    |>
   |>;
Main Role
Now everything on the stage is ready except for the star. We are going to put a diamond at the center.
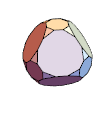
TruncatedPolyhedron is a handy function to cut a gem. With some additional positioning, in two lines we have our diamond mesh ready.
gem = Fold[TruncatedPolyhedron, Octahedron[], ConstantArray[.3, 2]] //
             ScalingTransform[1.3 {1, 1, 1}] //
             RotationTransform[-10 Degree, {0, 0, 1}];
gem // Graphics3D[#, Boxed -> False] &
gemMesh = gem // DiscretizeGraphics // RegionBoundary // Export["gem.ply", #, "PLY", "BinaryFormat" -> True] &;

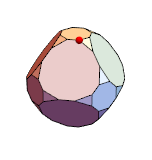
Recall our camera is focusing on stage center, now we would like to adjust it to focus on the top facet of the diamond.
gemBd   = gem   // BoundaryDiscretizeGraphics;
facetID = gemBd // {MeshCellIndex[#, 2], PropertyValue[{#, 2}, MeshCellCentroid]}\[Transpose] & //
                   MaximalBy[#[[2, -1]] &] // #[[1, 1]] &;
Or, more specifically, on one of the facet's corners nearest to our camera. Because we used delayed definition (reference: SetDelayed), our camera will be automatically up-to-date everytime we query it.
cameraFocus = MeshPrimitives[gemBd, facetID][[1]] // MinimalBy[Norm[# - cameraPos] &] // First;
Graphics3D[{gem, {Red, Sphere[cameraFocus, .05]}}
           , ViewVector -> Values[camera["lookat"]]
           , Boxed -> False]

To emulate a real diamond, we need LuxCoreRender's built-in "glass" material with refractive index of diamond.
gemIOR = Entity["Mineral", "Diamond"]@EntityProperty["Mineral", "RefractiveIndices"] // First
(* Out[]= 2.418 *)
For the dispersion, LuxCoreRender uses Cauchy's empirical formula. We'll set it to a very high value. (For details about the formula, please refer to http://scienceworld.wolfram.com/physics/CauchysFormula.html .)
gemDispersion = 0.02;

gemMaterial = <|
     "type"        -> "glass"
   , "kr"          -> {1, 1, 1}     (* <- reflected color *)
   , "kt"          -> {1, 1, 1}     (* <- transmited color *)
   , "interiorior" -> gemIOR        (* <- refractive index *)
   , "cauchyc"     -> gemDispersion (* <- coefficient of \[Lambda]^-2 term in Cauchy's dispersion formula *)
   |>;
The full configuration is
gemConfig = <|
     "objects"   -> <|"gem"     -> <|"ply" -> gemMesh, "material" -> "gem_mat"|>|>
   , "materials" -> <|"gem_mat" -> gemMaterial                                  |>
   |>;
The Whole Scene
Combining all the lights, camera and objects together, we have a full specification of our scene.
sceneConfig = <|"scene" -> Join[
     <|
        "camera" -> camera
      , "lights" -> <|"spot_light_1" -> spotLight|>
      |>
     , Merge[{stageConfig, gemConfig}, Apply@Join]
     ]|>;
We use our exporter luxcoreWriter to format the scene configuration to match LuxCoreRender's scn DSL specification.
sceneFile = sceneConfig // luxcoreWriter // Export["diamond.scn", #, "String"] &
(* Out[]= diamond.scn *)
Render
Our post is already lengthy so I'm not going into details about the render configuration here. Just to point out that our importer/exporter can handle both scene describing file (.scn) and render configuration file (.cfg).
Another thing worth reminding readers not familiar with rendering is the choice of render strategy. As in this case we would like to see nice caustic from the diamond, "BIDIRCPU" engine coupled with "METROPOLIS" sampling is our best choice. We may talk about other methods in the future.
renderConfig = <|
   "scene"          -> <|"file"     -> sceneFile   |>
   , "renderengine" -> <|"type"     -> "BIDIRCPU"  |>
   , "sampler"      -> <|"type"     -> "METROPOLIS"|>
   , "light"        -> <|"maxdepth" -> 20          |>
   , "path"         -> <|"maxdepth" -> 20          |>
   , "batch"        -> <|"haltspp"  -> 2000        |>
   , "film" -> <|
                  "width" -> 1920, "height" -> 1080
                , "filter" -> <|"type" -> "NONE"|>
                , "imagepipelines" -> <| "0" -> <| "0" -> <|"type" -> "TONEMAP_AUTOLINEAR"               |>
                                                 , "1" -> <|"type" -> "GAMMA_CORRECTION", "value" -> 2.5`|>
                                                 |>
                                       , "1" -> <| "0" -> <|"type" -> "INTEL_OIDN"                       |>
                                                 , "1" -> <|"type" -> "TONEMAP_AUTOLINEAR"               |>
                                                 , "2" -> <|"type" -> "GAMMA_CORRECTION", "value" -> 2.5`|>
                                                 |>
                                       |>
                , "outputs" -> <| "0" -> <|"index" -> 0, "type" -> "RGB_IMAGEPIPELINE", "filename" -> "diamond_original.png"|>
                                , "1" -> <|"index" -> 1, "type" -> "RGB_IMAGEPIPELINE", "filename" -> "diamond_denoised.png"|>
                                |>
                |>
   |>;

renderCfgFile = renderConfig // luxcoreWriter // Export["diamond.cfg", #, "String"] &
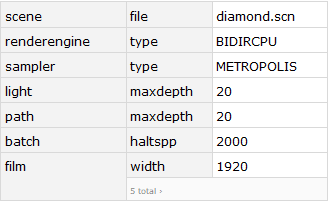
We can import the configuration file and browse it with Dataset as easy.
Import[renderCfgFile, "String"] // StringTrim // luxcoreReader // Dataset

To start rendering, we use the portable LuxCoreRender Standalone release v2.2 from https://luxcorerender.org/download/ . (The one I used is Python 3.7 and Windows 64bit with OpenCL support).
After extracting you'll find two executables pyluxcoretool and luxcoreui. You can either start the renderer from console by executing (from our working directory, which is Directory[])
pyluxcoretool console diamond.cfg
or by loading the .cfg file through Rendering » Load menu in luxcoreui (which has a simple GUI).
To be lazy and stay in Mathematica, on Windows you can invoke the console as following. (Please remember to change the luxbin to your actual path.)
luxbin = "path\\to\\your\\pyluxcoretool.exe";

luxPS = StartProcess[{$SystemShell, "/C",
   StringTemplate[
     "start /I /WAIT cmd /C \"\"`bin`\" console \"`cfg`\"\""][<|
     "bin" -> luxbin,
     "cfg" -> renderCfgFile
     |>]
   }]
When the render process finishes, we shall find the results under our current working directory with filenames according to renderConfig[["film","outputs",;;,"filename"]].
We have set the render halt condition to 2000 samples (renderConfig[["batch","haltspp"]]). For this scene it will take almost 1 hour on a computer with Intel Core i7-8750H CPU. ("BIDIRCPU" engine does most job on CPU.) For quick preview rendering, you can set it to smaller values (e.g. 20). Smaller renderConfig[["film",{"width","height"}]] will also reduce the computing time (with smaller resulting images). Additionally, you can always break the render process anytime (on Windows press Ctrl + C in cmd, or click the Rendering » Pause menu in luxcoreui). The intermediate result will be saved to disk for the console mode, or can be manually saved from Film » Save outputs menu in luxcoreui.
Epilog
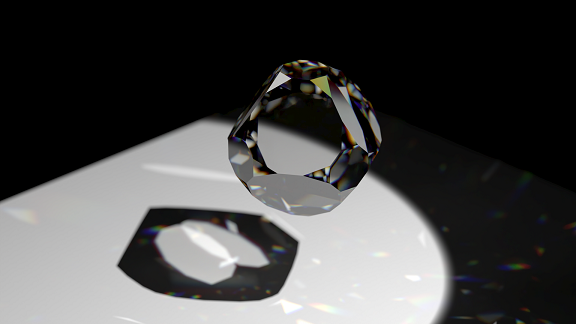
Hopefully you have got a beautiful photo of the diamond like our cover image.
So far we have demonstrated in Mathematica how to setup a simple scene and render it with LuxCoreRender. We have plans to talk about more advanced topics (like HDRI, volume, how to generate smooth mesh, etc.) in the fufuture.
References
Bounus
 Attachments: