
We all know that what you see depends on your viewpoint or, as Mathematica says, the ViewVector. If you look with one eye or a camera at a 3D scene, you see a "3D Perspective Projection" of the scene. So what you see can be modified, fooled or embellished by modifying this projection. This "3D perspective anamorphism" has been widely used in popular art forms. 3D sidewalk- and street art are only some of the examples. Mathematica has some very useful functions to explore the mathematics of 3D perspective anamorphism and to create some examples yourself. In this community contribution, I explore some of the many possibilities and hope to give inspiration to others...
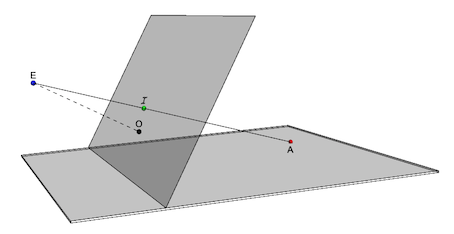
Here is some perspective geometry: Point A in the x-y plane is observed by the eye E as an image point I. The point I is in the view-plane of E. This is the plane perpendicular to the view- line EO and anchored at O. The angle between the view-line and an x-y plane is the view direction [Phi]. The function perspectivePoint computes the perspective point A from the image point I (xi,yi) given the view direction phi. xE and xO are the abscissas of the points E and O.
perspectivePoint[imagePoint : {xi_, yi_}, viewDirection : phi_,
  eyeAbscissa : xE_, anchorAbscissa : xO_] :=
 Quiet[Module[{zE, eye, zO, ptO, imPlane, ptI, ray}, zE = xE Tan[phi];
    zO = xO Tan[phi]; ptO = {xO, 0, zO};
   imPlane = InfinitePlane[ptO, {{0, 1, 0}, {xO, 0, -xO Cot[phi]}}];
   ptI = {xO - yi Sin[phi], xi, zO + yi Cos[phi]}; eye = {xE, 0, zE};
   ray = HalfLine[{eye, ptI}];
   First[{x, y, z} /.
     NSolve[{{x, y, z} \[Element] ray, z == 0}, {x, y, z}]]]]
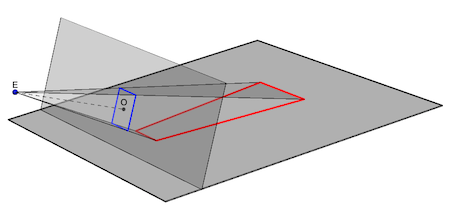
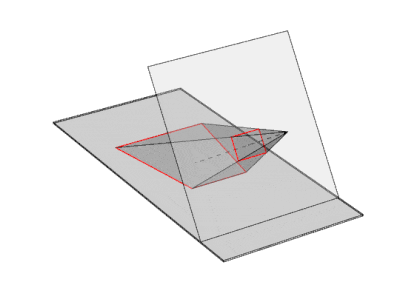
Applying the function perspectivePoint to a unit square (the blue polygon), we see its projection in the x-y plane as the red polygon. Likewise, all image points within the blue polygon will be projected as points within the red polygon. The following GIF shows the transformation of the red polygon into its blue projection as the ViewVector is directing the camera towards the right viewpoint.
To apply the function perspectivePoint to real images, we can use two methods:
Converting the image to graphics primitives using ImageGraphics and map the function perspectivePoint to all the coordinates of the resulting graphics objects .
Using the function perspectivePoint to create a set of corresponding pairs (image-point/perspective-point). We use this point set inside FindGeometricTransform to compute a TransformationFunction. This transformation function can then be used inside ImagePerspectiveTransformation
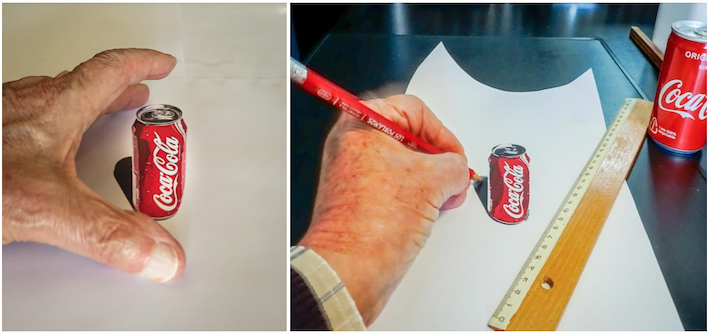
We first start with a coke can and use method 1
Module[{w, h, colaGC, colaGCScaled, colaGCOK},
 {w, h} = ImageDimensions@cola; colaGC = ImageGraphics[cola][[1]];
 colaGCScaled =
  MapAt[# /. {x_?NumericQ,
       y_?NumericQ} :> {y - h/2, x - w/2}/h*1.65 &, colaGC, 1];
 colaGCOK =
  MapAt[Most@perspectivePoint[#, .35, 10, 4] &,
    colaGCScaled, {1, All}] /. {x_?NumericQ, y_, 0} :> {x, y};
 Graphics[colaGCOK]]
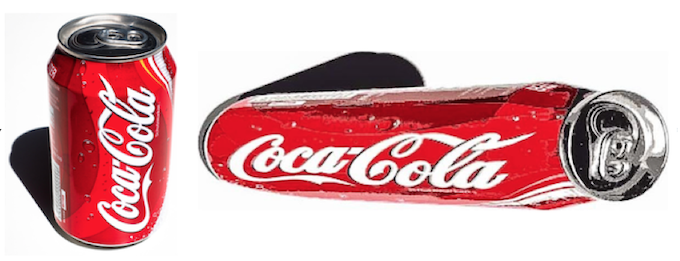
The following GIF shows the effect of changing the camera position with ViewVector toward the right viewpoint:
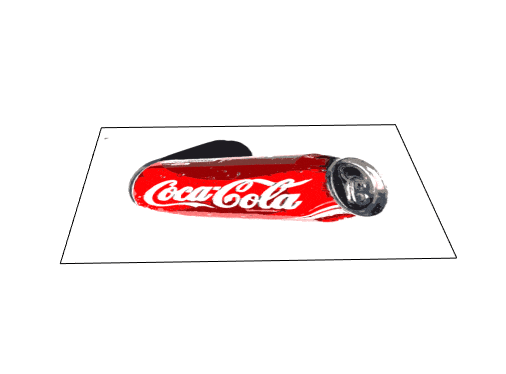
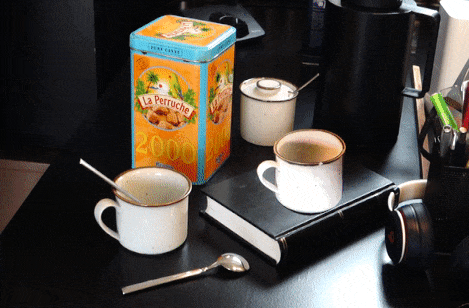
After printing the output on paper, we can create a mixed scene of anamorphic and real objects creating a welcome confusion between the real and the perspective:
To use method 2 with a coffee cup, we first find the necessary transformation function to be inserted into ImagePerspectiveTransformation. We use FindGeometricTransform with a set of points on a circle and their corresponding perspectives .
Block[{xv = -10, zv = 8, imagePoints, perspectivePoints},
  imagePoints = Table[{ Cos[t], Sin[t]}, {t, 6}];
  perspectivePoints = (Most[perspectivePoint[#1, .35, 10, 4]] &) /@
    imagePoints;
  tf = Last[FindGeometricTransform[imagePoints, perspectivePoints]]];
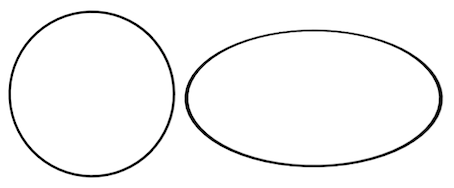
This is the result of our transformation function applied to a circle:
Row[{Image[
    g = Graphics[{AbsoluteThickness[5],
       Line[Table[{2.68 Cos[t], 2.68 Sin[t]}, {t, 0,
          6.3, .1}]]}]] ImagePerspectiveTransformation[g, tf,
    PlotRange -> {{-1, 1}, {-1, 1}}, DataRange -> {{-1, 1}, {-1, 1}},
    Padding -> "Fixed", Masking -> Full]}]
And this is how the transformation function performs on a photo of a coffee cup.
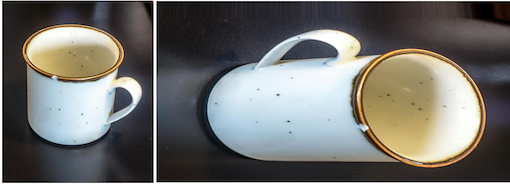
As the following movie shows, an unexpected scene can be created by mixing real world objects with a printout of our anamorphic coffee cup. What you see is not always what you get!
Perspective Anamorphism is when only one viewpoint gives the correct image. An extreme example of this are the "Living Photographs" made in the US by Arthur Mole during the first world war. Using tens of thousands of soldiers positioned in a deformed but well designed layout, he made photographs from the right vantage point on top of a tower. Using our function perspectivePoint, we try to simulate the setup of his "Human Statue of Liberty" photograph from 1918.
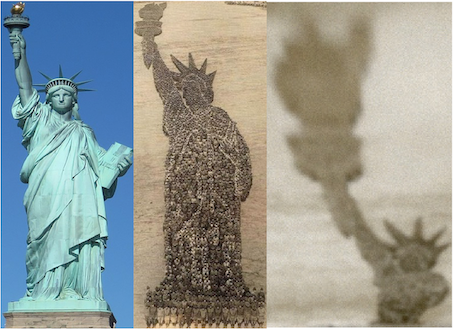
The right picture shows the view from above and shows the positions of the 18,000 (!) soldiers. The middle picture is the photo of the same soldiers made by a camera on top of a 25 meter high tower. According to the website "Human Statue of Liberty" by David Mikkelson, those were the number of soldiers in each part of the scene:
Number of men in the flame of torch: 12,000
Number of men in the torch: 2,800
Number of men in the right arm: 1,200
Number of men in the body, head and balance of the figure only: 2,000
I used the following Manipulate to get an idea of the surface area distribution within the anamorphic image and this way, approximate the settings for the function perspectivePoint. Starting from the 16 equal squares (left) we see 16 polygons (right) with a surface area distribution close to that of the number of soldiers in the original 1918 layout.
Module[{verticesI, verticesQ, areasQ},
 verticesI =
  Table[{{-1 + i, -1 + j}, {-.5 + i, -1 + j}, {-.5 + i, -.5 +
      j}, {-1 + i, -.5 + j}}, {i, 0, 1.5, .5}, {j, 0, 1.5, .5}];
 verticesQ =
  Map[Most[perspectivePoint[#1, 0.35, 10, 4]] &, verticesI, {3}];
 areasQ = First[Map[Area[Polygon[#1]] &, verticesQ, {2}]];
 Column[{areasQ/First[areasQ],
   GraphicsRow[{Graphics[{{FaceForm[], EdgeForm[Black],
        Polygon /@ (.75 verticesI)}}],
     Graphics[{{FaceForm[], EdgeForm[Black],
        Map[Polygon, verticesQ, {2}]}}]}]}]]

Together with other dimensions gathered from the internet, we could make a close estimate for the settings of our perspectivePoint function.
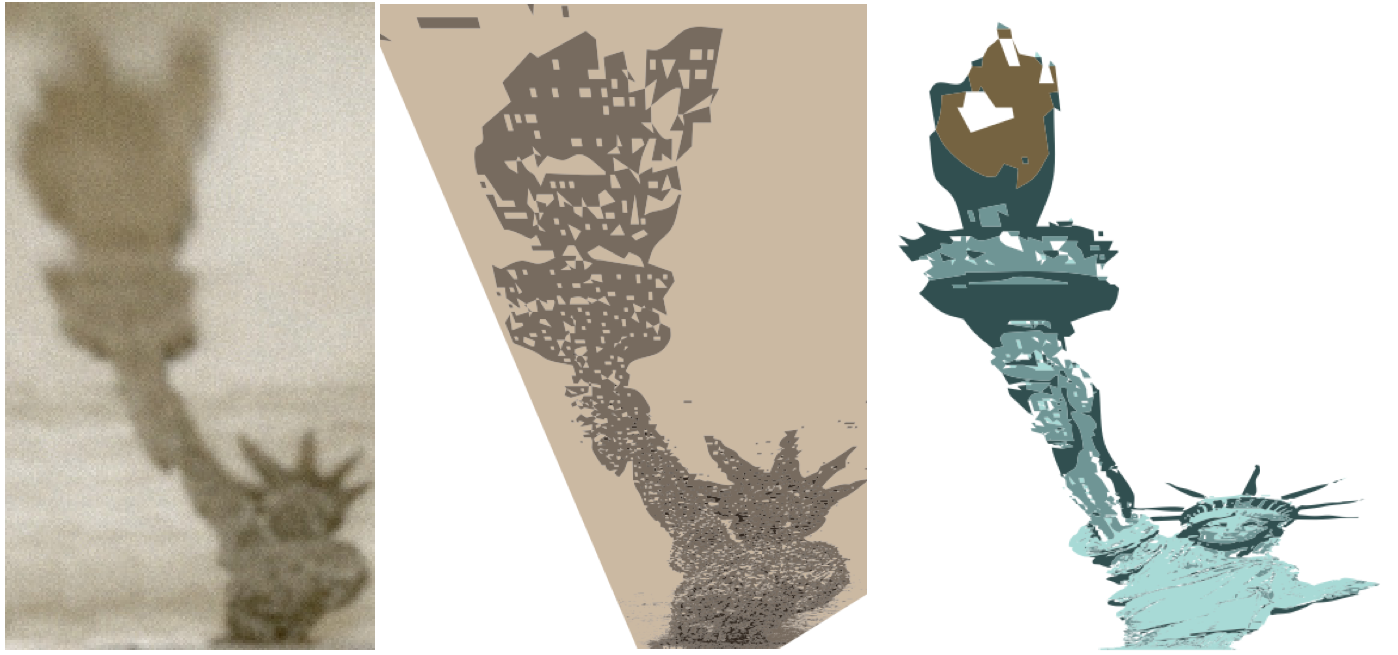
Above is the result of this "investigation": To the left is the historic aerial view of the 18,000 servicemen, in the middle is the perspective transformation by our function perspectivePoint using the original postcard by Arthur Mole, and to the right is the same transformation using a modern photograph of the statue of liberty. The human statue of liberty, understandingly, did not have exactly the same proportions as the real Lady Liberty. I hope these experiments entice community members to explore the astonishing world of anamorphic and perspective art. Have fun!


