
After my previous previous community contribution, I looked deeper into this type of illusion by further analysing existing illusions and creating exciting new ones.
1. Video as a spatio-temporal object
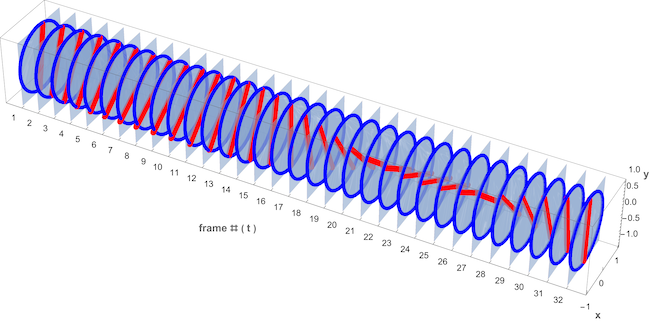
A video can be represented as an x-y-t space. The frames are periodic cross sections perpendicular to the t-axis. They show motion over time. To detect motion in the x- or y-direction, one needs cross sections perpendicular to the x- or y-axis. This is simple video containing 32 frames of 120 by 120 pixels with a static (blue circle) and moving (red propeller) part:
aV = AnimationVideo[
   Graphics[{AbsoluteThickness[10], Red,
     Rotate[Line[{{0, -.99}, {0, .99}}], -\[Phi]], Blue, Circle[]},
    Background -> LightGray, PlotRange -> 1.2], {\[Phi], 0,
    6.28, \[Pi]/16}, RasterSize -> 120];
Here is the same video represented as an x-y-t space. The 32 Cross sections perpendicular to the t-axis are the video frames.
The frames are 120 by 120 pixels and the above video can also be defined by its 120 cross sections perpendicular to the x- or y-axis. Here is a function ytSectionFromVideo for making a cross section perpendicular to the y-axis at pixel position yf.
ytSectionFromVideo[v_, yf_] :=
 Module[{frames, count, size}, frames = VideoFrameList[v, All];
  size = ImageDimensions[frames[[1]]]; count = Length[frames];
  Raster[ParallelTable[
    PixelValue[frames[[frm]], {x, yf}], {x, size[[1]]}, {frm,
     count}]]]
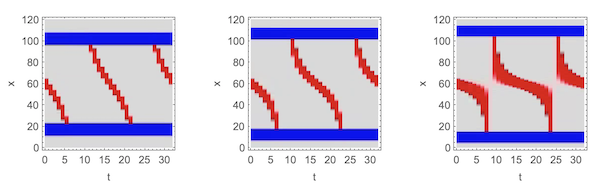
Here are some of the y-t sections at pixel positions 35, 45 and 55 along the y-axis:
Reversely, the function videoFromYtSections makes a complete set of video frames of size sz from the full set of y-t sections (one for each pixel in the y direction).
videoFromYtSections[ytSections_, sz_] :=
 Module[{xSize, ySize}, {xSize, ySize} =
   ImageDimensions[ytSections[[1]]];
  Table[ImageRotate[
    ImageReflect[
     ImageResize[
      Image[ParallelTable[(PixelValue[#1, {frm, xf}] &) /@
         ytSections, {xf, ySize}]], {sz, sz}]], -Pi/2], {frm, xSize}]]
This is a re-creation of the original video aV from its y-t sections:
avFrames = videoFromYtSections[avYTs, 100];
Video[FrameListVideo[Reverse@avFrames], ImageSize -> 100]
2. Motion and motion illusion in videos
The y-t sections (or x-t sections) are essential to detect and create motion in videos. First we look at the completely motionless video of a landscape and 3 of its by-t sections: (landscape still.jpg", attached from "Banff NP images"
landscapeV = FrameListVideo[Table[banff, 10]]
GraphicsRow[
 Graphics[ytSectionFromVideo[landscapeV, #], AspectRatio -> 1,
    Frame -> True, FrameLabel -> {"t", "x"}] & /@ {50, 70, 90},
 ImageSize -> 600]
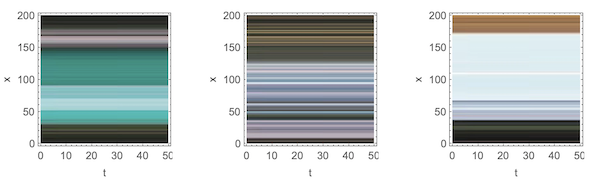
Since there is no motion at all, the pixels form parallel lines to the x-axis (if we made x-t sections, lines would be parallel to the y-axis)
This is a video and some of the y-t sections of the real motion in a bouncing ball video: (bouncing balls video.mp4 (attached) taken from: depositphotos"

GraphicsRow[
 Graphics[ytSectionFromVideo[landscapeV, #], AspectRatio -> 1,
    Frame -> True, FrameLabel -> {"t", "x"}] & /@ {50, 70, 90},
 ImageSize -> 600]
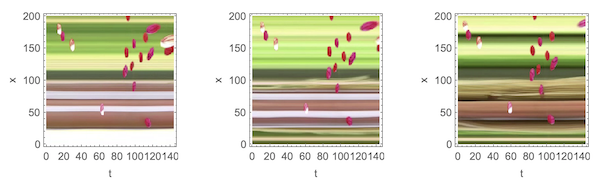 The background is static and forms parallel lines to the x-axis but the bouncing balls trace slanted or even Perpendicular lines to the x-axis.
Finally, the Mario video from Jacob Yates creating the illusion of motion:
fullMarioV =
  Video["https://jake.vision/motionillusionblog/marioReversePhi.mp4"];
The y-t sections of the complete video would be too crowded so, we take a cropped detail from the original:
croppedMarioV =
  VideoFrameMap[ImageTake[#1, {228, 318}, {555, 645}] &, fullMarioV];

These are the 10 colors of the periodic flashes.
vfl = VideoFrameList[croppedMarioV, All];
colors = ((DominantColors[#1, 2] &) /@ Take[vfl, 10])[[All, 2]]

GraphicsRow[
 Graphics[ytSectionFromVideo[croppedMarioV, #], AspectRatio -> 1,
    Frame -> True, FrameLabel -> {"t", "x"}] & /@ {15, 40, 50},
 ImageSize -> 600]
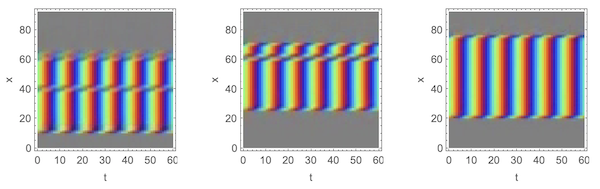
The y-t sections above are a mix of parallel and slanted sections parts. If we look along the time axis of these y-t sections, we notice two essential features of this illusion: the periodic flashing and the slanted edges of the y-t section pattern. In the middle, the flashing merely shows a different color each period. At the slanted edges, there is a time shift. Our brain compares the color flash of the mid section with the delayed color at the sides and will interpret it as movement. The perceived motion at the edges will appear to our eyes as to be for the whole bar and the whole frame as a set of bars. A more scientific explanation can be found in "Spatiotemporal energy models for the perception of motion" by Adelson and Bergen.
3. Making YT sections with slanted edges
A video can be re-created from its y-t sections. We want to make y-t sections with slanted edges to create the illusion of motion in a static video. The function edgeShiftedYTsection makes an image for an y-t section with slanted edges starting at pixel position pos and w pixels wide. The edges are d pixels wide and the number of frames per bar is frs. The total number of frames will be the number of colors in cols times frs.
edgedStrip[y_, w_, h_, d_, col_] := {col,
  Polygon[{{d - 0.5` w, -h + y}, {-0.5` w, d - h + y}, {-0.5` w,
     d + h + y}, {d - 0.5` w, h + y}, {-d + 0.5` w,
     h + y}, {0.5` w, -d + h + y}, {0.5` w, -d - h + y}, {-d +
      0.5` w, -h + y}}]}
edgedStripe[pos_, w_, d_, cols_] :=
 Translate[
  MapThread[
   edgedStrip[#1, w, 0.5`, d, #2] &, {Range[Length[cols]],
    cols}], {0.5` w + pos, 0}]
edgeShiftedYTsection[pos_, w_, d_ : 3, frs_ : 6, cols_ : colors] :=
 Module[{cls}, cls = Length[cols];
  Image[ImageRotate[
    Image[Graphics[
      Table[Translate[edgedStripe[pos, w, d, cols], {0, y}], {y, -cls,
         frs cls, cls}], PlotRange -> {{0, 92}, {0, frs cls}}]],
    Pi/2]]]
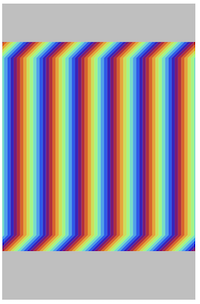
This is an example of an image to be used as an y-t section: the y-position of the edged pattern is at pixel 15 from the bottom, the total width is 65 pixels and the slanted edges are 5 pixels wide. The pattern will give flashes in 10 different colors and is repeated 6 times to create 6 video frames.
4. Reverse engineering Mario
We try our edgeShiftedYTsection function to produce y-t sections and re-create the Mario video from them. This is our home made Mario:

Step 1: Divide the image into horizontal bars (16 for the Mario pic) and collect the position and width of the bars into a list. To re create the video, one needs all y-t sections but, for images like Mario, one y-t section for each of the 16 horizontal bars is sufficient. The complete set of y-t sections is then 16 times the number of frames in the resulting video.
marioBarData = {{{21, 33}}, {{14, 55}}, {{14, 47}}, {{8, 67}}, {{8,
     74}}, {{8, 67}}, {{21, 47}}, {{14, 40}}, {{8, 67}}, {{0,
     82}}, {{0, 82}}, {{0, 82}}, {{0, 82}}, {{14, 18}, {48, 21}}, {{8,
      18}, {54, 21}}, {{0, 26}, {54, 28}}};
Step 2: Make an y-t section for each bar:
marioYTs = (ColorReplace[#1,
      White ->
       Lighter[Gray, 0.5]] &) /@ (ImageResize[#1, {60, 92}] &) /@
    Apply[ImageMultiply,
     Apply[edgeShiftedYTsection, marioBarData, {2}], {1}];
Grid[{marioYTs}, ItemSize -> 3.5, Frame -> True];

Step 3: Create the video using the function videoFromYtSections:
marioFrames =
  ImagePad[#, {{12, 0}, {0, 12}}, Lighter[Gray, 0.65]] & /@
   videoFromYtSections[marioYTs, 100];
VideoTimeStretch[Video[FrameListVideo[marioFrames], ImageSize -> 100],
  2]
5. Creating completely new illusions: bunny Here is a bunny extracted from: Clip-art library rasterized and converted to 34 horizontal bars:
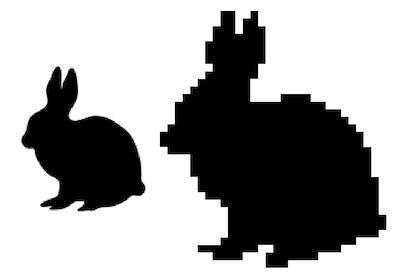
This is a list of positions and widths in pixels of the 34 bars and their respective y-t sections:
bunnyBarData = {{{26, 6}, {38, 3}}, {{26, 6}, {35, 6}}, {{23, 9}, {35,
      9}}, {{23, 21}}, {{20, 24}}, {{20, 24}}, {{20, 24}}, {{23,
     18}}, {{20, 21}}, {{17, 21}}, {{14, 24}}, {{11, 27}, {50,
     12}}, {{8, 60}}, {{8, 66}}, {{8, 69}}, {{5, 75}}, {{2, 81}}, {{2,
      81}}, {{5, 81}}, {{14, 72}}, {{14, 72}}, {{14, 72}}, {{17,
     72}}, {{17, 72}}, {{20, 69}}, {{26, 63}}, {{29, 60}}, {{29,
     63}}, {{29, 63}}, {{29, 60}}, {{26, 54}}, {{17, 24}, {47,
     27}}, {{23, 12}, {44, 21}}, {{44, 9}}};
bunnyYTs = (ImageReflect[#1,
      Left] &) /@ (ImageResize[#1,
       60] &) /@ (ColorReplace[#1, White -> Lighter[Gray, 0.65]] &) /@
      Apply[ImageMultiply,
      Map[edgeShiftedYTsection[Sequence @@ #1, 3, 6, colors] &,
       bunnyBarData, {2}], {1}];
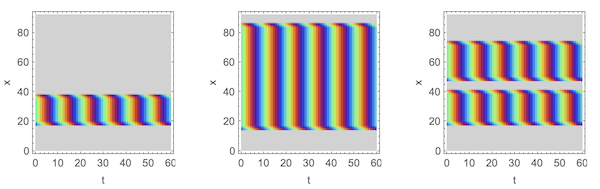
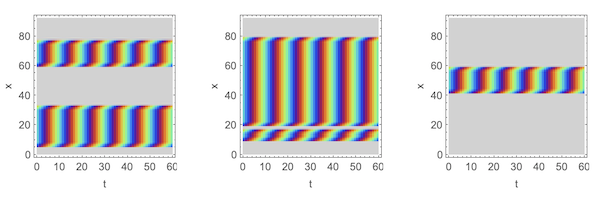
Some of the 34 y-t sections (at bars nos 10, 20 and 32 ):
GraphicsRow[
 Graphics[bunnyYTs[[#]], AspectRatio -> 1, Frame -> True,
    FrameLabel -> {"t", "x"}] & /@ {10, 20, 32}, ImageSize -> 600]
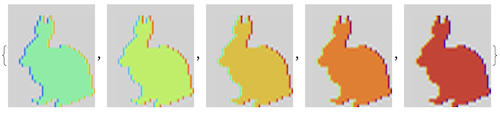
The video frames and the resulting video are derived from the y-t sections:
bunnyFrames =
  Map[ImageResize[#, {95, 112}] &,
   ImagePad[#, {{12, 0}, {0, 12}}, Lighter[Gray, 0.65]] & /@
    videoFromYtSections[bunnyYTs, 100]];
bunnyFrames[[;; 5]]
Video[FrameListVideo[
  ImagePad[#, {{12, 0}, {0, 6}}, Lighter[Gray, 0.65]] & /@
   Flatten@Table[ImageReflect[#, Left] & /@ bunnyFrames, 10]],
 ImageSize -> 275]
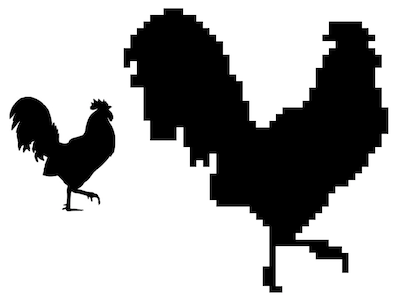
8. Creating completely new illusions: rooster
Here is a rooster image extracted from: Clip-art library rasterized and converted to 43 horizontal bars:
roosterBarData = {{{13, 6}}, {{9, 14}}, {{7, 18}, {63, 10}}, {{5,
     22}, {63, 12}}, {{3, 26}, {61, 16}}, {{3, 28}, {65, 10}}, {{1,
     30}, {63, 14}}, {{1, 32}, {61, 18}}, {{1, 2}, {5, 28}, {61,
     18}}, {{5, 28}, {59, 18}}, {{3, 32}, {59, 18}}, {{3, 34}, {59,
     18}}, {{7, 30}, {57, 22}}, {{7, 30}, {57, 22}}, {{7, 32}, {55,
     24}}, {{7, 32}, {49, 32}}, {{7, 32}, {47, 34}}, {{9, 32}, {45,
     36}}, {{9, 8}, {19, 62}}, {{9, 8}, {19, 60}}, {{19, 60}}, {{21,
     56}}, {{21, 6}, {29, 46}}, {{21, 2}, {25, 2}, {29, 46}}, {{29,
     44}}, {{27, 44}}, {{27, 42}}, {{27, 38}}, {{27, 36}}, {{29,
     34}}, {{39, 22}}, {{41, 18}}, {{43, 14}}, {{45, 10}}, {{45,
     8}}, {{45, 18}}, {{45, 2}, {57, 10}}, {{45, 2}, {59, 10}}, {{45,
     2}, {67, 2}}, {{43, 4}, {67, 2}}, {{43, 4}}, {{43, 4}}, {{45,
     4}}};
Sample YT sections at bars nos 10, 20 and 32 out of 43:
roosterYTs = (ImageResize[#1, 60] &) /@
   Apply[ImageMultiply,
    Apply[edgeShiftedYTsection, roosterBarData, {2}], {1}];
GraphicsRow[
 Graphics[roosterYTs[[#]], AspectRatio -> 1, Frame -> True,
    FrameLabel -> {"t", "x"}] & /@ {10, 20, 32}, ImageSize -> 600]
The video frames and video as derived from the y-t sections:

roosterV =
 Video[FrameListVideo[
   ImagePad[#, {{12, 0}, {0, 6}}, Lighter[Gray, 0.65]] & /@
    Flatten@Table[ImageReflect[#, Left] & /@ roosterFrames, 10]],
  ImageSize -> 275]
Several of the illusions can be combined into new ones. The possibilities are endless. Here is the code for the "rooster and hens" video at the top:

I hope this helps you making your own visual illusions!
 Attachments:


