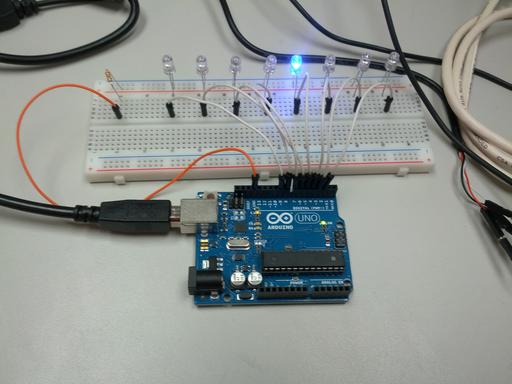
This post shows how to talk to a Arduino Uno over a serial connection using the Wolfram Language.
To recreate this experiment you will need the following hardware:
(and a resistor of about 400 ohm)
As a first step upload the following sketch to the Arduino Uno so that it will listen and respond
to serial traffic from the Wolfram Language:
void setup()
{
Serial.begin( 115200);
for(int i=2;i<10;i++) {
pinMode(i,OUTPUT);
}
}
void loop()
{
if( Serial.available()>=2)
{
int pin = Serial.read();
int value = Serial.read();
digitalWrite( pin, value);
Serial.write("ok");
}
}
This particular code will expect two values: A pin number (from 2 to 9) and an on/off value (0/1).
Next configure your hardware as shown in the image below. Use 8 jumper wires to connect pin 2 through 9 to individual rows on the breadboard in column F. Then connect 8 leds from those same rows from the J column to the blue minus column. Finally use the resistor and one jumper wire to connect back to the GND (ground) on the Arduino.

Now connect the Arduino Uno to the Raspberry Pi using the USB A-B cable. Turn on your Raspberry Pi and launch the Wolfram Language. You can open the serial device with the DeviceOpen command shown below. Then after you open it, you can turn LEDs on and off with individual DeviceWrite commands. In this case I use {5,1} to turn the LED connected to pin 5 on:
pi@raspberry-wri2 ~ $ wolfram
Wolfram Language (Raspberry Pi Pilot Release)
Copyright 1988-2013 Wolfram Research
Information & help: wolfram.com/raspi
In[1]:= serial = DeviceOpen["Serial", {"/dev/ttyACM0", "BaudRate"->115200}]
Out[1]= DeviceObject[{Serial, 1}]
In[2]:= DeviceWriteBuffer[serial, {5,1}]