Message Boards Message Boards

13
|
120730 Views
|
23 Replies
|
19 Total Likes
View groups...
Share
Share this post:

Using the GPIO with the Wolfram Language + Raspberry Pi

Posted 12 years ago
This post shows how to use the GPIO with the Wolfram Language on a Raspberry Pi.

To recreate this experiment you will need the following hardware (in addition to the Raspberry Pi itself):


Set up the breadboard as shown: Plug the T-Cobbler into the breadboard with 13 pins in the E column and 13 pin in the G column. Use the jumper wires
to connect pins 4, 17, 27, 22, 18, 23, 24 and 25 to evenly spaced free rows lower on the breadboard. Connect 8 blue LEDs from each jumper wire row to
the blue - column, with the flattened cathode side on the blue - column. Complete the circuit by connecting the resistor from the blue - column to the GND pin.
Connect the ribbon cable to the T-Cobbler and the Raspberry Pi correctly, and turn on your Raspberry Pi.
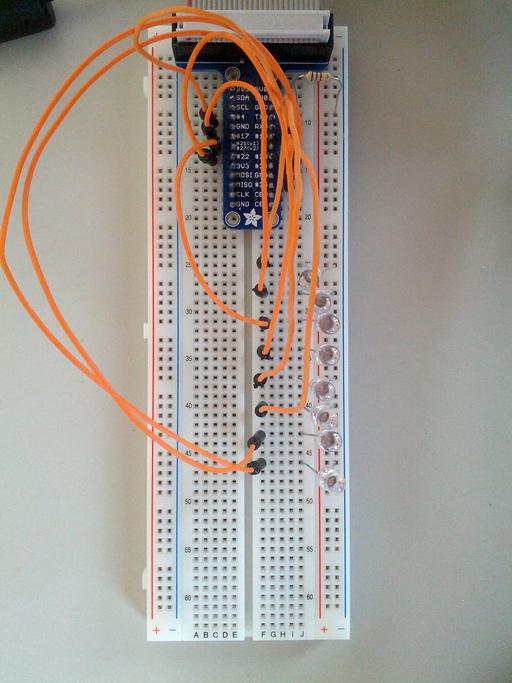


The GPIO interface requires root privilege for access so the Wolfram Language or Mathematica needs to be started as root for this experiment.

In a terminal start the Wolfram Language using the following command (as root):
> sudo wolfram

Wolfram Language (Raspberry Pi Pilot Release)
Copyright 1988-2013 Wolfram Research
Information & help: wolfram.com/raspi

In[1]:=


First we define the pins that correspond to connected LEDs:
pins = {4,17,27,22,18,23,24,25}


Next we can turn on individual LEDs by writing the value '1' to it:
DeviceWrite[ "GPIO", First[pins] -> 1 ]


And of course turn it back off, by writing the value '0':
DeviceWrite[ "GPIO", First[pins] -> 0 ]


Or turn the LEDs on and off one at a time:
Do[
DeviceWrite[ "GPIO", pins[[i]]->1 ];
Pause[.2];
DeviceWrite[ "GPIO", pins[[i]]->0 ];
,{i,8}]
POSTED BY: Arnoud Buzing
23 Replies

I'm late to this discussion but I wondered about something I noted on the 40 pin connector on the Pi. Pin 12 and pin 33 are marked as PWM0 and PWM1 respectively. In my experience You set the Pulse Width Modulator's frequency and the pulses symmetry then just turn it on. No further code is necessary. Has anyone looked into this?

Robert Dieter

POSTED BY: Robert Dieter

...Don't look now but DeviceWrite["GPIO", 18->1] doesn't work on MMA V11.0 anymore, at least not on my Raspberry Pi. It throws up a bunch of error messages. Can anyone please confirm this issue on their own machine?

Hi Francesco,

This is a known problem that had a fix pushed out a few weeks ago. It appears as if your machine didn't automatically pull down the update, you can manually update with the following:

PacletUpdate["MRAALink"]

This should return something like Paclet[MRAALink, 1.0.5, <>]. Then restart the kernel and try again. I just tested this with a fresh install of Raspian and Mathematica v11.0.1 and it worked for me.

Thanks,

Ian

POSTED BY: Ian Johnson
Posted 8 years ago

The program at the opening of this post is critically flawed. I appreciate the insight into the programing of Mathematica but there needs to be two pauses in the program. If the program follows the pattern {on,pause,off} the light will flick on and off so fast it will not be visible. The program should follow the pattern {on,pause,off,pause} before it repeats. If one more pause is added the program it works as expected.

POSTED BY: Owen Riemer
Posted 10 years ago

I ran a mod to the above code to create a long-running loop (running remotely on my MAC using a sudo wolfram kernel):

pins = {4, 17, 27, 22, 18, 23, 24, 25}; i = 1150; While [i > 0, Do[DeviceWrite["GPIO", pins[[i]] -> 1]; Pause[.2]; DeviceWrite["GPIO", pins[[i]] -> 0];, {i, 8}]; Print[i]; i--]

The loop counts down successfully, but after about a few hundred iterations, the GPIO seems to go offline and the lights stop blinking in succession. If I evaluate FindDevices["GPIO"] at that point, it shows either not connected or I get an error message "message not found" from /opt/Wolfram/WolframEngine/10.0/SystemFiles/Devices/DeviceDrivers. If I restart the kernel, I can re-run the loop. Does anyone know what would cause the kernel to lose its remote connection to GPIO after a few minutes of driving the I/O pins? At a given time, one LED is sourcing 15 mA, which I think is acceptable.

POSTED BY: Anthony Mancuso
Posted 10 years ago

I too have had problems after running a loop that blink the LEDs. Same symptoms as yours, and the same solution: restart the kernel.

Has anyone managed to find any answers to this?

POSTED BY: Paul Horth
Posted 10 years ago

I've followed this to the letter and all that happened is the first led in the series turned on then off and the other seven did nothing. Any advice?

POSTED BY: Chris Rowley

Hi, Are you certain that the other 7 LEDs are properly connected? Also, if you are sure of that, does using

 DeviceWrite["GPIO", 4->1]

and

 DeviceWrite["GPIO", 17->1]

etc. for all the other pins work to turn the LEDs on manually?

POSTED BY: Ian Johnson

Okay, so when you use the Do loop, you only need to have

{4}

and not

{4,4}

You can check the documentation for Do at

http://reference.wolfram.com/language/ref/Do.html

Here, you are using form 2 as mentioned in the documentatuon, and you need form 1, as you're not iterating over anything, you just want to run it a certain number of times.

POSTED BY: Ian Johnson

Dear Ian,

I have tried with pins[[4]] as well. I am using the second script on shown in the screen shot. It gives the same error Not sure..why? Further, I have connected single LED on GPIO pin 4. Appreciate you help. Any documentaion ? Many thanks Chandra

Dear All,

I have trying toggle LED through GPIO. Toggling single LED works. But i tried, the Do loop getting the - A pin number of list of pin numbers is expected.

Please refer the attached screen shot for details. Any suggestion welcome. (hope it will be useful for others as well)

With regards, Chandra

enter image description here

Hi Chandra, I think the error you're seeing is from not taking the fourth part of the variable pins. For example, I think what you need is

pins[[4]]

and not

pins[4]

The first one will take the fourth member of the pins list, while the second one will try and call a function named pins with an argument of 4. Hope this helps, and let us know how it goes! Thanks, Ian

POSTED BY: Ian Johnson

There is an updated version of this post available here.

POSTED BY: Ian Johnson
Posted 11 years ago
My apologies to the group.

When I made the previous post, I was getting a bizzare result and was wondering why.  The button had not been properly seated.  The post has been edited.

Another mistake led to my post about not being able to run Mathematica on the Pi using VNC.  I could see the Raspian desktop, but could not start Mathematica.   The problem was a typo in the autostart file for tightvncserver.  Using VNC Viewer on an iPad, it feels like you're running Mathematica on the iPad.  That is really neat.

At least I didn't make a post about nothing happening when I first tried to light LEDs, when I had the ribbon connector backwards.
POSTED BY: Roger Kirchner
Posted 11 years ago
We need DeviceRead examples.  Here is one.

In the example above,
pins = {4,17,27,22,18,23,24,25}
I modified the (equivalent of) the above breadboard by replacing the LED at  #4 with a button, using a 10K resister to hold #4 to 1.  Pressing the button will set #4 to 0.  One might expect DeviceRead["GPIO",4] to return 0 or 1, depending on whether the button is pressed or not.  Actually it returns either {4->0} or {4->1}.

The following will turn the LED connected to #17 on when the button is pressed and off when it is released:
inv=DeviceRead["GPIO",4];
While[inv=={4->1}, inv=DeviceRead["GPIO",4]];
DeviceWrite["GPIO", 17->1];
While[inv=={4->0}, inv=DeviceRead["GPIO",4]];
DeviceWrite["GPIO", 17->0],

The following will successively light the LEDs connected to 17,27,22,18,23,24,25 when the button is pressed 7 times.
Do[
  inv=DeviceRead["GPIO",4];
  While[inv=={4->1}, inv=DeviceRead["GPIO",4]];
  DeviceWrite["GPIO", pins[[i]]->1];
  While[inv=={4->0}, inv=DeviceRead["GPIO",4]];
  DeviceWrite["GPIO", pins[[i]]->0],
  {i,2,8}]

Be sure the button is properly seated.  If it isn't, you might experience what I did:  The first time the button was pressed, the LEDs at pins[[2]],...,pins[[6]] flickered and the LED at pins[[7]] stayed on.  The second time it was pressed, the LED at pins[[8]] stayed on.  And that was it.

Note:  This post has been edited to provide more detail.
POSTED BY: Roger Kirchner
Posted 12 years ago
Anyone know what would be needed to generate control voltages (with 1 volt per musical octave) via this GPIO? I'd love to be able to use Mathematica to control a modular synthesizer
POSTED BY: David Jameson
Posted 12 years ago
Sucess, with two 180 ohm resisters in series.  (Also one 180 ohm resister works.)  Fortunately, I didn't ruin my Pi having the ribbon cable plugged in backwards!  When I switched it around, the LEDs blinked like they are supposed to.  I bought the CanaKit Ultimate starter kit from Amazon for $89.95, which includes a new model RPi, power supply, nice black case, 8 GB SD with several operating systems, usb wifi, HDMI cable (which I connect to a TV), small breadboard (I put 4 LEDs on each side of the board.), ribbon cable, Pi Cobbler, wires, eight LEDs, a tri LED, ten 10K and five 180 ohm resisters, and a couple of switches.   I also got a powered USB hub into which I plug an Apple keyboard/mouse.

Wolfram language installed with 'sudo apt-get update && sudo apt-get install wolfram-engine', but only wolfram, not Mathematica was found under the Education menu.  Was able to start Mathematica from a root terminal with '/opt/Wolfram/WolframEngine/10.0/Executables/Mathematica',  but then read 'wolfram' and 'mathematica' start the command line and notebook interfaces from a terminal.  Just found http://reference.wolfram.com/language/guide/RaspberryPi.html.

It's really neat to be able to control a Pi with Mathematica.
POSTED BY: Roger Kirchner
> Will "sudo mathematica" start the notebook interface as root?

Yes.

> It's a lot of work entering commands in "sudo wolfram". 

This is true (and you lose all the typing at the end of your session). As an alternative, you can
also use:

> sudo wolfram -script filename.m


where filename.m is a file containing Wolfram Language commands. Or you can write a shell style script like this (using a shell editor like vi or pico or nano):

#!/usr/bin/wolfram -script
Print["Hi there"];


and then make it executable in the shell with 'chmod a+x hi.m' and then running it like a shell command:

> ./hi.m
Hi there
>
POSTED BY: Arnoud Buzing
You can use Ohm's law (V = IR)  to determine if the resistors you have are appropriate for your LEDs.  LEDs that I've seen have max current limits in the range of 15 to 20 mA.  If you are powering your LED from a 3.3V GPIO pin, then 3.3/180 ~ 18 mA which is the upper limit of your LED - it's possible that this might burn out your LED.  The 10K resistor will give you about 0.3 mA of current which will light your LED dimly, if at all. 

Resistors do add in series, so two 180 ohm resistors in series will give you 360 ohms of resistance, and this would result in a current of about 9 mA which is probably good for your application (assuming you didn't burn out the LED with the single 180 ohm resistor).

As for sudo mathematica, yup, it works.
POSTED BY: BoB LeSuer
Posted 12 years ago
I tried putting two 180 ohm resisters in series, thinking 360 ohms might be about right.
Nothing happened.
It's a lot of work entering commands in "sudo wolfram".  Will "sudo mathematica" start the notebook interface as root?
POSTED BY: Updating Name
Posted 12 years ago
I have two each of red, blue, yellow and green leds, and 10K and 180 ohm resistors from a canakit ultimate starting kit.  Can I use these resistors to complete this project?
POSTED BY: Roger Kirchner
Andreas,

The DeviceWrite function still needs work to be fast. If you use lower level Wolfram Language functions, like OpenWrite and Write you get about 3.1KHz to 3.5KHz:

 pi@raspberry-wri2 ~ $ sudo wolfram
 Wolfram Language (Raspberry Pi Pilot Release)
 Copyright 1988-2013 Wolfram Research
 Information & help: wolfram.com/raspi
 
 In[1]:= file = OpenWrite["/sys/class/gpio/gpio4/value"]
 
 Out[1]= OutputStream[/sys/class/gpio/gpio4/value, 56]
 
In[2]:= Do[Write[file,1];Write[file,0],{100000}] // AbsoluteTiming

Out[2]= {32.227557, Null}

In[3]:= 100000/32.227557

Out[3]= 3102.93


You can improve the speed to 3.5KHz by using BinaryWrite (in which case you have to write the ascii codes for 0 and 1 (48 and 49):

 pi@raspberry-wri2 ~ $ sudo wolfram
 Wolfram Language (Raspberry Pi Pilot Release)
 Copyright 1988-2013 Wolfram Research
 Information & help: wolfram.com/raspi
 
 In[1]:= file = OpenWrite["/sys/class/gpio/gpio4/value", BinaryFormat->True]
 
 Out[1]= OutputStream[/sys/class/gpio/gpio4/value, 56]
 
In[2]:= Do[ BinaryWrite[file,49];BinaryWrite[file,48], {100000}]; // AbsoluteTiming

Out[2]= {28.047030, Null}

In[3]:= 100000/28.047030

Out[3]= 3565.44


(Additionally you can link in a c compiled exectable using mathlink or librarylink, but that would just give you the c performance.)
POSTED BY: Arnoud Buzing
Hello,

have you already tested the GPIO speed? Currently, I am using wiringPi (http://wiringpi.com/) to use the GPIOs at high speed. If the Wolfram language is sufficiently fast, I could move from compiled C to Wolfram language. There is a nice speed summary available at http://codeandlife.com/2012/07/03/benchmarking-raspberry-pi-gpio-speed/. Unfortunately, I have no oscilloscope to test it...
Reply to this discussion
Community posts can be styled and formatted using the Markdown syntax.
Reply Preview
Attachments
Remove
or Discard

Group Abstract Group Abstract